Pages

Tuesday, April 20, 2021

Fedora 33 : The YARA tool for Linux security - part 002.

YARA rules are a way of identifying malware or other issues by creating rules that look for certain characteristics.
This tool was originally developed by Victor Alvarez of Virustotal and is mainly used in malware research and detection.
It was developed with the idea to describe patterns that identify particular strains or entire families of malware.
Let's install it on Fedora 33 Linux distro.
[root@desk mythcat]# dnf search malware
Last metadata expiration check: 0:41:28 ago on Tue 20 Apr 2021 09:50:27 PM EEST.
=========================== Summary Matched: malware ===========================
yara.i686 : Pattern matching Swiss knife for malware researchers
yara.x86_64 : Pattern matching Swiss knife for malware researchers
[root@desk mythcat]# dnf install yara.x86_64
...
Installed:
  yara-4.0.2-2.fc33.x86_64                                                      

Complete!
You can see the help of this tool.
[mythcat@desk ~]$ yara -h
You can create your rules or use these default rules from GitHub.
I download it with git tool:
[mythcat@desk ~]$ git clone https://github.com/Yara-Rules/rules
This is a simple example for detect suspicious strings into bin folder with Linux commands:
[mythcat@desk ~]$ sudo yara rules/utils/suspicious_strings.yar /bin/
[sudo] password for mythcat: 
Misc_Suspicious_Strings /bin//bash
Misc_Suspicious_Strings /bin//sh
Misc_Suspicious_Strings /bin//brotli
Antivirus /bin//mkbundle
Misc_Suspicious_Strings /bin//openssl
Misc_Suspicious_Strings /bin//unzip
Misc_Suspicious_Strings /bin//zipinfo
Misc_Suspicious_Strings /bin//ps
VMWare_Detection /bin//lscpu
Qemu_Detection /bin//lscpu
VMWare_Detection /bin//lsblk
VMWare_Detection /bin//broadwayd
Qemu_Detection /bin//grub2-editenv
Misc_Suspicious_Strings /bin//abrt-retrace-client
Qemu_Detection /bin//grub2-mkstandalone
Qemu_Detection /bin//grub2-mkimage
Qemu_Detection /bin//grub2-mknetdir
...
YARA detection can be easily bypassed since YARA only does pattern/string/signature matching where a more effective method of detecting malware is available and this is a limitation of YARA.
You can see my previous old tutorial about YARA and Fedora 25.

Tuesday, April 13, 2021

Fedora 33 : First steps with manim.

Manim is an engine for precise programmatic animations, designed for creating explanatory math videos like 3Blue1Brown
The documentation can be found on this webpage
First, install with the DNF tool all packages:
[root@desk manim_Projects]# dnf install cairo-devel pango-devel ffmpeg python3-devel 
texlive-scheme-medium texlive-standalone.noarch texlive-collection-latexextra.noarch

Last metadata expiration check: 2:19:22 ago on Tue 13 Apr 2021 08:20:03 PM EEST.
Package cairo-devel-1.16.0-9.fc33.x86_64 is already installed.
Package pango-devel-1.48.4-1.fc33.x86_64 is already installed.
Package ffmpeg-4.3.2-2.fc33.x86_64 is already installed.
Package python3-devel-3.9.2-1.fc33.x86_64 is already installed.
Package texlive-scheme-medium-9:svn54074-35.fc33.noarch is already installed.
Package texlive-standalone-9:svn47136-35.fc33.noarch is already installed.
Package texlive-collection-latexextra-9:svn54851-35.fc33.noarch is already installed.
Dependencies resolved.
Nothing to do.
Complete!
Use pip tool to install manim and manimlib.
[mythcat@desk manim_Projects]$ pip install manim
...
[mythcat@desk manim_Projects]$ pip install manimlib
...
You can use --user option argument. A default example from the doc area can be a good test.
from manim import * 

config.background_color = DARK_GRAY
class MovingFrame(Scene):
     def construct(self):
        # Write equations
        equation = MathTex("2x^2-5x+2", "=", "(x-2)(2x-1)")

        # Create animation
        self.play(Write(equation))

        # Add moving frames
        framebox1 = SurroundingRectangle(equation[0], buff=.1)
        framebox2 = SurroundingRectangle(equation[2], buff=.1)

        # Create animations
        self.play(Create(framebox1))  # creating the frame

        self.wait()
        # replace frame 1 with frame 2
        self.play(ReplacementTransform(framebox1, framebox2))
    
        self.wait()
I run it well:
[mythcat@desk manim_Projects]$ /home/mythcat/.local/bin/manim -pl -ql -i follow_me_textxt.py 
This is the result:

Sunday, April 11, 2021

Fedora 34 : Testing the new Fedora 34 beta.

Approaching the release date for Fedora Linux 34, the development team has included a number of testing steps.
For each test stage, some events were set up in which users participate and test the new Fedora distribution. Here are these see events.
Here is a screenshot with the virtualization test step for the ISO file called Fedora 34: x86_64 DVD ISO Beta! from the official page:

Fedora 33 : Use hw-probe to collect hardware details .

This is a project to anonymously collect hardware details of Linux-powered computers over the world and help people collaboratively debug hardware-related issues, check for Linux compatibility and find drivers. 
Probe your computer in order to participate in the project and discover your hardware in detail. Share your probes with Linux developers to debug and fix problems with your computer. 

First, install the hw-probe package with the DNF Linux tool:
[root@desk mythcat]# dnf search hw-probe
Last metadata expiration check: 0:03:35 ago on Sun 11 Apr 2021 03:10:31 PM EEST.
======================== Name Exactly Matched: hw-probe ========================
hw-probe.noarch : Check operability of computer hardware and find drivers
[root@desk mythcat]# dnf install hw-probe.noarch
Last metadata expiration check: 0:03:52 ago on Sun 11 Apr 2021 03:10:31 PM EEST.
Dependencies resolved.
================================================================================
 Package             Architecture  Version                 Repository      Size
================================================================================
Installing:
 hw-probe            noarch        1.5-4.fc33              fedora          93 k
Installing dependencies:
 hdparm              x86_64        9.58-4.fc33             fedora          95 k
 hwinfo              x86_64        21.68-2.fc33            fedora          88 k
 hwinfo-libs         x86_64        21.68-2.fc33            fedora         872 k
 libx86emu           x86_64        3.1-2.fc33              fedora          69 k
 sysstat             x86_64        12.3.1-3.fc33           fedora         433 k
Installing weak dependencies:
 acpica-tools        x86_64        20200925-1.fc33         updates        960 k

Transaction Summary
================================================================================
Install  7 Packages

Total download size: 2.5 M
Installed size: 8.6 M
Is this ok [y/N]: y
...
This tool can be used easy:
[root@desk mythcat]# sudo -E hw-probe -all -upload
WARNING: 'edid-decode' package is not installed
Probe for hardware ... Ok
Reading logs ... Ok
Uploaded to DB, Thank you!

Probe URL: https://linux-hardware.org/?probe=7b4c090391
You can see my hardware on the link result.

Fedora 33 : Using the mutt software with Yahoo.

Mutt is a small but very powerful text-based mail client for Unix operating systems. In this tutorial, I configure mutt with yahoo to read mail account and send mails.
[root@desk mythcat]# dnf install mutt
Last metadata expiration check: 0:04:13 ago on Sat 10 Apr 2021 09:23:41 PM EEST.
Dependencies resolved.
================================================================================
 Package         Arch      Version                             Repository  Size
================================================================================
Installing:
 mutt            x86_64    5:2.0.5-1.fc33                      updates    1.9 M
Installing dependencies:
 tokyocabinet    x86_64    1.4.48-16.fc33                      fedora     506 k
 urlview         x86_64    0.9-28.20131022git08767a.fc33       fedora      31 k

Transaction Summary
================================================================================
Install  3 Packages

Total download size: 2.4 M
Installed size: 8.6 M
Is this ok [y/N]: y
...
Installed:
  mutt-5:2.0.5-1.fc33.x86_64                                                    
  tokyocabinet-1.4.48-16.fc33.x86_64                                            
  urlview-0.9-28.20131022git08767a.fc33.x86_64                                  

Complete!
The mutt should be compiled with support for tls, you can see all of these with this command:
[root@desk ~]# mutt -v | grep tls
Configure options: '--build=x86_64-redhat-linux-gnu' '--host=x86_64-redhat-linux-gnu' 
...ode>
Let's create all settings for the mutt software with vi editor:
[root@desk mythcat]# vi ~/.muttrc
set imap_user = "catafest@yahoo.com"
set imap_pass = "your-generate-app-password"
set smtp_url = "smtp://catafest@yahoo.com@smtp.mail.yahoo.com:587"
set smtp_pass = "your-generate-app-password"
set from = "catafest@yahoo.com"
set realname = "Catalin George Festila"
set folder = "imaps://catafest@yahoo.com@imap.mail.yahoo.com:993"
set spoolfile = "+INBOX"
set postponed="+[Yahoo]/Drafts"
set header_cache = "~/.mutt/cache/headers"
set message_cachedir = "~/.mutt/cache/bodies"
set certificate_file = "~/.mutt/certificates"
set move = no
set sort = 'threads'
set sort_aux = 'last-date-received'
set imap_check_subscribed
set ssl_force_tls = yes
set abort_nosubject = no
set mail_check = 60
set timeout = 10
set sort = "reverse-date-received"
set signature = "~/.mutt/signature"
set copy = no
set imap_keepalive = 900
Then use this command to run it:
[root@desk ~]# mutt
See the result:

Thursday, March 18, 2021

Fedora 33 : The balenaEtcher tool.

You can flash OS images to SD cards & USB drives, safely and easily with this balenaEtcher.
You can flash from a file, URL, or clone a drive.
I download the AppImage and I run it easily on Fedora with an ISO Linux image antiX for an old laptop.
[mythcat@desk ~]$ ./balenaEtcher-1.5.116-x64.AppImage 
ready-to-show: 1816.354ms
Checking for update
Update for version 1.5.116 is not available (latest version: 1.5.116, downgrade is disallowed).
...

Monday, March 8, 2021

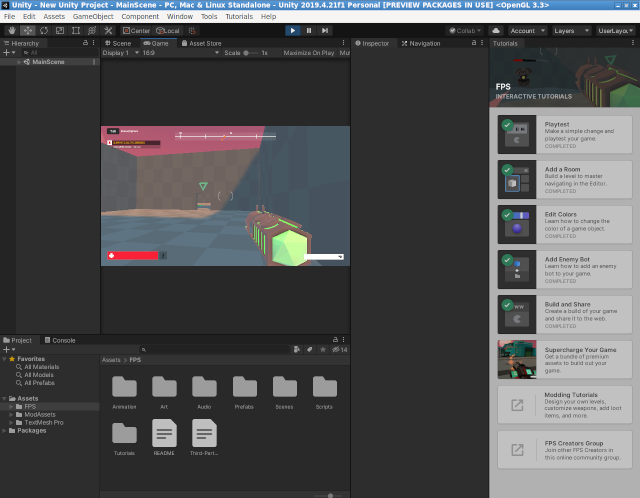
Fedora 33 : Unity FPS Microgame.

Today I tested the FPS Microgame from learning area of Unity 3D with Fedora linux distro.
The project works great even my hardware is old.
This is an screenshot of the running process of the project.

Sunday, March 7, 2021

Fedora 33 : Electron based terminal named Hyper.

Hyper is an Electron-based terminal built on HTML/CSS/JS.
About Electron is an open-source software framework developed and maintained by GitHub.
The original Hyper renderer was based on the DOM, and now Hyper 3 use Electron from V1 to V3 and is tested with V4.
You can install multiple plugins and themes to make your work easier.
The install process is easy, just download the RPM package and use the DNF tool to install it:
[root@desk mythcat]# dnf install Downloads/hyper-3.0.2.x86_64.rpm 
Last metadata expiration check: 0:14:49 ago on Sun 07 Mar 2021 11:22:49 AM EET.
Dependencies resolved.
================================================================================
 Package        Architecture    Version             Repository             Size
================================================================================
Installing:
 hyper          x86_64          3.0.2-3440          @commandline           37 M

Transaction Summary
================================================================================
Install  1 Package

Total size: 37 M
Installed size: 141 M
Is this ok [y/N]: y
Downloading Packages:
Running transaction check
Transaction check succeeded.
Running transaction test
Transaction test succeeded.
Running transaction
  Preparing        :                                                        1/1 
  Installing       : hyper-3.0.2-3440.x86_64                                1/1 
  Running scriptlet: hyper-3.0.2-3440.x86_64                                1/1 
  Verifying        : hyper-3.0.2-3440.x86_64                                1/1 

Installed:
  hyper-3.0.2-3440.x86_64                                                       

Complete!
The Hyper terminal is installed on the LXDE main menu on the Other submenu.
You can find more information on the official webpage.
The next image is a screenshot from my Fedora 33 distro with Hyper terminal.

Sunday, February 28, 2021

Fedora 33 : Unity Platformer Microgame 2D.

This Microgame Template is a classic 2D platform game that you can mod and make your own. Check out the Creative Mods to tweak the project and add your own levels, while learning the basics of Unity. Viewing from the Learn tab in the Unity Hub? Click Download Project > Open Project to automatically open it in Unity. Viewing from the Unity Learn website? Simply go to the Learn tab in the Unity Hub and search for this Microgame, or manually import it via the Asset Store link below.
I download the Unity Editor and Unity Hub AppImage.
I run the UnityHub.AppImage and I set the path of Unity Editor into settings area.
I login with my Unity account and on learning area in UnityHub application I download the Platformer Microgame.
I select to follow the tutorial on Unity I.D.E. environment.
You can see in the next screenshot how this works:

Saturday, February 27, 2021

Fedora 33 : Local 5.9.9 by flywheel for WordPress sites.

Build WordPress sites faster than ever before Local is built for speed and simplicity. We’ve spent years designing Local to make building, testing and deploying WordPress sites a breeze.
Basically this is a standalone local development application.
You can add locally all you need for your WordPress website:
  • SSH & WP-CLI;
  • simple root SSH access to individual sites;
  • mailcatcher;
  • view, test, and debug mail sending;
  • log files;
  • PHP, NGINX, and MySQL logs available;
I download the rpm package from the official website and I install it with the DNF tool.
[root@desk Downloads]# dnf install local-5.9.9-linux.rpm 
...
Installed:
  local-5.9.9-20210215.1.x86_64  ncurses-compat-libs-6.2-3.20200222.fc33.x86_64
  nss-tools-3.60.1-1.fc33.x86_64

Complete! 
Now you can start from the LXDE main menu environment.
You can use addons available for Local, see this webpage.
You can see in the next video tutorial from the official youtube how this works.

Friday, February 26, 2021

Fedora 33 : Bash script for GitHub to fix bad commit branch.

One mistake is to have changed in the [master] branch instead of [mymain]. This can be fixed with this bash script:
# check the branch that you committed to by accident, in this case, is master
git checkout master

# reset the branch back one commit
git reset --soft HEAD^

# use stash to record the current state of the working directory
git stash

# checkout the branch it should be in, in this case, is mymain
git checkout mymain

# apply the stash
git stash apply

# commit the changes 
git commit -am "main commit"

# then push the changes to our main branch
git push origin mymain

# checkout the original branch, in this case, is master
git checkout master

# the last step is to force push the commit deletion to the original branch.
git push --force origin master
Hope this help's !!

Saturday, February 13, 2021

Fedora 33 : Can be better? part 017.

Today I will show you how Fedora distro Linux can be better in terms of the LXDE environment.
Fedora team come with Fedora LXDE on Spins, see this intro:
LXDE, the "Lightweight X11 Desktop Environment", is an extremely fast, performant, and energy-saving desktop environment. It maintained by an international community of developers and comes with a beautiful interface, multi-language support, standard keyboard shortcuts, and additional features like tabbed file browsing.
Fedora does not have a defined environment because multiple work environments can be set.
Today, I will show you how to use the LXDE environment with Fedora can be improved.
I often use a simple environment in Linux because:
  • I have older hardware
  • their simplicity allows me to make my personal settings to be more efficient;
Here are some examples of how we can improve the LXDE environment:

Using the ObConf tool

ObConf now easily installs new themes that use the .obt Openbox theme archive format for distribution.
[root@desk mythcat]# dnf search obconf
...
obconf.x86_64 : A graphical configuration editor for the Openbox window manager
[root@desk mythcat]# dnf install obconf.x86_64
Last metadata expiration check: 0:25:25 ago on Sat 13 Feb 2021 11:49:09 AM EET.
Package obconf-2.0.4-17.20150213git63ec47.fc33.x86_64 is already installed.
Dependencies resolved.
Nothing to do.
Complete!

Windows open on the center screen.

You need to add this source code to the end of the file named lxde-rc.xml.
<application type="normal">
<position>
 <x>center</x>
 <y>center</y>
</position>
</application>
Depending on the keyboard and configuration you can set key combinations for different functions such as the Fn key.
The Fn key is the wakeup key when the machine is suspended.
If anyone wants to map it to other functions, then that's okay.
Let's see one example with the lxde-rc.xml file.
<keybindkey="XF86AudioRaiseVolume">
<actionname="Execute">
<command>amixersetMaster5%+unmute</command></action>
</keybind>
<keybindkey="XF86AudioLowerVolume">
<actionname="Execute">
<command>amixersetMaster5%-unmute</command></action>
</keybind>
<keybindkey="XF86MonBrightnessDown">
<actionname="Execute">
<command>xbacklight-20</command>
<startupnotify><enabled>yes</enabled><name>Decreasescreenbrightness</name></startupnotify></action>
</keybind>
<keybindkey="XF86MonBrightnessUp">
<actionname="Execute">
<command>xbacklight+20</command>
<startupnotify><enabled>yes</enabled><name>Increasescreenbrightness</name></startupnotify></action>
</keybind>
You can now run this command for the changes to take effect each time you edit the lxde-rc.xml file:
[mythcat@desk ~]$ openbox --reconfigure

Settings for users and languages.

[mythcat@desk ~]$ lxappearance 
[root@desk mythcat]# lxdm-config 
[root@desk mythcat]# setxkbmap -layout "us,ro" -option "grp:alt_shift_toggle".
In conclusion, there are enough settings that can be included by both the LXDE development team and Fedora team in a simpler way to configure the LXDE environment.
I would like to have in the LXDE environment from Fedora, the Fedora widget, the Fedora theme, Fedora Color.
The Fedora development team could effortlessly include its own utility to manage these settings for LXDE or other work environments.

Thursday, February 11, 2021

Fedora 33 : Meson build system.

Meson is a build system that is designed to be as user-friendly as possible without sacrificing performance. The main tool for this is a custom language that the user uses to describe the structure of his build. The main design goals of this language has been simplicity, clarity and conciseness. Much inspiration was drawn from the Python programming language, which is considered very readable, even to people who have not programmed in Python before., see the official webpage.
Let's test with an simple example on Fedora 33 distro.
First step, install this tool with DNF tool.
[root@desk mythcat]# dnf search meson
Last metadata expiration check: 2:20:41 ago on Thu 11 Feb 2021 08:39:26 PM EET.
============================== Name Exactly Matched: meson ==============================
meson.noarch : High productivity build system
[root@desk mythcat]# dnf install meson.noarch 
...
Installed:
  meson-0.55.3-1.fc33.noarch               ninja-build-1.10.2-1.fc33.x86_64              

Complete!
The next step is to create a C file with a simple example and one with the build file:
[mythcat@desk ~]$ mkdir CProjects
[mythcat@desk ~]$ cd CProjects/
[mythcat@desk CProjects]$ vi main.c
[mythcat@desk CProjects]$ vi meson.build
The C example file named main.c has this source code:
#include 

//
// main is where all program execution starts
//
int main(int argc, char **argv) {
  printf("Hello there.\n");
  return 0;
} 
The build file named meson.build comes with this content:
project('tutorial', 'c')
executable('demo', 'main.c') 
Use the meson with setup builddir and compile to build executable and run it.
[mythcat@desk CProjects]$ meson setup builddir
The Meson build system
Version: 0.56.2
Source dir: /home/mythcat/CProjects
Build dir: /home/mythcat/CProjects/builddir
Build type: native build
Project name: tutorial
Project version: undefined
C compiler for the host machine: cc (gcc 10.2.1 "cc (GCC) 10.2.1 20201125 (Red Hat 10.2.1-9)")
C linker for the host machine: cc ld.bfd 2.35-18
Host machine cpu family: x86_64
Host machine cpu: x86_64
Build targets in project: 1

Found ninja-1.10.2 at /bin/ninja
[mythcat@desk CProjects]$ cd builddir/
[mythcat@desk builddir]$ ls
build.ninja  compile_commands.json  meson-info	meson-logs  meson-private
[mythcat@desk builddir]$ meson compile
Found runner: ['/bin/ninja']
ninja: Entering directory `.'
[2/2] Linking target demo
[mythcat@desk builddir]$ ls
build.ninja  compile_commands.json  demo  demo.p  meson-info  meson-logs  meson-private
[mythcat@desk builddir]$ ./demo
Hello there.
You can see this run well.

Sunday, February 7, 2021

Fedora 33 : Running Zeek - part 001.

Zeek is often used as a network analysis tool but can also be deployed as an IDS known as Intrusion Detection System.
The full documentation can be found on this website page.
Let's install this tool on Fedora 33 distro.
[root@desk mythcat]# dnf search zeek
Last metadata expiration check: 0:18:02 ago on Sun 07 Feb 2021 11:21:35 AM EET.
No matches found.
[root@desk mythcat]# dnf config-manager --add-repo 
https://download.opensuse.org/repositories/security:zeek/Fedora_33/security:zeek.repo
Adding repo from: https://download.opensuse.org/repositories/security:zeek/Fedora_33/security:zeek.repo
[root@desk mythcat]# dnf install zeek
The Zeek Network Security Monitor. (Fedora_33)  105 kB/s | 128 kB     00:01    
Last metadata expiration check: 0:00:01 ago on Sun 07 Feb 2021 11:40:31 AM EET.
...
  Verifying        : zeekctl-3.2.3-1.1.x86_64                               8/8 

Installed:
  libbroker-devel-3.2.3-1.1.x86_64       libpcap-devel-14:1.9.1-6.fc33.x86_64  
  openssl-devel-1:1.1.1i-1.fc33.x86_64   zeek-3.2.3-1.1.x86_64                 
  zeek-core-3.2.3-1.1.x86_64             zeek-devel-3.2.3-1.1.x86_64           
  zeek-libcaf-devel-3.2.3-1.1.x86_64     zeekctl-3.2.3-1.1.x86_64              

Complete!
[root@desk mythcat]# whereis zeek
zeek: /opt/zeek/bin/zeek
[root@desk mythcat]# whereis zeekctl
zeekctl: /opt/zeek/bin/zeekctl
I found this informations into the documentation area:
ZeekControl is an interactive shell for easily operating/managing Zeek installations on a single system or even across multiple systems in a traffic-monitoring cluster.
A Minimal Starting Configuration
These are the basic configuration changes to make for a minimal ZeekControl installation that will manage a single Zeek instance on the localhost:
  • In $PREFIX/etc/node.cfg, set the right interface to monitor.
  • In $PREFIX/etc/networks.cfg, comment out the default settings and add the networks that Zeek will consider local to the monitored environment.
  • In $PREFIX/etc/zeekctl.cfg, change the MailTo email address to a desired recipient and the LogRotationInterval to a desired log archival frequency.
Next step is to configure and adjust your PATH environment variable:
[root@desk mythcat]# export PATH=/opt/zeek/bin:$PATH
[root@desk mythcat]# zeekctl

Welcome to ZeekControl 2.2.0

Type "help" for help.
...
Use install , start and diag commands on Zeek command line to check if the Zeek tool works fine.
If you received this error on diag command , then you need to set your network interface:
==== stderr.log
fatal error: problem with interface eth0 (pcap_error: SIOCGIFHWADDR: No such device (pcap_activate))
Let's fix this error using the files configuration:
[root@desk mythcat]# updatedb
[root@desk mythcat]# locate node.cfg
/opt/zeek/etc/node.cfg
[root@desk mythcat]# vi /opt/zeek/etc/node.cfg
I change the row with the interface= with my network interface.
You can find your interface with these commands:
[root@desk mythcat]# ip link show
1: lo:  mtu 65536 qdisc noqueue state UNKNOWN mode DEFAULT group default qlen 1000
...
[root@desk mythcat]# nmcli device status
DEVICE  TYPE      STATE                   CONNECTION 
...
Now I can run the zeekctl command an check if is all right.
And first issue reported by diag and zeekctl is this:
1612693272.168741 Reporter::WARNING Your interface is likely receiving invalid TCP and UDP checksums, most likely from NIC checksum offloading. By default, packets with invalid checksums are discarded by Zeek unless using the -C command-line option or toggling the 'ignore_checksums' variable. Alternatively, disable checksum offloading by the network adapter to ensure Zeek analyzes the actual checksums that are transmitted. /opt/zeek/share/zeek/base/misc/find-checksum-offloading.zeek, line 54
You can see this tool can provide good information for users.

Fedora 33 : C# and Google A.P.I .

In this tutorial, I will show you how to use C # with Google A.P.I. on Fedora Linux. 
You can find more C # tutorials written by me on the web. 
This tutorial was added here by me because it is used with Fedora 33 distro. 
You will need to set an authentication key in your google account, see the credentials page
I used Fedora Linux to install the NuGet command:
[root@desk mythcat]# dnf install nuget 
...
Installed:
  nuget-2.8.7-11.fc33.x86_64                                                    
Complete!
Use this command to install it:
[mythcat@desk CSharpProjects]$ nuget install Google.Apis.Discovery.v1 
Attempting to resolve dependency 'Google.Apis (= 1.10.0)'.
Attempting to resolve dependency 'Google.Apis.Core (≥ 1.10.0)'.
...
Attempting to resolve dependency 'Google.Apis (≥ 1.49.0)'.
'Google.Apis' already has a dependency defined for 'Google.Apis.Core'.
Create a basic C# project and test it:
[mythcat@desk CSharpProjects]$ mkdir booksAPI && cd booksAPI
[mythcat@desk booksAPI]$ dotnet new console
Getting ready...
...
[mythcat@desk booksAPI]$ dotnet run
Hello World!
Add Google A.P.I. to this project:
[mythcat@desk booksAPI]$ dotnet add package Google.Apis.Discovery.v1 --version 1.49.0
  Determining projects to restore...
log  : Restored /home/mythcat/CSharpProjects/booksAPI/booksAPI.csproj (in 8.86 sec).
Change the default project source code with this example and add your Google key:
using System;
using System.Threading.Tasks;

using Google.Apis.Discovery.v1;
using Google.Apis.Discovery.v1.Data;
using Google.Apis.Services;
namespace booksAPI
{
    class Program
    {
    [STAThread]
        static void Main(string[] args)
        {
            Console.WriteLine("Discovery API Sample");
            Console.WriteLine("====================");
            try
            {
                new Program().Run().Wait();
            }
            catch (AggregateException ex)
            {
                foreach (var e in ex.InnerExceptions)
                {
                    Console.WriteLine("ERROR: " + e.Message);
                }
            }
            Console.WriteLine("Press any key to continue...");
            Console.ReadKey();
        }

        private async Task Run()
        {
            // Create the service.
            var service = new DiscoveryService(new BaseClientService.Initializer
                {
                    ApplicationName = "Discovery Sample",
                    ApiKey="...",
                });

            // Run the request.
            Console.WriteLine("Executing a list request...");
            var result = await service.Apis.List().ExecuteAsync();

            // Display the results.
            if (result.Items != null)
            {
                foreach (DirectoryList.ItemsData api in result.Items)
                {
                    Console.WriteLine(api.Id + " - " + api.Title);
                }
            }
        }
    }
}
I used my key and this is the result of the run project:
[mythcat@desk booksAPI]$ dotnet run
Discovery API Sample
====================
Executing a list request...
abusiveexperiencereport:v1 - Abusive Experience Report API
acceleratedmobilepageurl:v1 - Accelerated Mobile Pages (AMP) URL API
accessapproval:v1 - Access Approval API
accesscontextmanager:v1beta - Access Context Manager API
...

Sunday, January 31, 2021

Fedora 33 : Roblox and Wine.

Because I tried to install this platform, I will show you what works and what doesn't. 
At this moment Roblox Player cannot be run with Wine. 
I tested two ways to run it.
First is the roblox-linux-wrapper and the second is the direct way to install RobloxPlayerLauncher.exe.
The roblox-linux-wrapper works but you will get this error
The install process is simple:
[mythcat@desk ~]$ git clone https://github.com/roblox-linux-wrapper/roblox-linux-wrapper.git
Cloning into 'roblox-linux-wrapper'...
remote: Enumerating objects: 17, done.
remote: Counting objects: 100% (17/17), done.
remote: Compressing objects: 100% (16/16), done.
remote: Total 1471 (delta 7), reused 4 (delta 1), pack-reused 1454
Receiving objects: 100% (1471/1471), 380.74 KiB | 274.00 KiB/s, done.
Resolving deltas: 100% (901/901), done.

[mythcat@desk ~]$ whereis wine
wine: /usr/bin/wine /usr/lib/wine /usr/lib64/wine /usr/share/wine /usr/share/man/man1/wine.1.gz

[mythcat@desk ~]$ roblox-linux-wrapper/rlw
> main: Sourcing /home/mythcat/roblox-linux-wrapper/data/rlw-core.sh
> wineinitialize: sourcing /home/mythcat/.rlw/wine_choice
Another way is to download the EXE file and run it with Wine.
[mythcat@desk ~]$ wget http://setup.rbxcdn.com/RobloxPlayerLauncher.exe
wine RobloxPlayerLauncher.exe 
...
You can try to start a game on browser , select the Roblox Player and will get the same error. A good news is about Roblox Studio, this works very well:
[mythcat@desk ~]$ wget https://setup.rbxcdn.com/RobloxStudioLauncherBeta.exe
[mythcat@desk ~]$ wine RobloxStudioLauncherBeta.exe
My video card NVIDIA Corporation GT218 [GeForce 210] (rev a2) is not very good with this application , but works.

Saturday, January 30, 2021

Fedora 33 : The new Wine 6.0.

The new released of Wine 6.0 comes with this intro:
The Wine team is proud to announce that the stable release of Wine 6.0 is now available. This release represents a year of development effort and over 8,300 individual changes. It contains a large number of improvements that are listed in the release notes below. The areas of major changes are:
- Core modules in PE format.
- Vulkan backend for WineD3D.
- DirectShow and Media Foundation support.
- Text console redesign. ...

About Wine:
Wine (originally an acronym for "Wine Is Not an Emulator") is a compatibility layer capable of running Windows applications on several POSIX-compliant operating systems, such as Linux, macOS, BSD. Instead of simulating internal Windows logic like a virtual machine or emulator, Wine translates Windows API calls into POSIX calls on-the-fly, eliminating the performance and memory penalties of other methods and allowing you to cleanly integrate Windows applications into your desktop.

I used the Wine repo to install easily this software:
[root@desk mythcat]# dnf config-manager --add-repo https://dl.winehq.org/wine-builds/fedora/33/winehq.repo
Adding repo from: https://dl.winehq.org/wine-builds/fedora/33/winehq.repo
[root@desk mythcat]# dnf install wine
WineHQ packages                                 1.8 MB/s | 1.2 MB     00:00    
Dependencies resolved.
================================================================================
 Package                       Arch   Version                     Repo     Size
================================================================================
Installing:
 wine                          x86_64 6.0-1.fc33                  updates  13 k
Installing dependencies:
 SDL2                          i686   2.0.14-1.fc33               updates 589 k
 cdparanoia-libs               i686   10.2-34.fc33                fedora   56 k
 gd                            i686   2.3.0-3.fc33                fedora  142 k
 graphene                      i686   1.10.2-4.fc33               fedora   71 k
 gstreamer1-plugins-base       i686   1.18.2-1.fc33               updates 2.1 M
 ...
  wine-opencl-6.0-1.fc33.x86_64                                                 
  wine-pulseaudio-6.0-1.fc33.i686                                               
  wine-pulseaudio-6.0-1.fc33.x86_64                                             
  wine-small-fonts-6.0-1.fc33.noarch                                            
  wine-symbol-fonts-6.0-1.fc33.noarch                                           
  wine-system-fonts-6.0-1.fc33.noarch                                           
  wine-systemd-6.0-1.fc33.noarch                                                
  wine-tahoma-fonts-6.0-1.fc33.noarch                                           
  wine-times-new-roman-fonts-6.0-1.fc33.noarch                                  
  wine-twain-6.0-1.fc33.i686                                                    
  wine-twain-6.0-1.fc33.x86_64                                                  
  wine-webdings-fonts-6.0-1.fc33.noarch                                         
  wine-wingdings-fonts-6.0-1.fc33.noarch                                        

Complete! 
You can build it from source code:
[mythcat@desk ~]$ cd wine-6.0/
[mythcat@desk wine-6.0]$ ls
aclocal.m4  configure.ac   fonts    LICENSE.OLD  nls	   server
ANNOUNCE    COPYING.LIB    include  loader	 po	   tools
AUTHORS     dlls	   libs     MAINTAINERS  programs  VERSION
configure   documentation  LICENSE  Makefile.in  README
Wine uses a virtual C: drive and you need to configure it with this command:
[mythcat@desk ~]$ winecfg
wine: created the configuration directory '/home/mythcat/.wine'
002c:fixme:winediag:LdrInitializeThunk wine-staging 6.0 is a testing version containing experimental patches.
...
This starts a new window where you can set the wine software.
Also, you can locate the virtual C: drive at:
[mythcat@desk ~]$ ls -la .wine/drive_c/
total 8
drwxr-xr-x  7 mythcat mythcat  124 Jan 30 11:56  .
drwxr-xr-x  4 mythcat mythcat  117 Jan 30 12:03  ..
drwxr-xr-x  3 mythcat mythcat   23 Jan 30 11:56  ProgramData
drwxr-xr-x  6 mythcat mythcat   97 Jan 30 11:56 'Program Files'
drwxr-xr-x  6 mythcat mythcat   97 Jan 30 11:56 'Program Files (x86)'
drwxr-xr-x  4 mythcat mythcat   35 Jan 30 11:56  users
drwxr-xr-x 18 mythcat mythcat 4096 Jan 30 11:57  windows
-rw-r--r--  1 mythcat mythcat    9 Jan 30 11:56  .windows-serial
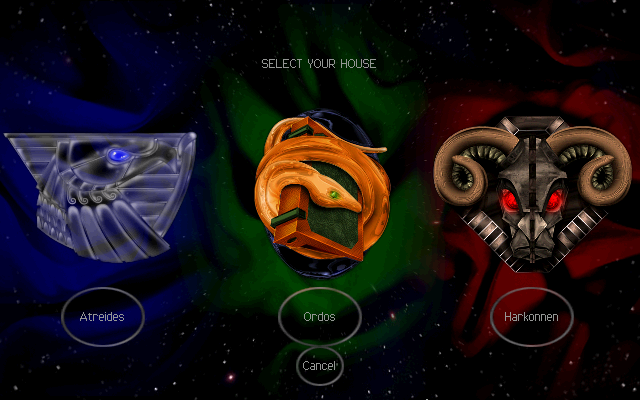
I tested with my favorite old game Dune 2000 from this webpage
Just unzip it and run wine with right-click on DUNE2000.EXE and select Open With and Wine Windows Program Loader.
The game runs it well:
Dune 2000 gane

You can read about Fedora Linux distro and Wine software on this official MediaWiki page.

Tuesday, January 19, 2021

Fedora 33 : Create a simple GUI Button on Unity 3D.

It is very useful to create applications in the Fedora 33 Linux distribution with the Unity 3D game engine.
In today's tutorial, I will show you how to build the simplest GUI with C# and a dynamic button.
To create a button dynamically you need to use GUI.Button.
Open Unity 3D new project in your Fedora 33 distro.
Add a new Game Object by right click and select Create Empty.
Select Game Object use Add Component to add a New script and name it create_button.
Open it and add this source code:
using UnityEngine;
using UnityEngine.UI;
using System.Collections;
 
public class create_button : MonoBehaviour {
   
    
    void OnGUI() 
        {    
            if (GUI.Button(new Rect(10, 10, 300, 20), "Test - Dynamically button")) 
            {    
                Debug.Log("Test button");
            }
            
        }
}
If you run the Unity project you will see a basic Unity 3D button, see the next image:

Friday, January 15, 2021

Fedora 33 : Using the finch chat program.

Finch is a TUI (text user interface) IM client for Linux which uses libpurple.
This is very useful when you want to chat and don't have an environment to install Fedora on.
Finch is built using the ncurses toolkit, which is a library designed especially to built text user interfaces.
This program lets you sign on to Jabber, GoogleTalk, IRC, and other IM networks. 
After this was built the Pidgin application.
Let's install it with the DNF tool:
[root@desk mythcat]# dnf install finch.x86_64
...
Installed:
  finch-2.14.1-2.fc33.x86_64                             libgnt-2.14.0-3.fc33.x86_64                            

Complete!
You can find all information using the man command:
[mythcat@desk ~]$ man finch 
You can run it easy with this command:
[mythcat@desk ~]$ finch
After that, you can see the windows form for your account.
You can see one example with my IRC account:
If not you can select it by pressing the keys: Alt+A and select Accounts.
Use the Tab key and select Modify.
The new window form lets you set your account.
In the next image, you can see some settings for my IRC account.
Another important element is that this interface can be customized using the file named .gntrc.
Open it with your editor, I used vi editor:
[mythcat@desk ~]$ vi ~/.gntrc
I make these changes to use the mouse:
[general]
mouse = 1
Although the manual page says the mouse support is still experimental.
I install the GPM - a cut and paste utility and mouse server for virtual consoles.
[root@desk mythcat]# dnf install gpm.x86_64 
...
[root@desk mythcat]# systemctl status gpm
● gpm.service - Console Mouse manager
     Loaded: loaded (/usr/lib/systemd/system/gpm.service; enabled; vendor prese>
     Active: inactive (dead)
...
[root@desk mythcat]# systemctl enable gpm 
[root@desk mythcat]# systemctl status gpm 
● gpm.service - Console Mouse manager
     Loaded: loaded (/usr/lib/systemd/system/gpm.service; enabled; vendor prese>
     Active: inactive (dead) since Fri 2021-01-15 15:35:56 EET; 6min ago
   Main PID: 15241 (code=exited, status=0/SUCCESS)
        CPU: 2ms

Jan 15 15:35:32 desk systemd[1]: Starting Console Mouse manager...
Jan 15 15:35:32 desk /usr/sbin/gpm[15314]: O0o.oops(): [daemon/check_uniqueness>
Jan 15 15:35:32 desk systemd[1]: Started Console Mouse manager.
Jan 15 15:35:32 desk /usr/sbin/gpm[15314]: gpm is already running as pid 15241
The GPM can be configureted to set your mouse settings.
I restart my Fedora 33 Linux distro and works very well with the mouse.

Tuesday, December 29, 2020

Fedora 33 : Fixes and changes for wordpress - part 001.

If you have the latest version of WordPress installed, then you may encounter this error when trying to add a new page or post.
Publishing failed. The response is not a valid JSON response.
The problem is with how to edit posts.
One solution would be to install this plugin.
The process of installing the new WordPress or making changes does not allow you to add new plugins to the Plugins menu.
Download the Classic Editor plugin to unzip and then copy it to the plugins folder.
[root@desk mythcat]# cp -r -f /home/mythcat/classic-editor/ /usr/share/wordpress/wp-content/plugins/
Activate this plugin and now you can create and edit pages and posts in WordPress.

Friday, December 25, 2020

Fedora 33 : Use Visual Code on root account.

Sometimes creating or modifying files that have root permissions is required.
I use the following command to run Visual Code with these permissions:
sudo code --user-data-dir="~/.vscode-root"

Thursday, December 24, 2020

Fedora 33 : Install wordpress on Fedora distro.

For those who are celebrating the winter holidays with the Linux operating system, I have created this little tutorial...
The first step - update and upgrade the Fedora 33 Linux distro.
[root@desk mythcat]# dnf update
...
Nothing to do.
Complete!
[root@desk mythcat]# dnf upgrade
...
Nothing to do.
Complete!
Install all packages for WordPress package:
[root@desk mythcat]# dnf install @"Web Server" php-mysqlnd mariadb-server
Last metadata expiration check: 1:10:28 ago on Thu 24 Dec 2020 12:59:20 PM EET.
Package php-mysqlnd-7.4.13-1.fc33.x86_64 is already installed.
No match for group package "powerpc-utils"
No match for group package "lsvpd"
Dependencies resolved.
...
Complete!
Finds the packages providing for WordPress.
[root@desk mythcat]# dnf provides wordpress
Last metadata expiration check: 1:13:24 ago on Thu 24 Dec 2020 12:59:20 PM EET.
wordpress-5.5.1-1.fc33.noarch : Blog tool and publishing platform
Repo        : fedora
Matched from:
Provide    : wordpress = 5.5.1-1.fc33

wordpress-5.6-1.fc33.noarch : Blog tool and publishing platform
Repo        : updates
Matched from:
Provide    : wordpress = 5.6-1.fc33
Install WordPress with DNF tool:
[root@desk mythcat]# dnf install wordpress
...
  Verifying        : php-simplepie-1.5.4-3.fc33.noarch                      7/7 

Installed:
  libc-client-2007f-26.fc33.x86_64      php-IDNA_Convert-0.8.0-14.fc33.noarch   
  php-getid3-1:1.9.20-2.fc33.noarch     php-imap-7.4.13-1.fc33.x86_64           
  php-phpmailer6-6.1.8-1.fc33.noarch    php-simplepie-1.5.4-3.fc33.noarch       
  wordpress-5.6-1.fc33.noarch          

Complete!
Allow firewall in case it is running on your system.
[root@desk mythcat]# firewall-cmd --add-port=80/tcp --permanent
success
[root@desk mythcat]# firewall-cmd --reload
success
If SELinux is running, run the commands to allow database and sendmail:
[root@desk mythcat]# setsebool -P httpd_can_network_connect_db=1
[root@desk mythcat]# setsebool -P httpd_can_sendmail=1
Enable systemctl services for WordPress:
[root@desk mythcat]# systemctl start httpd
...
[root@desk mythcat]# systemctl enable httpd
...
[root@desk mythcat]# systemctl enable mariadb
...
[root@desk mythcat]# systemctl start mariadb
...
Set up the MySQL service for WordPress:
[root@desk mythcat]# mysql_secure_installation

NOTE: RUNNING ALL PARTS OF THIS SCRIPT IS RECOMMENDED FOR ALL MariaDB
      SERVERS IN PRODUCTION USE!  PLEASE READ EACH STEP CAREFULLY!

In order to log into MariaDB to secure it, we'll need the current
password for the root user. If you've just installed MariaDB, and
haven't set the root password yet, you should just press enter here.

Enter current password for root (enter for none): 
OK, successfully used password, moving on...

Setting the root password or using the unix_socket ensures that nobody
can log into the MariaDB root user without the proper authorisation.

You already have your root account protected, so you can safely answer 'n'.

Switch to unix_socket authentication [Y/n] n
 ... skipping.

You already have your root account protected, so you can safely answer 'n'.

Change the root password? [Y/n] n
 ... skipping.

By default, a MariaDB installation has an anonymous user, allowing anyone
to log into MariaDB without having to have a user account created for
them.  This is intended only for testing, and to make the installation
go a bit smoother.  You should remove them before moving into a
production environment.

Remove anonymous users? [Y/n] Y
 ... Success!

Normally, root should only be allowed to connect from 'localhost'.  This
ensures that someone cannot guess at the root password from the network.

Disallow root login remotely? [Y/n] Y
 ... Success!

By default, MariaDB comes with a database named 'test' that anyone can
access.  This is also intended only for testing, and should be removed
before moving into a production environment.

Remove test database and access to it? [Y/n] Y
 - Dropping test database...
 ... Success!
 - Removing privileges on test database...
 ... Success!

Reloading the privilege tables will ensure that all changes made so far
will take effect immediately.

Reload privilege tables now? [Y/n] Y
 ... Success!

Cleaning up...

All done!  If you've completed all of the above steps, your MariaDB
installation should now be secure.

Thanks for using MariaDB!
Create a database named mysite for WordPress:
[root@desk mythcat]# mysqladmin create mysite -u root -p 
Enter password: 
[root@desk mythcat]# mysql -u root -p 
Enter password: 
Welcome to the MariaDB monitor.  Commands end with ; or \g.
Your MariaDB connection id is 25
Server version: 10.4.17-MariaDB MariaDB Server

Copyright (c) 2000, 2018, Oracle, MariaDB Corporation Ab and others.

Type 'help;' or '\h' for help. Type '\c' to clear the current input statement.

MariaDB [(none)]> SHOW DATABASES;
+--------------------+
| Database           |
+--------------------+
| information_schema |
| mysite             |
| mysql              |
| performance_schema |
+--------------------+
4 rows in set (0.000 sec)

MariaDB [(none)]> grant all privileges on mysite.* to testadmin@localhost identified by 'TESTtest!';
Query OK, 0 rows affected (0.019 sec)

MariaDB [(none)]> flush privileges;
Query OK, 0 rows affected (0.001 sec)

MariaDB [(none)]> quit;
Bye
Set WordPress default configuration file named wp-config.php:
[root@desk mythcat]# vim /etc/wordpress/wp-config.php
This source code show you to set wp-config.php for localhost install:
define( 'DB_NAME', 'mysite' );

/** MySQL database username */
define( 'DB_USER', 'testadmin' );

/** MySQL database password */
define( 'DB_PASSWORD', 'TESTtest!' );

/** MySQL hostname */
define( 'DB_HOST', 'localhost' );
Restart the httpd service:
[root@desk mythcat]# systemctl restart httpd
Open URL to set WordPress to set the last steps of this install process:
http://localhost/wordpress/ 

Thursday, December 17, 2020

Fedora 33 : Sigil software.

Sigil is a ePub editor for Linux and omes with powerful features like UTF-16, EPUB 2 spec, and limited EPUB 3 support.
The complete control over directly editing EPUB syntax in Code View and Table of Contents generator with multi-level heading support and metadata editor.
The user interface translated into many languages and spell checking and many plugins available.
These command will show you how can search and install this software:
[root@desk mythcat]# dnf search Sigil
Last metadata expiration check: 0:54:58 ago on Wed 16 Dec 2020 11:01:54 PM EET.
======================== Name & Summary Matched: Sigil =========================
FlightCrew-sigil-plugin.x86_64 : Sigil FlightCrew epub validator plugin
sigil-doc.noarch : Documentation for Sigil ebook editor
============================= Name Matched: Sigil ==============================
sigil.x86_64 : WYSIWYG ebook editor
[root@desk mythcat]# dnf install sigil.x86_64 
Last metadata expiration check: 0:55:32 ago on Wed 16 Dec 2020 11:01:54 PM EET.
Dependencies resolved.
================================================================================
 Package                     Arch       Version               Repository   Size
================================================================================
Installing:
 sigil                       x86_64     0.9.14-7.fc33         fedora      3.5 M
Installing dependencies:
 minizip                     x86_64     2.10.2-1.fc33         updates     112 k
 python3-cssselect           noarch     0.9.2-16.fc33         fedora       38 k
 python3-cssutils            noarch     1.0.2-9.fc33          fedora      270 k
 python3-regex               x86_64     2020.11.13-1.fc33     updates     345 k
 zipios++                    x86_64     0.1.5.9-25.fc33       fedora       78 k
Installing weak dependencies:
 FlightCrew-sigil-plugin     x86_64     0.9.1-21.fc33         fedora      336 k

Transaction Summary
================================================================================
Install  7 Packages

Total download size: 4.7 M
Installed size: 20 M
Is this ok [y/N]: y
...
  Running scriptlet: sigil-0.9.14-7.fc33.x86_64                             7/7 
  Verifying        : minizip-2.10.2-1.fc33.x86_64                           1/7 
  Verifying        : python3-regex-2020.11.13-1.fc33.x86_64                 2/7 
  Verifying        : FlightCrew-sigil-plugin-0.9.1-21.fc33.x86_64           3/7 
  Verifying        : python3-cssselect-0.9.2-16.fc33.noarch                 4/7 
  Verifying        : python3-cssutils-1.0.2-9.fc33.noarch                   5/7 
  Verifying        : sigil-0.9.14-7.fc33.x86_64                             6/7 
  Verifying        : zipios++-0.1.5.9-25.fc33.x86_64                        7/7 

Installed:
  FlightCrew-sigil-plugin-0.9.1-21.fc33.x86_64                                  
  minizip-2.10.2-1.fc33.x86_64                                                  
  python3-cssselect-0.9.2-16.fc33.noarch                                        
  python3-cssutils-1.0.2-9.fc33.noarch                                          
  python3-regex-2020.11.13-1.fc33.x86_64                                        
  sigil-0.9.14-7.fc33.x86_64                                                    
  zipios++-0.1.5.9-25.fc33.x86_64                                               

Complete!

Thursday, December 3, 2020

Fedora 33 : Create a simple AvaloniaUI window.

This tutorial is about Avalonia UI.
Avalonia is a cross-platform XAML-based UI framework providing a flexible styling system and supporting a wide range of Operating Systems such as Windows via .NET Framework and .NET Core, Linux via Xorg, macOS.
I install avalonia dotnet templates from here:
[mythcat@desk CSharpProjects]$ git clone https://github.com/AvaloniaUI/avalonia-dotnet-templates --recursive
Cloning into 'avalonia-dotnet-templates'...
remote: Enumerating objects: 37, done.
remote: Counting objects: 100% (37/37), done.
remote: Compressing objects: 100% (28/28), done.
remote: Total 379 (delta 14), reused 19 (delta 7), pack-reused 342
Receiving objects: 100% (379/379), 147.23 KiB | 881.00 KiB/s, done.
Resolving deltas: 100% (202/202), done.
[mythcat@desk CSharpProjects]$ ls
aspnetapp  avalonia-dotnet-templates  HelloWorld  myapp001  MyGame001  Todo
[mythcat@desk CSharpProjects]$ dotnet new --install avalonia-dotnet-templates 
...
Create a default window example with AvaloniaUI:
[mythcat@desk CSharpProjects]$ dotnet new avalonia.app -o MyAppAvalonia
The template "Avalonia .NET Core App" was created successfully.
[mythcat@desk CSharpProjects]$ cd MyAppAvalonia/
[mythcat@desk MyAppAvalonia]$ dotnet add package Avalonia
...
[mythcat@desk MyAppAvalonia]$ dotnet add package Avalonia.Desktop
...
[mythcat@desk MyAppAvalonia]$ ls
App.xaml  App.xaml.cs  MainWindow.xaml  MainWindow.xaml.cs  MyAppAvalonia.csproj  nuget.config  Program.cs
Publish this example:
[mythcat@desk MyAppAvalonia]$ dotnet publish --configuration Release --runtime fedora.33-x64 --self-contained false
Microsoft (R) Build Engine version 16.4.0+e901037fe for .NET Core
Copyright (C) Microsoft Corporation. All rights reserved.

Restore completed in 3.86 sec for /home/mythcat/CSharpProjects/MyAppAvalonia/MyAppAvalonia.csproj.
MyAppAvalonia -> /home/mythcat/CSharpProjects/MyAppAvalonia/bin/Release/netcoreapp3.0/fedora.33-x64/MyAppAvalonia.dll
MyAppAvalonia -> /home/mythcat/CSharpProjects/MyAppAvalonia/bin/Release/netcoreapp3.0/fedora.33-x64/publish/
The last step is the run:
[mythcat@desk MyAppAvalonia]$ dotnet /home/mythcat/CSharpProjects/MyAppAvalonia/bin/Release/netcoreapp3.0/
fedora.33-x64/publish/MyAppAvalonia.dll 
This will open a window build with AvaloniaUI.

Monday, November 30, 2020

Fedora 33 : Build and publish with .NET Core SDK .

In this tutorial I will show you how can use .NET Core SDK to build and run a simple MyGame001 application from the last tutorial.
Let's go to the project and get some infos:
[mythcat@desk ~]$ cd CSharpProjects/
[mythcat@desk CSharpProjects]$ cd MyGame001/
[mythcat@desk MyGame001]$ dotnet --info
.NET Core SDK (reflecting any global.json):
 Version:   3.1.109
 Commit:    32ced2d411

Runtime Environment:
 OS Name:     fedora
 OS Version:  33
 OS Platform: Linux
 RID:         fedora.33-x64
 Base Path:   /usr/lib64/dotnet/sdk/3.1.109/

Host (useful for support):
  Version: 3.1.9
  Commit:  774fc3d6a9

.NET Core SDKs installed:
  3.1.109 [/usr/lib64/dotnet/sdk]

.NET Core runtimes installed:
  Microsoft.AspNetCore.App 3.1.9 [/usr/lib64/dotnet/shared/Microsoft.AspNetCore.App]
  Microsoft.NETCore.App 3.1.9 [/usr/lib64/dotnet/shared/Microsoft.NETCore.App]

To install additional .NET Core runtimes or SDKs:
  https://aka.ms/dotnet-download
The next command will create MyGame001.dll.
[mythcat@desk MyGame001]$ dotnet publish --configuration Release --runtime fedora.33-x64 --self-contained false
Microsoft (R) Build Engine version 16.4.0+e901037fe for .NET Core
Copyright (C) Microsoft Corporation. All rights reserved.

  Restore completed in 50.58 ms for /home/mythcat/CSharpProjects/MyGame001/MyGame001.csproj.
  MyGame001 -> /home/mythcat/CSharpProjects/MyGame001/bin/Release/netcoreapp3.1/fedora.33-x64/MyGame001.dll
  MyGame001 -> /home/mythcat/CSharpProjects/MyGame001/bin/Release/netcoreapp3.1/fedora.33-x64/publish/
Now you can run it with dotnet command:
[mythcat@desk MyGame001]$ dotnet /home/mythcat/CSharpProjects/MyGame001/bin/Release/netcoreapp3.1/fedora.33-x64/MyGame001.dll
You can simply run it like an Linux application:
[mythcat@desk MyGame001]$ /home/mythcat/CSharpProjects/MyGame001/bin/Release/netcoreapp3.1/fedora.33-x64/publish/MyGame001 

Sunday, November 29, 2020

Fedora 33 : Testing xdotool linux tool .

Xdotool is a free and open source command line tool for simulating mouse clicks and keystrokes.
You can create beautiful scrips and tools with this command.
The help for this command is this:
[mythcat@desk ~]$ xdotool -help
Let's see some examples:
This simulate a keystroke for key c:
m[mythcat@desk ~]$ xdotool key c
c[mythcat@desk ~]$ c
The next command will simulate a key press for key c:
[mythcat@desk ~]$ xdotool keydown c
c[mythcat@desk ~]$ cccccccccccccccccccccccccccccccccccccccccccccccccccc^C
[mythcat@desk ~]$ ^C
The next command will simulate a key release for key c:
[mythcat@desk ~]$ xdotool keyup c
Use the enter key:
[mythcat@desk ~]$ xdotool key KP_Enter

[mythcat@desk ~]$
The next command will open a new tab in terminal:
[mythcat@desk ~]$ xdotool key shift+ctrl+t
This command simulate a right click at current location of pointer
xdotool click 3
The reference is: 1 – Left click, 2 – Middle click, 3 – Right click, 4 – Scroll wheel up, 5 – Scroll wheel down.
The next command get ID of terminal window currently in focus and then minimize it:
[mythcat@desk ~]$ xdotool getactivewindow windowminimize
This command lists all open windows:
[mythcat@desk ~]$ xdotool search --name ""
I get the open window with name New Tab - Google Chrome, with this command:
[mythcat@desk ~]$ xdotool search --name "New Tab -"
18874375
This command get the pid of the active window:
[mythcat@desk ~]$ xdotool getactivewindow getwindowpid
3538
The pid is from lxterminal tool:
[mythcat@desk ~]$ ps aux | grep 3538
mythcat     3538  0.3  0.4 601468 42500 ?        Sl   11:42   0:05 lxterminal
mythcat     5713  0.0  0.0 221432   780 pts/1    S+   12:07   0:00 grep 3538
The active window can be move with:
[mythcat@desk ~]$ xdotool getactivewindow windowmove 0 0
The next command get the current mouse coordinates:
[mythcat@desk ~]$ xdotool getmouselocation --shell
X=521
Y=339
SCREEN=0
WINDOW=16780805
These coordinates can be parsed:
[mythcat@desk ~]$ xdotool getmouselocation 2>/dev/null | cut -d\  -f1,2 -
x:0 y:0
[mythcat@desk ~]$ xdotool getmouselocation 2>/dev/null | sed 's/ sc.*//; s/.://g; s/ /x/'
0x0
Open inkscape and select Layer for this window Always on top:
[mythcat@desk ~]$ inkscape 
Start xdotool with focus on mouse and click on rectangle and draw area and follow the output:
[mythcat@desk ~]$ xdotool search --name "inkscape" behave %@ focus getmouselocation
x:25 y:239 screen:0 window:16786173
x:340 y:378 screen:0 window:16786173
x:332 y:358 screen:0 window:16786173
x:518 y:643 screen:0 window:16786173
x:723 y:466 screen:0 window:16780805
I create a bash script named inkscape_xdotool.sh and I add these commands:
#! /bin/sh
sleep 1
inkscape > /dev/null 2>&1 &
sleep 3
my_app=xdotool search --sync --name 'inkscape'
xdotool windowactivate $my_app
xdotool mousemove 0 0
xdotool mousemove 25 239
xdotool click 1
xdotool mousemove 332 358 mousedown 1 mousemove 518 643
xdotool mouseup 1
sleep 1
exit
I run the script:
[mythcat@desk ~]$ ./inkscape_xdotool.sh 
The script run well.
The output is an rectangle in inkscape with the default black color.

Saturday, November 28, 2020

Fedora 33 : Install and test with MonoGame .NET library .

MonoGame is a simple and powerful .NET library for creating games for desktop PCs, video game consoles, and mobile devices.
Today I tested with Fedora 33.
First let's install this templates for .NET Core CLI and the Rider IDE.:
[mythcat@desk ~]$ dotnet new --install MonoGame.Templates.CSharp

Welcome to .NET Core 3.1!
---------------------
SDK Version: 3.1.109

----------------
Explore documentation: https://aka.ms/dotnet-docs
Report issues and find source on GitHub: https://github.com/dotnet/core
Find out what's new: https://aka.ms/dotnet-whats-new
Learn about the installed HTTPS developer cert: https://aka.ms/aspnet-core-https
Use 'dotnet --help' to see available commands or visit: https://aka.ms/dotnet-cli-docs
Write your first app: https://aka.ms/first-net-core-app
--------------------------------------------------------------------------------------
Getting ready...
  Restore completed in 2.76 sec for /home/mythcat/.templateengine/dotnetcli/v3.1.109/scratch/restore.csproj.
...
Install MGCB Editor is a tool for editing .mgcb files:
[mythcat@desk ~]$ dotnet tool install --global dotnet-mgcb-editor
You can invoke the tool using the following command: mgcb-editor
Tool 'dotnet-mgcb-editor' (version '3.8.0.1641') was successfully installed.
[mythcat@desk ~]$ mgcb-editor --register
Installing icon...
Installation complete!
Installing mimetype...
gtk-update-icon-cache: No theme index file.
Installation complete!
Installing application...
Installation complete!

Registered MGCB Editor!
Install C# extension for code editor:
[mythcat@desk ~]$ code --install-extension ms-dotnettools.csharp
Installing extensions...
Extension 'ms-dotnettools.csharp' is already installed.
The next step is to create new MonoGame projects:
[mythcat@desk ~]$ cd CSharpProjects/
[mythcat@desk CSharpProjects]$ dotnet new mgdesktopgl -o MyGame001
The template "MonoGame Cross-Platform Desktop Application (OpenGL)" was created successfully.

An update for template pack MonoGame.Templates.CSharp::3.8.0.1641 is available.
    install command: dotnet new -i MonoGame.Templates.CSharp::3.8.0.1641 
I run the default template and working well:
[mythcat@desk CSharpProjects]$ cd MyGame001
[mythcat@desk MyGame001]$ ls
app.manifest  Content  Game1.cs  Icon.bmp  Icon.ico  MyGame001.csproj  Program.cs
[mythcat@desk MyGame001]$ dotnet run Program.cs 
The default source code from Program.cs file is this:
using System;

namespace MyGame001
{
    public static class Program
    {
        [STAThread]
        static void Main()
        {
            using (var game = new Game1())
                game.Run();
        }
    }
} 

Tuesday, November 17, 2020

Fedora 33 : Smokeping tool.

Smokeping is a latency measurement tool. It sends test packets out to the net and measures the amount of time they need to travel from one place to the other and back. SmokePing consists of a daemon process which organized the latency measurements and a CGI which presents the graphs. 
You can install it like a webpage, see a demo on this webpage with Customers.SALAG.
[root@desk mythcat]# dnf search SmokePing
Last metadata expiration check: 0:12:18 ago on Tue 17 Nov 2020 08:45:57 PM EET.
=============================== Name Matched: SmokePing ===============================
smokeping.noarch : Latency Logging and Graphing System
[root@desk mythcat]# dnf install smokeping.noarch
Last metadata expiration check: 0:12:24 ago on Tue 17 Nov 2020 08:45:57 PM EET.
Dependencies resolved.
=======================================================================================
 Package                    Architecture  Version                  Repository     Size
=======================================================================================
Installing:
 smokeping                  noarch        2.7.3-2.fc33             fedora        564 k
Installing dependencies:
 fedora-logos-httpd         noarch        30.0.2-5.fc33            fedora         15 k
 fping                      x86_64        5.0-1.fc33               fedora         38 k
 httpd                      x86_64        2.4.46-1.fc33            fedora        1.4 M
 httpd-filesystem           noarch        2.4.46-1.fc33            fedora         14 k
 httpd-tools                x86_64        2.4.46-1.fc33            fedora         83 k
 libdbi                     x86_64        0.9.0-16.fc33            fedora         50 k
 mod_fcgid                  x86_64        2.3.9-21.fc33            fedora         77 k
 mod_http2                  x86_64        1.15.14-2.fc33           fedora        152 k
 perl-CGI                   noarch        4.50-4.fc33              fedora        198 k
 perl-CGI-Fast              noarch        2.15-6.fc33              fedora         18 k
 perl-Config-Grammar        noarch        1.13-6.fc33              fedora         29 k
 perl-FCGI                  x86_64        1:0.79-5.fc33            fedora         47 k
 perl-Net-DNS               noarch        1.21-5.fc33              fedora        356 k
 perl-Net-Telnet            noarch        3.04-15.fc33             fedora         62 k
 perl-Path-Tiny             noarch        0.114-3.fc33             fedora         67 k
 perl-SNMP_Session          noarch        1.13-25.fc33             fedora         67 k
 perl-Unicode-UTF8          x86_64        0.62-13.fc33             fedora         26 k
 rrdtool                    x86_64        1.7.2-14.fc33            fedora        569 k
 rrdtool-perl               x86_64        1.7.2-14.fc33            fedora         43 k

Transaction Summary
=======================================================================================
Install  20 Packages

Total download size: 3.8 M
Installed size: 11 M
Is this ok [y/N]: y
Downloading Packages:
...
Complete!
[root@desk mythcat]# dnf install lighttpd
...
Complete!

[root@desk mythcat]# dnf install lighttpd-fastcgi
...
Complete!
Most users use the smokeping service:
sudo service smokeping start
sudo service smokeping status
You can set your configuration file using this file:
[mythcat@desk ~]$ sudo vi /etc/smokeping/config
I let this file unchanged and I run these commands:
[mythcat@desk ~]$ sudo smokeping --check
Configuration file '/etc/smokeping/config' syntax OK.
[mythcat@desk ~]$ sudo smokeping --debug
### Compiling alert detector pattern 'someloss'
### >0%,*12*,>0%,*12*,>0%
...
Smokeping version 2.007003 successfully launched.
Not entering multiprocess mode with '--debug'. Use '--debug-daemon' for that.
FPing: probing 3 targets with step 300 s and offset 118 s.
FPing: Executing /usr/sbin/fping -C 20 -q -B1 -r1 -4 -i10 planet.fedoraproject.org fedoraproject.org 
docs.fedoraproject.org
FPing: Got fping output: 'planet.fedoraproject.org : 165 166 167 167 165 172 165 165 165 164 168 165 166 165
165 164 165 164 171 165'
FPing: Got fping output: 'fedoraproject.org        : 77.8 75.6 75.0 68.3 69.1 73.6 71.1 71.1 69.0 67.5
69.9 69.5 70.6 70.8 76.9 76.0 70.8 70.6 72.1 68.3'
FPing: Got fping output: 'docs.fedoraproject.org   : 171 165 165 165 180 164 170 164 164 165 163 171 
169 160 170 167 166 166 166 164'
Calling RRDs::update(/var/lib/smokeping/rrd/Ping/FedoraprojectOrg.rrd --template uptime:loss:median:
ping1:ping2:ping3:ping4:ping5:ping6:ping7:ping8:ping9:ping10:ping11:ping12:ping13:ping14:ping15:
ping16:ping17:ping18:ping19:ping20 1605642550:U:0:7.0800000000e-02:6.7500000000e-02:
...
1.6700000000e-01:1.6800000000e-01:1.7100000000e-01:1.7200000000e-01)

Saturday, November 7, 2020

Fedora 33 : Install PyGame 2.0 on Fedora.

Today I will show you how to install the python PyGame version 2.0 package with python version 3.9 in Fedora 33 distro. Let's install all Fedora packages need for this python package:
[root@desk pygame]# dnf install SDL2-devel.x86_64 
...
Installed:
  SDL2-devel-2.0.12-4.fc33.x86_64                                               

Complete!
[root@desk pygame]# dnf install SDL2_ttf-devel.x86_64
...
Installed:
  SDL2_ttf-2.0.15-6.fc33.x86_64       SDL2_ttf-devel-2.0.15-6.fc33.x86_64      

Complete!
[root@desk pygame]# dnf install SDL2_image-devel.x86_64
...
Installed:
  SDL2_image-2.0.5-5.fc33.x86_64      SDL2_image-devel-2.0.5-5.fc33.x86_64     

Complete!
[root@desk pygame]# dnf install SDL2_mixer-devel.x86_64 
...
Installed:
  SDL2_mixer-2.0.4-7.fc33.x86_64      SDL2_mixer-devel-2.0.4-7.fc33.x86_64     

Complete!
[root@desk pygame]# dnf install SDL2_gfx-devel.x86_64 
...
Installed:
  SDL2_gfx-1.0.4-3.fc33.x86_64        SDL2_gfx-devel-1.0.4-3.fc33.x86_64       

Complete!
[root@desk pygame]# dnf install portmidi-devel.x86_64 
...
Installed:
  portmidi-devel-217-38.fc33.x86_64                                             

Complete!
Use this command to clone it from GitHub and install it:
[mythcat@desk ~]$ git clone https://github.com/pygame/pygame
Cloning into 'pygame'...
remote: Enumerating objects: 4, done.
remote: Counting objects: 100% (4/4), done.
remote: Compressing objects: 100% (4/4), done.
remote: Total 38509 (delta 0), reused 0 (delta 0), pack-reused 38505
Receiving objects: 100% (38509/38509), 17.78 MiB | 11.66 MiB/s, done.
Resolving deltas: 100% (29718/29718), done.
[mythcat@desk ~]$ cd pygame/
[mythcat@desk pygame]$ python3.9 setup.py install --user


WARNING, No "Setup" File Exists, Running "buildconfig/config.py"
Using UNIX configuration...


Hunting dependencies...
SDL     : found 2.0.12
FONT    : found
IMAGE   : found
MIXER   : found
PNG     : found
JPEG    : found
SCRAP   : found
PORTMIDI: found
PORTTIME: found
FREETYPE: found 23.4.17

If you get compiler errors during install, double-check
the compiler flags in the "Setup" file.
...
copying docs/pygame_tiny.gif -> build/bdist.linux-x86_64/egg/pygame/docs
creating build/bdist.linux-x86_64/egg/EGG-INFO
copying pygame.egg-info/PKG-INFO -> build/bdist.linux-x86_64/egg/EGG-INFO
copying pygame.egg-info/SOURCES.txt -> build/bdist.linux-x86_64/egg/EGG-INFO
copying pygame.egg-info/dependency_links.txt -> build/bdist.linux-x86_64/egg/EGG-INFO
copying pygame.egg-info/entry_points.txt -> build/bdist.linux-x86_64/egg/EGG-INFO
copying pygame.egg-info/not-zip-safe -> build/bdist.linux-x86_64/egg/EGG-INFO
copying pygame.egg-info/top_level.txt -> build/bdist.linux-x86_64/egg/EGG-INFO
writing build/bdist.linux-x86_64/egg/EGG-INFO/native_libs.txt
creating dist
creating 'dist/pygame-2.0.1.dev1-py3.9-linux-x86_64.egg' and adding 'build/bdist.linux-x86_64/egg' to it
removing 'build/bdist.linux-x86_64/egg' (and everything under it)
Processing pygame-2.0.1.dev1-py3.9-linux-x86_64.egg
creating /home/mythcat/.local/lib/python3.9/site-packages/pygame-2.0.1.dev1-py3.9-linux-x86_64.egg
Extracting pygame-2.0.1.dev1-py3.9-linux-x86_64.egg to /home/mythcat/.local/lib/python3.9/site-packages
Adding pygame 2.0.1.dev1 to easy-install.pth file

Installed /home/mythcat/.local/lib/python3.9/site-packages/pygame-2.0.1.dev1-py3.9-linux-x86_64.egg
Processing dependencies for pygame==2.0.1.dev1
Finished processing dependencies for pygame==2.0.1.dev1
Let's test it:
[mythcat@desk pygame]$ ls
build	     dist  examples	    README.rst	setup.cfg  src_c   test
buildconfig  docs  pygame.egg-info  Setup	setup.py   src_py
[mythcat@desk pygame]$ python3.9
Python 3.9.0 (default, Oct  6 2020, 00:00:00) 
[GCC 10.2.1 20200826 (Red Hat 10.2.1-3)] on linux
Type "help", "copyright", "credits" or "license" for more information.
>>> import pygame
pygame 2.0.1.dev1 (SDL 2.0.12, python 3.9.0)
Hello from the pygame community. https://www.pygame.org/contribute.html
>>>