Pages

Showing posts with label golang. Show all posts

Tuesday, February 18, 2020

Fedora 31 : The Fyne UI toolkit for Go programming language.

Today I will show you how to use a UI toolkit with the Go programming. language. The development team comes with this toolkit at the GitHub official webpage.
Fyne is an easy to use UI toolkit and app API written in Go. It is designed to build applications that run on desktop and mobile devices with a single codebase...
[mythcat@desk ~]$ sudo dnf install golang
[sudo] password for mythcat:
...
Installed:
  golang-1.13.6-1.fc31.x86_64            golang-bin-1.13.6-1.fc31.x86_64       
  golang-src-1.13.6-1.fc31.noarch        mercurial-4.9-2.fc31.x86_64           

Complete! 
First is need to install these packages with DNF tool:
[root@desk mythcat]# dnf install libX11-devel libXcursor-devel libXrandr-devel libXinerama-devel 
mesa-libGL-devel libXi-devel
Last metadata expiration check: 0:04:28 ago on Sun 16 Feb 2020 12:25:04 PM EET.
Package libX11-devel-1.6.9-2.fc31.x86_64 is already installed.
Package mesa-libGL-devel-19.2.8-1.fc31.x86_64 is already installed.
Package libXi-devel-1.7.10-2.fc31.x86_64 is already installed.
Dependencies resolved.
...

Installed:
  libXcursor-devel-1.1.15-6.fc31.x86_64           libXinerama-devel-1.1.4-4.fc31.x86_64           
  libXrandr-devel-1.5.2-2.fc31.x86_64             libXrender-devel-0.9.10-10.fc31.x86_64          

Complete! 
Let's install the fyne toolkit and the demo application:
[mythcat@desk ~]$ go get fyne.io/fyne
[mythcat@desk ~]$ go get fyne.io/fyne/cmd/fyne_demo/
I run the demo with this command and works very well:
[mythcat@desk ~]$ go run /home/mythcat/go/src/fyne.io/fyne/cmd/fyne_demo/main.go  

Thursday, October 4, 2018

Fedora 28 : Strife another golang game framework.

Today I tested this 2D game framework named Strife.
You can read more about this from the official website.
The development team tells us:
  "This a work in progress. It provides a very minimal toolset for rendering shapes, images, and text as well as capturing user input."
This game framework uses SDL2 libraries.
Strife is open source and available under the MIT license.
Let's start with installation into Fedora 28 distro.
[root@desk mythcat]# dnf install SDL2-devel.x86_64
[root@desk mythcat]# dnf install SDL2_ttf-devel.x86_64 
[root@desk mythcat]# dnf install SDL2_image-devel.x86_64 
[mythcat@desk ~]$ go get github.com/felixangell/strife
[mythcat@desk ~]$ cd $GOPATH/src/github.com/felixangell/strife
I test one example from installation folder with particles:
[mythcat@desk strife]$ cd example/particles
[mythcat@desk particles]$ go run particles.go
2018/10/04 22:13:18 initializing window  1280 x 720
2018/10/04 22:13:18 dpi, default_dpi =  0 72
2018/10/04 22:13:21 Loading font  /usr/share/fonts/DejaVuSans.ttf
2018/10/04 22:13:21 Failed to load font at '/usr/share/fonts/DejaVuSans.ttf'
 ' try setting a font yourself with strife.LoadFont
resize to  1280 x 960
resize to  1280 x 720
closing window!
This is result of the running example:

Monday, September 10, 2018

Fedora 28 : The Revel framework with golang.

The development team has a very effective text:
A high productivity, full-stack web framework for the Go language.
They used this words:
Revel provides routing, parameter parsing, validation, session/flash, templating, caching, job running, a testing framework, and even internationalization. I tested it yesterday and today I will show you how effective it is.
This framework is very easy to install and use it with Fedora 28.
I could say this is like django framework with the temptation style.
Let's start with a simple example into a folder created by me and named gocode:
[mythcat@desk ~]$ mkdir ~/gocode
[mythcat@desk ~]$ export GOPATH=~/gocode
[mythcat@desk ~]$ echo export GOPATH=$GOPATH >> ~/.bash_profile
[mythcat@desk ~]$ cd gocode/
[mythcat@desk gocode]$ go get github.com/revel/revel
[mythcat@desk gocode]$ ls
pkg  src
[mythcat@desk gocode]$ go get github.com/revel/cmd/revel
[mythcat@desk gocode]$ ls
bin  pkg  src
[mythcat@desk gocode]$ export PATH="$PATH:$GOPATH/bin"
[mythcat@desk gocode]$ revel helpDEBUG 19:24:09  revel  server.go:27: arguments by adding nil
~
~ revel! http://revel.github.io
~
usage: revel command [arguments]

The commands are:

    new         create a skeleton Revel application
    run         run a Revel application
    build       build a Revel application (e.g. for deployment)
    package     package a Revel application (e.g. for deployment)
    clean       clean a Revel application's temp files
    test        run all tests from the command-line
    version     displays the Revel Framework and Go version

Use "revel help [command]" for more information.
[mythcat@desk gocode]$ ls
bin  pkg  src
[mythcat@desk gocode]$ revel new myapp
DEBUG 19:38:50  revel  server.go:27: RegisterServerEngine: Registered engine 
~
~ revel! http://revel.github.io
~
Your application is ready:
   /home/mythcat/gocode/src/myapp

You can run it with:
   revel run myapp
[mythcat@desk gocode]$ revel run myapp
DEBUG 19:39:15  revel  server.go:27: RegisterServerEngine: Registered engine 
~
~ revel! http://revel.github.io
~
Trying to build with myapp (0x0,0x0)
DEBUG 19:39:15  revel module.go:152: Sorted keys  section=module keys=module.static 
...
Let's see the source code - in this case the default files: app.go and Index.html .
[mythcat@desk gocode]$ cd src/myapp/app/
[mythcat@desk app]$ ls
controllers  init.go  routes  tmp  views
[mythcat@desk app]$ cd controllers/
[mythcat@desk controllers]$ ls
app.go
[mythcat@desk controllers]$ cat app.go 
package controllers

import (
    "github.com/revel/revel"
)

type App struct {
    *revel.Controller
}

func (c App) Index() revel.Result {
    return c.Render()
}

[mythcat@desk App]$ cat Index.html 
The cat command will show the source code of Index.html file.
Let's add a golang variable named greeting to app.go and Index.html files:
[mythcat@desk controllers]$ cat app.go 
package controllers

import (
    "github.com/revel/revel"
)

type App struct {
    *revel.Controller
}

func (c App) Index() revel.Result {
    greeting := "Fedora and revel framework !"
    return c.Render(greeting)
} 
This variable greeting will will be add into file Index.html with tag p after It works!
This is result of two screenshots from start install and after I change with the variable greeting.

Tuesday, April 17, 2018

Fedora 28 : GoLang first example .

This tutorial is about GoLang IDE . About this IDE you can read more here - my intro article about this IDE.
I try to used with the platform-native GUI library for Go named andlabs/ui.
First, after you install the IDE you can check the settings on menu Settings: Using this tool with Fedora 28 is easy.
About the first install of andlabs/ui then this come with this error:
[mythcat@desk ~]$ go get github.com/andlabs/ui
# pkg-config --cflags gtk+-3.0
Package gtk+-3.0 was not found in the pkg-config search path.
Perhaps you should add the directory containing `gtk+-3.0.pc'
to the PKG_CONFIG_PATH environment variable
Package 'gtk+-3.0', required by 'virtual:world', not found
pkg-config: exit status 1
That tell us is need to install some packages from Fedora repo:
# dnf install gtk3-devel
I used this source code to test the andlabs/ui:
package main

import (
   "github.com/andlabs/ui"
)

func main() {
   err := ui.Main(func() {
      input := ui.NewEntry()
      button := ui.NewButton("Greet")
      greeting := ui.NewLabel("")
      box := ui.NewVerticalBox()
      box.Append(ui.NewLabel("Enter your name:"), false)
      box.Append(input, false)
      box.Append(button, false)
      box.Append(greeting, false)
      window := ui.NewWindow("Hello", 200, 100, false)
      window.SetMargined(true)
      window.SetChild(box)
      button.OnClicked(func(*ui.Button) {
         greeting.SetText("Hello, " + input.Text() + "!")
      })
      window.OnClosing(func(*ui.Window) bool {
         ui.Quit()
         return true
      })
      window.Show()
   })
   if err != nil {
      panic(err)
   }
}
First time was run well and after I restart the IDE I got this error:
# gui_test
/usr/lib/golang/pkg/tool/linux_amd64/link: running gcc failed: exit status 1
gcc: error: /home/mythcat/go/src/github.com/andlabs/ui/libui_linux_amd64.a: No such file or directory

The problem come from GoLang IDE settings and andlabs/ui.
I remove and install again the andlabs/ui and now working well.
The result of this source code come with this output:

Saturday, April 7, 2018

Fedora 28 : Golang by JetBrains .

This I.D.E. is a commercial and a free 30-day trial.
The price varies :
  • € 199.00 /1st year
  • € 159.00 /2nd year
  • € 119.00 /3rd yr onwards
JetBrains s.r.o. is a software development company whose tools are targeted towards software developers and project managers. 
... 
JetBrains, creator of the leading Java IDE - IntelliJ IDEA - is a cutting-edge software vendor specializing in the creation of intelligent development tools.

The development team come with this infos about the Golang I.D.E. :
GoLand is a new commercial IDE by JetBrains aimed at providing an ergonomic environment for Go development.
... 
The new IDE extends the IntelliJ platform with the coding assistance and tool integrations specific for the Go language.

You can download it from here.
The tree command show install files:
[mythcat@desk bin]$ tree
.
├── format.sh
├── fsnotifier
├── fsnotifier64
├── fsnotifier-arm
├── goland64.vmoptions
├── goland.png
├── goland.sh
├── goland.vmoptions
├── idea.properties
├── inspect.sh
├── libyjpagent-linux64.so
├── libyjpagent-linux.so
├── log.xml
├── printenv.py
└── restart.py

0 directories, 15 files

Some screenshots with this  linux tool:


Thursday, March 29, 2018

Fedora 27 : Tips and tricks with hugo framework .

he most important fact in learning development is knowing the information flow and how to drain it knowing the elements and stages of information processing of the content.
That's why I wrote this article succinctly to show you how simple basics of exemplification can correctly complete and help the user to modify and create content.
I will show you how to follow steps into hugo framework and website development with hugo.
You need to read the basic of hugo terms from documentation if you want to learn all about hugo or take some helpful information.
First use --verbose flag gives extra information that will be helpful when we debug or build your hogo website.
You need to know your hugo version because is the old versions has bad issues, check it with:
$ hugo version
The next command is to see and debug your work:
$ hugo --verbose 
How hugo framework works when you start for the first time with hugo development.
Now, the first place that Hugo will look for rules and files is in the layouts/ directory so it will always find the skin.
If you start with hugo then you can change the default.
This files name skins are the files responsible for the look and feel of your site.
You have two ways to create a skin:
  • create it in the layouts/ directory;
  • create it in a sub-directory of the themes/ directory.
A skin in layouts/ folder can’t be customized without updating the templates and static files that it is built from.
The skin created in themes/ folder , can be and that makes it easier for other people to use it.
In my example tutorial , I add this text to themes/test_themes_001/layouts/index.html.
The result of running hugo server command will rput this text on your browser at 127.0.0.1:13131, see command:
$ hugo server --buildDrafts
The hugo command come with many features like :
  • --buildDrafts this include content marked as draft ( see files with draft:true from .md file);
  • --ignoreCache this ignores the cache directory if you use it;
Using --verbose let you to see your errors.
For example a bad template or configuration can come with this error:
 ...Unable to locate layout for "taxonomyTerm" ...
This show you what term created by you is not on your hugo development area.
I make just few changes to show you how the hugo working. 
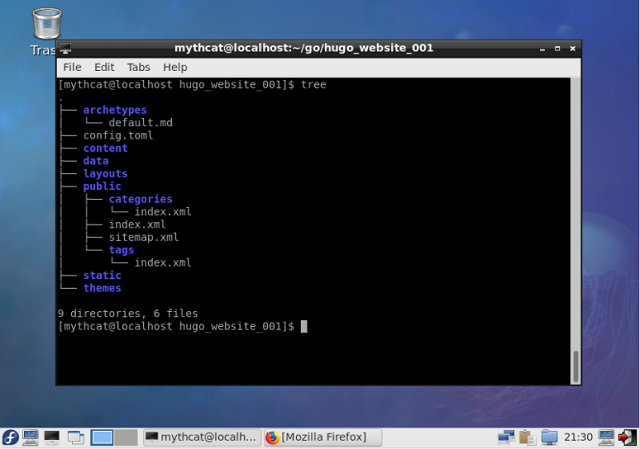
First I create the website named hugo_website_001. I used hugo command to add some pages first_test.md and new.md and a theme named test_theme_001, see:
$ hugo new site hugo_website_001
$ cd hugo_website_001
$ hugo new theme test_theme_001
$ hugo new first_test.md
$ hugo new new.md
$ tree 
.
├── archetypes
│   └── default.md
├── config.toml
├── content
│   ├── first_test.md
│   └── new.md
├── data
├── fpaste_hugo.txt
├── layouts
├── public
│   ├── categories
│   │   └── index.xml
│   ├── css
│   ├── index.html
│   ├── index.xml
│   ├── js
│   ├── sitemap.xml
│   └── tags
│       └── index.xml
├── static
└── themes
    └── test_theme_001
        ├── archetypes
        │   └── default.md
        ├── layouts
        │   ├── 404.html
        │   ├── _default
        │   │   ├── list.html
        │   │   └── single.html
        │   ├── index.html
        │   ├── index.html.save
        │   └── partials
        │       ├── footer.html
        │       └── header.html
        ├── LICENSE.md
        ├── static
        │   ├── css
        │   └── js
        └── theme.toml

19 directories, 20 files
$ 
Let's see files for settings - the toml file type. First is the config.toml file:
baseURL = "http://localhost.com"
languageCode = "en-us"
title = "My New Hugo Site"
theme = "test_theme_001"
contentdir ="content"
publishdir = "public"
The next file is the theme.toml .

# theme.toml template for a Hugo theme
# See https://github.com/gohugoio/hugoThemes#themetoml for an example

name = "Test_theme_001"
license = "MIT"
licenselink = "https://github.com/yourname/yourtheme/blob/master/LICENSE.md"
description = "first theme with hugo"
homepage = "http://example.com/"
tags = ["tags","categories"]
features = []
min_version = "0.31"

[author]
  name = "catafest"
  homepage = "free-tutorials.org"

# If porting an existing theme
[original]
  name = ""
  homepage = ""
  repo = ""
I will show a minimal example to understand the changes you need to make to run well with hugo framework and the my custom theme.
I show next how this changes into files is show by hugo on browser.
The basic file load is the index.html from themes/test_theme_001/layouts folder with tag h2 and text Some text !, see:

Some text !


{{ partial "header.html" . }}
This file load another file from partials folder and is named header.html with tag p and this text:
This is a custom header
Let's run the hugo server :
hugo server --theme=test_theme_001 --buildDrafts --ignoreCache --disableFastRender
This is result is this:
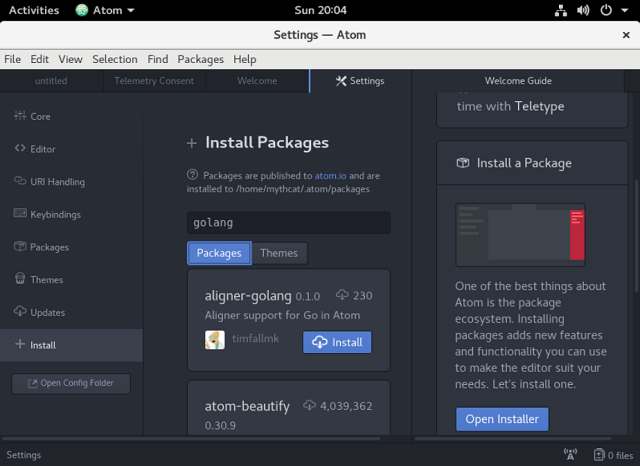
Saturday, March 24, 2018

Fedora 27 : Testing the hugo web framework .

The development team come with this shot info: The world’s fastest framework for building websites.
I don't know if is the fastest framework but I'm sure is the fastest process to install and make settings using Fedora distro.
First you need to know this framework works with golang programming language.
Let's start testing this framework with the first step install the golang on the system.
$ sudo dnf install golang
$ mkdir -p $HOME/go
$ echo 'export GOPATH=$HOME/go' >> $HOME/.bashrc
$ source $HOME/.bashrc
$ go env GOPATH
/home/mythcat/go
Now you will have a go folder into home folder. Let's install the hugo framework.
$ cd  go
$ hugo new site hugo_website_001
$ cd hugo_website_001
$ tree
The result will the this:

The next step is the testing the hugo server with some commands:
$ hugo version
$ hugo --verbose
$ hugo server --verbose
$ hugo server
This will start the server and you can be see it at 127.0.0.1:1313. This is a bind address of the default hugo server and you need to set like any website. The file named config.toml in your site directory contains the global configuration for your Hugo site. This settings will make our website to run well. We can use one theme from a list of themes using git tool, see themes gohugo.io. If you get a theme named theme_001 you need to add it into config.toml file like:
theme = theme_001
The next step is to create some content and we can start with draft files. The draft file named first_test.md can be created with this command into hugo_website_001 folder. This will create the file into content folder.
$ hugo new first_test.md
The draf files can be render just if you use D option:
$ hugo server -D
If you don't have install or set a theme then you cannot see the draft or any content web pages. You can create a new theme (example: test_theme_001) and deal with this theme.
hugo new theme test_theme_001
If you use a theme from hugo then hugo is fastest framework, but if you need to create a new theme then for me is as fast as any framework.

Sunday, December 17, 2017

Fedora 27 : Go and atom editor.

The Go programming language was created at Google in 2009 by Robert Griesemer, Rob Pike, and Ken Thompson.
The Go often referred to as golang is a programming language created at Google.
Using go with Fedora 27 is very simple , just install it with dnf tool.
#sudo dnf install golang
To use it with atom editor you need to install the atom editor , see this tutorial.
The next step is to set the atom editor with the packages for go programming language, like:
  • go-plus
  • go-get
  • go-imports
  • platformio-ide-terminal
The go command come with this help:
Go is a tool for managing Go source code.

Usage:

go command [arguments]
The commands are:

build       compile packages and dependencies
clean       remove object files
doc         show documentation for package or symbol
env         print Go environment information
bug         start a bug report
fix         run go tool fix on packages
fmt         run gofmt on package sources
generate    generate Go files by processing source
get         download and install packages and dependencies
install     compile and install packages and dependencies
list        list packages
run         compile and run Go program
test        test packages
tool        run specified go tool
version     print Go version
vet         run go tool vet on packages
Use "go help [command]" for more information about a command.

Additional help topics:

c           calling between Go and C
buildmode   description of build modes
filetype    file types
gopath      GOPATH environment variable
environment environment variables
importpath  import path syntax
packages    description of package lists
testflag    description of testing flags
testfunc    description of testing functions
The next step is to install your packages with go command and get:
go get -u golang.org/x/tools/
go get -u github.com/golang/lint/golint
Let's make a simple example:
package main
import "fmt"
func main() {
    fmt.Println("Hello world !")
}
Let's test it with go command. To run the program, create a file named hello-world.go put the code in and use go run:
$ go run hello-world.go
hello world
If you want to build our programs into binaries, we can do this using go build :
$ go build hello-world.go
$ ls
hello-world hello-world.go
Finally, we can then execute the built binary directly.
$ ./hello-world
hello world
After I searched the internet I found a website with many examples and I recommend it. You can find him here.

Friday, November 13, 2009

News: Go - a systems programming language

Do you hear about "Go"?
This is the logo :

...and this is the code:
package main
import "fmt"
func main() {
fmt.Printf("Hello, 世界\n")
}
One of the text comments I found is:
" this combines the style of Python, the syntax of vBasic, and the speed of C?"
For me is like "perl".
More from google developers :