The JupyterLab is the next-generation web-based user interface for Project Jupyter.
This can be installed using conda, pip or pipenv.
I used pip3 tool for instalation process on Fedora 30 distro:
[mythcat@desk ~]$ pip3 install jupyterlab --user
...
Successfully installed Send2Trash-1.5.0 attrs-19.1.0 backcall-0.1.0 bleach-3.1.0 defusedxml-0.6.0
ipykernel-5.1.2 ipython-7.8.0 ipython-genutils-0.2.0 jedi-0.15.1 json5-0.8.5 jsonschema-3.0.2
jupyter-client-5.3.1 jupyter-core-4.5.0 jupyterlab-1.1.1 jupyterlab-server-1.0.6 mistune-0.8.4
nbconvert-5.6.0 nbformat-4.4.0 notebook-6.0.1 pandocfilters-1.4.2 parso-0.5.1 pexpect-4.7.0
pickleshare-0.7.5 prometheus-client-0.7.1 prompt-toolkit-2.0.9 ptyprocess-0.6.0 pyrsistent-0.15.4
pyzmq-18.1.0 terminado-0.8.2 testpath-0.4.2 tornado-6.0.3 traitlets-4.3.2 wcwidth-0.1.7
webencodings-0.5.1
[mythcat@desk ~]$ jupyter notebook --version
6.0.1The tool can be start with this command:
[mythcat@desk ~]$ jupyter lab
[I 19:53:05.527 LabApp] Writing notebook server cookie secret to ...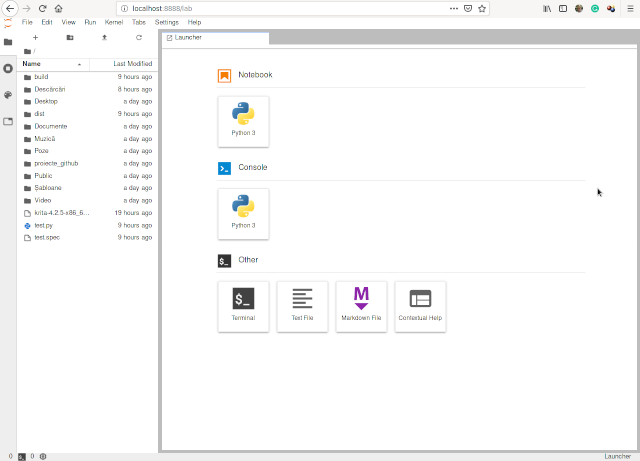
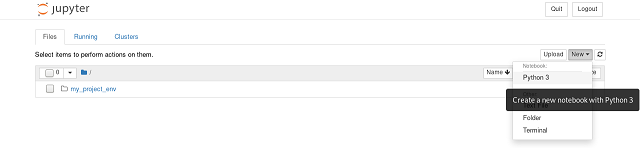
If you install a new python module then you need to close and reopen the tool.
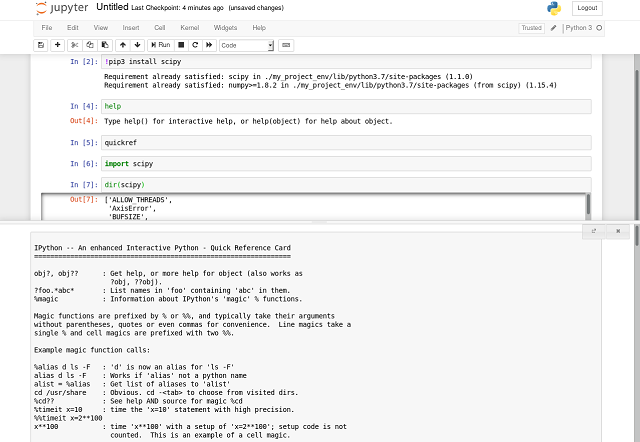
You can run every row command with Shift+Enter keys.
When you want to close it just close the browser tab and press Ctrl+C keys.
Shutdown this notebook server (y/[n])? y
[C 20:09:00.058 LabApp] Shutdown confirmed
[I 20:09:00.304 LabApp] Shutting down 0 kernels[root@desk mythcat]# dnf search jupyter | grep kernel
Last metadata expiration check: 0:57:13 ago on Mi 04 sep 2019 19:46:15 +0300.
polymake-jupyter.noarch : Jupyter kernel for polymake
gap-pkg-jupyterkernel.noarch : Jupyter kernel written in GAP
python3-jupyter-c-kernel.noarch : Minimalistic C kernel for Jupyter
gap-pkg-jupyterkernel-doc.noarch : Jupyter kernel for GAP documentation
python3-jupyter-kernel-test.noarch : Machinery for testing Jupyter kernels via
python3-jupyroot.x86_64 : ROOT Jupyter kernel
python3-metakernel.noarch : Metakernel for Jupyter
python3-ipykernel.noarch : IPython Kernel for Jupyter
python3-octave-kernel.noarch : A Jupyter kernel for Octave
python3-metakernel-bash.noarch : A Bash kernel for Jupyter/IPython
python3-metakernel-python.noarch : A Python kernel for Jupyter/IPython
python3-spyder-kernels.noarch : Jupyter kernels for the Spyder console
python3-metakernel-echo.noarch : A simple echo kernel for Jupyter/IPython
R-IRkernel.noarch : Native R Kernel for the 'Jupyter Notebook'[mythcat@desk ~]$ jupyter nbconvert --generate-config
Writing default config to: /home/mythcat/.jupyter/jupyter_nbconvert_config.py
[mythcat@desk ~]$ cat /home/mythcat/.jupyter/jupyter_nbconvert_config.py
# Configuration file for jupyter-nbconvert.
#------------------------------------------------------------------------------
# Application(SingletonConfigurable) configuration
#------------------------------------------------------------------------------
## This is an application.## Accept connections from all IPs
c.ServePostProcessor.ip = '*'
## Do not open the browser automatically
c.ServePostProcessor.open_in_browser = False[mythcat@desk ~]$ jupyter nbconvert "Test001.ipynb" --to slides --post serve[NbConvertApp]
Converting notebook Test001.ipynb to slides
[NbConvertApp] Writing 278626 bytes to Test001.slides.html
[NbConvertApp] Redirecting reveal.js requests to https://cdnjs.cloudflare.com/ajax/libs/reveal.js/3.5.0
Serving your slides at http://*:8000/Test001.slides.html
Use Control-C to stop this server