Pages

Showing posts with label tutorials. Show all posts

Saturday, December 14, 2024

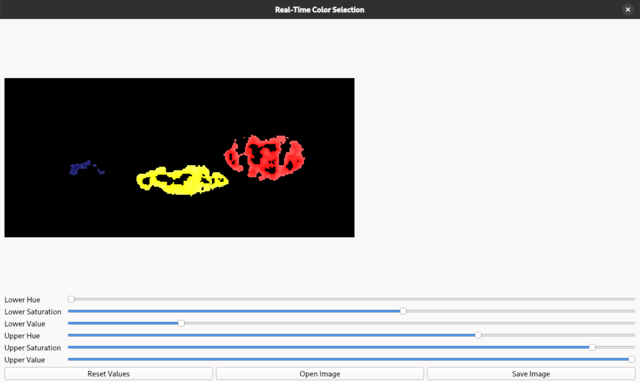
Fedora 41 : OpenCV example with PyQt6.

Today I tested another source code with opencv, numpy, PyQt6 python packages.
I install opencv python package with dnf5 tool:
root@localhost:/home/mythcat# dnf5 install  python3-opencv.x86_64
The source code let you to open, change a image and save using sliders and a reset option.
This is the source code:
import sys
import cv2
import numpy as np
from PyQt6.QtWidgets import QApplication, QMainWindow, QWidget, QVBoxLayout, QLabel, QSlider, QFileDialog, QPushButton, QHBoxLayout
from PyQt6.QtGui import QImage, QPixmap
from PyQt6.QtCore import Qt, pyqtSlot

class MainWindow(QMainWindow):
    def __init__(self):
        super().__init__()
        self.setWindowTitle("Real-Time Color Selection")
        self.setGeometry(100, 100, 1200, 800)

        # Create central widget and main layout
        central_widget = QWidget()
        self.setCentralWidget(central_widget)
        main_layout = QVBoxLayout(central_widget)

        # Create image label
        self.image_label = QLabel()
        main_layout.addWidget(self.image_label)

        # Initialize sliders
        self.lower_h = QSlider(Qt.Orientation.Horizontal)
        self.lower_s = QSlider(Qt.Orientation.Horizontal)
        self.lower_v = QSlider(Qt.Orientation.Horizontal)
        self.upper_h = QSlider(Qt.Orientation.Horizontal)
        self.upper_s = QSlider(Qt.Orientation.Horizontal)
        self.upper_v = QSlider(Qt.Orientation.Horizontal)

        # Set slider ranges
        for slider in [self.lower_h, self.upper_h]:
            slider.setRange(0, 179)
        for slider in [self.lower_s, self.lower_v, self.upper_s, self.upper_v]:
            slider.setRange(0, 255)

        # Set initial slider values
        self.lower_h.setValue(50)
        self.lower_s.setValue(100)
        self.lower_v.setValue(50)
        self.upper_h.setValue(130)
        self.upper_s.setValue(255)
        self.upper_v.setValue(255)

        # Connect sliders to update function
        self.lower_h.valueChanged.connect(self.update_hsv_range)
        self.lower_s.valueChanged.connect(self.update_hsv_range)
        self.lower_v.valueChanged.connect(self.update_hsv_range)
        self.upper_h.valueChanged.connect(self.update_hsv_range)
        self.upper_s.valueChanged.connect(self.update_hsv_range)
        self.upper_v.valueChanged.connect(self.update_hsv_range)

        # Create slider layouts with labels
        sliders_layout = QVBoxLayout()
        
        # Add slider pairs with labels
        slider_pairs = [
            ("Lower Hue", self.lower_h),
            ("Lower Saturation", self.lower_s),
            ("Lower Value", self.lower_v),
            ("Upper Hue", self.upper_h),
            ("Upper Saturation", self.upper_s),
            ("Upper Value", self.upper_v)
        ]

        for label_text, slider in slider_pairs:
            row_layout = QHBoxLayout()
            label = QLabel(label_text)
            label.setMinimumWidth(120)
            row_layout.addWidget(label)
            row_layout.addWidget(slider)
            sliders_layout.addLayout(row_layout)

        main_layout.addLayout(sliders_layout)

        # Add buttons
        button_layout = QHBoxLayout()
        
        self.reset_button = QPushButton("Reset Values")
        self.reset_button.clicked.connect(self.reset_values)
        button_layout.addWidget(self.reset_button)

        self.open_image_button = QPushButton("Open Image")
        self.open_image_button.clicked.connect(self.open_image)
        button_layout.addWidget(self.open_image_button)

        self.save_button = QPushButton("Save Image")
        self.save_button.clicked.connect(self.save_image)
        button_layout.addWidget(self.save_button)
        main_layout.addLayout(button_layout)

        # Process initial image
        self.process_image()

    def process_image(self):
        image_bgr = cv2.imread("image.png")
        if image_bgr is None:
            image_bgr = cv2.imread("default_image.png")
        
        self.image_bgr = image_bgr
        self.image_hsv = cv2.cvtColor(image_bgr, cv2.COLOR_BGR2HSV)

        # Create initial mask using current slider values
        lower_values = np.array([self.lower_h.value(), self.lower_s.value(), self.lower_v.value()])
        upper_values = np.array([self.upper_h.value(), self.upper_s.value(), self.upper_v.value()])
        
        mask_test = cv2.inRange(self.image_hsv, lower_values, upper_values)
        image_bgr_masked = cv2.bitwise_and(image_bgr, image_bgr, mask=mask_test)
        self.image_rgb = cv2.cvtColor(image_bgr_masked, cv2.COLOR_BGR2RGB)
        self.update_image()

    def update_image(self):
        height, width, channel = self.image_rgb.shape
        bytes_per_line = width * channel
        q_image = QImage(self.image_rgb.data, width, height, bytes_per_line, QImage.Format.Format_RGB888)
        pixmap = QPixmap.fromImage(q_image)
        self.image_label.setPixmap(pixmap.scaled(700, 500, Qt.AspectRatioMode.KeepAspectRatio))

    def update_hsv_range(self):
        lower_values = np.array([self.lower_h.value(), self.lower_s.value(), self.lower_v.value()])
        upper_values = np.array([self.upper_h.value(), self.upper_s.value(), self.upper_v.value()])
        mask_test = cv2.inRange(self.image_hsv, lower_values, upper_values)
        image_bgr_masked = cv2.bitwise_and(self.image_bgr, self.image_bgr, mask=mask_test)
        self.image_rgb = cv2.cvtColor(image_bgr_masked, cv2.COLOR_BGR2RGB)
        self.update_image()

    def reset_values(self):
        self.lower_h.setValue(50)
        self.lower_s.setValue(100)
        self.lower_v.setValue(50)
        self.upper_h.setValue(130)
        self.upper_s.setValue(255)
        self.upper_v.setValue(255)

    def open_image(self):
        filename, _ = QFileDialog.getOpenFileName(self, "Select Image File", "", "Image Files (*.png *.jpg *.jpeg)")
        if filename:
            self.image_bgr = cv2.imread(filename)
            if self.image_bgr is not None:
                self.image_hsv = cv2.cvtColor(self.image_bgr, cv2.COLOR_BGR2HSV)
                self.update_hsv_range()  # This will apply current filter and update display

    def save_image(self):
        filename, _ = QFileDialog.getSaveFileName(self, "Save Image", "", "PNG Files (*.png);;JPEG Files (*.jpg)")
        if filename:
            # Make sure filename has an extension
            if not filename.endswith(('.png', '.jpg', '.jpeg')):
                filename += '.png'
            # Convert and save
            output_image = cv2.cvtColor(self.image_rgb, cv2.COLOR_RGB2BGR)
            cv2.imwrite(filename, output_image)

if __name__ == "__main__":
    app = QApplication(sys.argv)
    window = MainWindow()
    window.show()
    sys.exit(app.exec())

Monday, November 25, 2024

Fedora 41 : assembly fasm with cat command and qemu test.

I tested the basic direct binary concatenation where the second file is appended to the end of the first file, preserving all bytes exactly as they are without any linking metadata or relocations with the cat command.
Let's see how can do this.
You need to create two files: kernel.fasm and kernel2.fasm.
First will like this:
org 7C00h

; First stage bootloader
start:
    mov [bootdrive], dl
    mov ax, 0x2000  ; Load kernel at 0x2000:0
    mov es, ax
    xor bx, bx      ; ES:BX = buffer
    
    mov ah, 02h     ; Read sectors
    mov al, 6       ; Number of sectors to read
    mov ch, 0       ; Cylinder 0
    mov cl, 2       ; Start from sector 2
    mov dh, 0       ; Head 0
    mov dl, [bootdrive]
    int 13h
    
    jmp 0x2000:0    ; Jump to second stage

bootdrive db 0
times 510-($-$$) db 0
dw 0xAA55
The second one named kernel2.fasm will come with new features:
org 0

COLS equ 80
ROWS equ 25
VIDEO_MEM equ 0xB800

; Box drawing characters
BOX_DR    equ 201  ; ╔
BOX_HL    equ 205  ; ═
BOX_DL    equ 187  ; ╗
BOX_VL    equ 186  ; ║
BOX_UR    equ 200  ; ╚
BOX_UL    equ 188  ; ╝
BOX_BLOCK equ 219  ; █
...
Use fasm and cat commands to create the bin files and the result file for qemu:
mythcat@localhost:~/fasm$ ./fasm.x64 kernel.fasm kernel.bin
flat assembler  version 1.73.32  (16384 kilobytes memory, x64)
2 passes, 512 bytes.
mythcat@localhost:~/fasm$ ./fasm.x64 kernel2.fasm kernel2.bin
flat assembler  version 1.73.32  (16384 kilobytes memory, x64)
2 passes, 132 bytes.
mythcat@localhost:~/fasm$ cat kernel.bin kernel2.bin > os.img
The last step is to run qemu-system-i386 to test the result
mythcat@localhost:~/fasm$ qemu-system-i386 -fda os.img
The result is this:

Sunday, November 24, 2024

Fedora 41 : Error gio default application for image.

I run today an old python script in my Fedora 41 to create an image and the result after running was:
mythcat@localhost:~$ python test_001.py 
gio: file:///tmp/tmpwy1k4wyo.PNG: Failed to find default application for content type ‘image/png’
This can be fixed with an default application for images like feh:
$ sudo dnf5 install feh

Fedora 41 : remove package lead to unexpected results.

Today I saw the mutter package from Fedora distro come with a new update.
I don't use this package, ... is a mess in my oppinion.
But I found this output when I tried to remove
root@localhost:/home/mythcat# dnf5 remove mutter 
Package                          Arch   Version                 Reposit      Size
Removing:
 mutter                          x86_64 47.1-3.fc41             updates  12.5 MiB
Removing dependent packages:
 gdm                             x86_64 1:47.0-8.fc41           updates   5.3 MiB
 gnome-shell                     x86_64 47.1-1.fc41             updates  13.8 MiB
Removing unused dependencies:
 accountsservice                 x86_64 23.13.9-5.fc41          fedora  379.5 KiB
 accountsservice-libs            x86_64 23.13.9-5.fc41          fedora  212.3 KiB
 bluez-obexd                     x86_64 5.79-1.fc41             updates 345.1 KiB
 bolt                            x86_64 0.9.8-3.fc41            fedora  503.3 KiB
 boost-thread                    x86_64 1.83.0-8.fc41           fedora  136.8 KiB
 color-filesystem                noarch 1-34.fc41               fedora  151.0   B
 colord                          x86_64 1.4.7-5.fc41            fedora    1.7 MiB
 colord-gtk4                     x86_64 0.3.1-2.fc41            fedora   35.6 KiB
 composefs-libs                  x86_64 1.0.6-1.fc41            fedora  166.3 KiB
 cups-pk-helper                  x86_64 0.2.7-8.fc41            fedora  379.0 KiB
 dbus-daemon                     x86_64 1:1.14.10-4.fc41        fedora  553.2 KiB
 evolution-data-server           x86_64 3.54.1-1.fc41           updates   8.8 MiB
 evolution-data-server-langpacks noarch 3.54.1-1.fc41           updates   8.8 MiB
 flatpak-libs                    x86_64 1.15.10-1.fc41          fedora    1.0 MiB
 ...
 
Is this ok [y/N]: N
 ... 
If I used this command the gdm and gnome-shell is gone:
root@localhost:/home/mythcat# dnf5 remove --noautoremove mutter 
Package                        Arch   Version                   Repository        Size
Removing:
 mutter                        x86_64 47.1-3.fc41               updates       12.5 MiB
Removing dependent packages:
 gdm                           x86_64 1:47.0-8.fc41             updates        5.3 MiB
 gnome-session-wayland-session x86_64 47.0.1-1.fc41             fedora        15.9 KiB
 gnome-shell                   x86_64 47.1-1.fc41               updates       13.8 MiB

Transaction Summary:
 Removing:           4 packages
 
Is this ok [y/N]: N
...
I tried with the --noautoremove, and --exclude args and not result:
root@localhost:/home/mythcat# dnf5 remove --noautoremove --exclude=gnome-shell,gdm mutter
Failed to resolve the transaction:
Problem: installed package gnome-shell-47.1-1.fc41.x86_64 requires libmutter-15.so.0()(64bit), but none of the providers can be installed
  - installed package gnome-shell-47.1-1.fc41.x86_64 requires libmutter-clutter-15.so.0()(64bit), but none of the providers can be installed
  - installed package gnome-shell-47.1-1.fc41.x86_64 requires libmutter-cogl-15.so.0()(64bit), but none of the providers can be installed
  - installed package gnome-shell-47.1-1.fc41.x86_64 requires libmutter-mtk-15.so.0()(64bit), but none of the providers can be installed
  - installed package gnome-shell-47.1-1.fc41.x86_64 requires mutter(x86-64) >= 47.0, but none of the providers can be installed
  - conflicting requests
  - problem with installed package
The solution is old rpm tool:
root@localhost:/home/mythcat# rpm -e --nodeps mutter 
root@localhost:/home/mythcat# dnf5 remove mutter
No packages to remove for argument: mutter

Nothing to do.

Sunday, October 27, 2024

Fedora 42 : Can be better? part 020.

I wrote in some posts about this blog about the possibility of improving the distribution of Linux Fedora.
Today I discovered that choosing GNOME is a better option with lighting modes and options for the Nemo file manager actions.
I would have wanted to have a better network system similar to portmanager with S.P.N. for fedora users and team on web.
SPN (Secure Peer Name) is a technology related to secure communication protocols, particularly in the context of peer-to-peer networks and distributed systems.
I want to have more tools and applications on tty with GUI, like ncurses... I created an radio online application with ncurses and you can find it on my pagure.
The main goal of these type of graphic user interface is simplicity, no need hardware resources - this HP Compaq 6710b has only 4Gb RAM, and cand be used with Single Board Computer.
I think Fedora don't have a Fedora Spin for Single Board Computer hardware.
Let's start with python 3 action on nemo file manager.
Go to the action folder and create an action file named: python3.nemo_action.
[root@fedora mythcat]# cd /usr/share/nemo/actions
[root@fedora actions]# nano python3.nemo_action
Add this source code :
[Nemo Action]
Name=Execute Python Script
Icon-Name=python
Exec=env /usr/bin/python3 %F
Selection=S
Name[tr]=Python script         
Extensions=py;
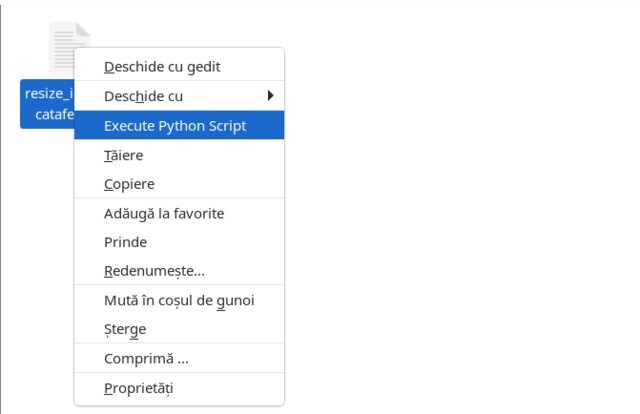
Reopen the Nemo file manager and you see an an Execute Python Script, only on the python script on right click menu.
Let's see some screenshots:

Saturday, October 26, 2024

Fedora 42 : ... testing Advanced Intrusion Detection Environment (AIDE).

Advanced Intrusion Detection Environment (AIDE) is a utility that creates a database of files on the system, and then uses that database to ensure file integrity and detect system intrusions.. See more on the official fedora documentation webpage.
NOTE : The documentation and translations on the official page are in progress due to ongoing development and resource management ...
I used the DNF tool to install:
[mythcat@fedora ~]$ sudo dnf install aide
... aide      x86_64      0.18.6-5.fc41        rawhide      
Make sure the AIDE database file exists and is accessible:
[mythcat@fedora ~]$ sudo ls -l /var/lib/aide/aide.db.gz
Ensure that the user running AIDE has the necessary permissions:
[mythcat@fedora ~]$ sudo ls -l /var/lib/aide/
Check the AIDE configuration file:
[mythcat@fedora ~]$ sudo cat /etc/aide.conf | grep DBDIR
Check if the AIDE service file exists:
[mythcat@fedora ~]$ sudo ls /usr/lib/systemd/system/ | grep aide
If the service exists then check the status:
[mythcat@fedora ~]$ sudo systemctl status aide
Unit aide.service could not be found.
If the service not exist then take some time to run first time ...
[mythcat@fedora ~]$ sudo /sbin/aide --init
...
End timestamp: 2024-10-26 14:10:00 +0300 (run time: 98m 41s)
You can check each time you want ...
[mythcat@fedora ~]$ sudo /sbin/aide --check
If you want and your Fedora linux need to use this tool, then you can use it like service:
sudo nano /usr/lib/systemd/system/aide.service
Fill with the basic service source code like any unit service :
[Unit]
   Description=Advanced Intrusion Detection Environment
   After=network.target

   [Service]
   Type=simple
   ExecStart=/sbin/aide --init
   ExecStop=/sbin/aide --check
   Restart=on-failure

   [Install]
   WantedBy=multi-user.target
This is a simple tutorial about how to start with AIDE tool ...

Sunday, October 13, 2024

Fedora 42 : The cvxpy python module ... part 001.

We are building a CVXPY community on Discord. Join the conversation! CVXPY is an open source Python-embedded modeling language for convex optimization problems. It lets you express your problem in a natural way that follows the math, rather than in the restrictive standard form required by solvers.
Today I install the cvxpy python module ...
You can see on the official website - www.cvxpy.org .
NOTE: I don't understand why the blogger don't have a a code tag , I used a div - pre - code into txt file to wrote my posts ...
[mythcat@fedora ~]$ nano tutoriale.txt 
Let's see ...
[mythcat@fedora home]# dnf5 upgrade
[mythcat@fedora home]# dnf5 install openblas-devel
[mythcat@fedora home]# dnf5 install blas-devel
...
$ ldconfig -p | grep openblas
$ ldconfig -p | grep blas
...
[mythcat@fedora home]$ pip install cvxpy
...
Successfully built cvxpy ecos scs qdldl
Installing collected packages: scipy, scs, qdldl, ecos, clarabel, osqp, cvxpy
Successfully installed clarabel-0.9.0 cvxpy-1.5.2 ecos-2.0.14 osqp-0.6.7.post3 qdldl-0.1.7.post4 scipy-1.14.1 scs-3.2.7

Thursday, October 10, 2024

Fedora 42 : First test with red language - part 001.

Red is a next-generation programming language strongly inspired by Rebol, but with a broader field of usage thanks to its native-code compiler, from system programming to high-level scripting and cross-platform reactive GUI, while providing modern support for concurrency, all in a zero-install, zero-config, single ~1MB file!
I download and change to be executable:
[mythcat@fedora ~]$ cd red-lang/
[mythcat@fedora red-lang]$ ls
red-03oct24-920dd0452  red-toolchain-03oct24-920dd0452  red-view-03oct24-920dd0452
[mythcat@fedora red-lang]$ ls -l
total 4444
-rw-r--r--. 1 mythcat mythcat 1347348 Oct  4 23:56 red-03oct24-920dd0452
-rw-r--r--. 1 mythcat mythcat 1611781 Oct  4 23:55 red-toolchain-03oct24-920dd0452
-rw-r--r--. 1 mythcat mythcat 1589092 Oct  4 23:55 red-view-03oct24-920dd0452
[mythcat@fedora red-lang]$ chmod 760 red*
[mythcat@fedora red-lang]$ ls -l
total 4444
-rwxrw----. 1 mythcat mythcat 1347348 Oct  4 23:56 red-03oct24-920dd0452
-rwxrw----. 1 mythcat mythcat 1611781 Oct  4 23:55 red-toolchain-03oct24-920dd0452
-rwxrw----. 1 mythcat mythcat 1589092 Oct  4 23:55 red-view-03oct24-920dd0452
I check and install these supporting libraries:
sudo yum install glibc.i686
sudo yum install libcurl.i686
sudo yum install gtk3.i686
I start with the basic intro example from the official website.
Then I need to check the missing files with the DNF tool and install Fedora packages for each error on runtime with executable result
dnf provides \*/libgtk-3.so.0
The result is this:

Monday, October 7, 2024

Fedora 42 : Fedora game project with pygame and agentpy - part 004.

... working on hacking game code , you can test two version of the unfinished game with agentpy at my pagure Fedora account.
* Hack the code based on minimal information versus total information. The code has 5 distinct letters. - click on the letters on the keypad - the number of guessed letters is displayed in the form: centered - guessed letters on positions and moved guessed letters but on other positions NOTE: the source code is under development, I need to enter a scroll to be able to enter more codes with letters

Saturday, September 28, 2024

Fedora 42 : testing programming for ARM - part 001.

Today I tested the creation of a program that works on ARM processors and tested with QEMU emulator in Fedora 42.
I install with dnf5 these fedora packages:
[root@fedora mythcat]# dnf5 clean all
[root@fedora mythcat]# dnf5 install qemu-system-arm
[root@fedora mythcat]# dnf5 install arm-none-eabi-gcc gcc-arm-linux-gnu gcc-c++-arm-linux-gnu
[root@fedora mythcat]# dnf5 install arm-none-eabi-newlib.noarch 
...
[root@fedora mythcat]# dnf5 install binutils-devel
I create a new folder into may pagure account to test this issue with QEMU:
[mythcat@fedora mythcat]$ mkdir ARMProjects
[mythcat@fedora mythcat]$ cd ARMProjects/
[mythcat@fedora ARMProjects]$ qemu-system-arm --version
QEMU emulator version 9.1.0 (qemu-9.1.0-2.fc42)
I create a default assembly file for ARM named hello.s:
[mythcat@fedora ARMProjects]$ cat hello.s 
.global _start

_start:
    mov r0, #1     
    mov r7, #4     
    str r0, [r7]
    bx lr
Let's see how this means:
  • global _start: This declares the _start label as global, making it accessible from outside the file.
  • _start:: This marks the beginning of the program.
  • mov r0, #1: Moves the immediate value 1 into register R0.
  • mov r7, #4: Moves the immediate value 4 into register R7. This represents the system call number for write().
  • str r0, [r7]: Stores the contents of R0 (which contains 1) into the memory address pointed to by R7.
  • bx lr: Branches to the address in Link Register (LR). In this case, it loops indefinitely because there's no return instruction.
The compile of the file:
[mythcat@fedora ARMProjects]$ arm-none-eabi-gcc -nostartfiles -lc hello.s -o hello.o
[mythcat@fedora ARMProjects]$ ls
hello.o  hello.s
Let's see the hello.o file:
[mythcat@fedora ARMProjects]$ nm hello.o
00008000 t $a
00009010 T __bss_end__
00009010 T _bss_end__
00009010 T __bss_start
00009010 T __bss_start__
00009010 T __data_start
00009010 T _edata
00009010 T __end__
00009010 T _end
00080000 B _stack
00008000 T _start
[mythcat@fedora ARMProjects]$ objdump -f hello.o

hello.o:     file format elf32-little
architecture: UNKNOWN!, flags 0x00000112:
EXEC_P, HAS_SYMS, D_PAGED
start address 0x00008000

Fedora 42 : ima: Error Communicating to TPM chip ... cannot be fixed.

TPM stands for Trusted Platform Module. It's a hardware security chip designed to provide cryptographic capabilities and perform platform authentication.
I found this error and I tried to fix on my laptop HP 6710b:
[mythcat@fedora ~]$ sudo dmesg | grep Error
[    1.274790] tpm tpm0: [Hardware Error]: Adjusting reported timeouts: A 750->750000us B 2000->2000000us C 750->750000us D 750->750000us
[    2.240276] ima: Error Communicating to TPM chip
[    2.243913] ima: Error Communicating to TPM chip
[    2.246923] ima: Error Communicating to TPM chip
[    2.249919] ima: Error Communicating to TPM chip
[    2.253088] ima: Error Communicating to TPM chip
[    2.255923] ima: Error Communicating to TPM chip
[    2.258921] ima: Error Communicating to TPM chip
[    2.261938] ima: Error Communicating to TPM chip
[    2.415255] RAS: Correctable Errors collector initia
I update and nistall with the dnf5 tool
[root@fedora mythcat]# dnf5 upgrade 
...
[root@fedora mythcat]# dnf install tpm-tools
...
I reboot the Fedora and I try to test it:
[mythcat@fedora ~]$ ls /dev/tpm*
/dev/tpm0
[mythcat@fedora ~]$ lsmod | grep tpm
tpm_infineon           20480  0
To see all commands, use:
[mythcat@fedora ~]$ tpm_
tpm_changeownerauth  tpm_nvwrite          tpm_setclearable
tpm_clear            tpm_resetdalock      tpm_setenable
tpm_createek         tpm_restrictpubek    tpm_setoperatorauth
tpm_getpubek         tpm_restrictsrk      tpm_setownable
tpm_nvdefine         tpm_revokeek         tpm_setpresence
tpm_nvinfo           tpm_sealdata         tpm_takeownership
tpm_nvread           tpm_selftest         tpm_unsealdata
tpm_nvrelease        tpm_setactive        tpm_version
I install tcsd
[root@fedora mythcat]#  dnf install tcsd
...
[mythcat@fedora ~]$ sudo usermod -a -G tss $USER
[root@fedora mythcat]# systemctl daemon-reload
[root@fedora mythcat]# systemctl start tcsd
[root@fedora mythcat]#  systemctl status tcsd
I check the tpm version vith:
[mythcat@fedora ~]$ tpm_version
  TPM 1.2 Version Info:
  Chip Version:        1.2.1.2
  Spec Level:          2
  Errata Revision:     0
  TPM Vendor ID:       IFX
  TPM Version:         01010000
  Manufacturer Info:   49465800
[mythcat@fedora ~]$ sudo dnf5 search tpm2-tools
Updating and loading repositories:
Repositories loaded.
Matched fields: name (exact)
 tpm2-tools.x86_64: A bunch of TPM testing toolS build upon tpm2-tss
[mythcat@fedora ~]$ sudo dnf5 install tpm2-tools
...
Package "tpm2-tools-5.7-2.fc41.x86_64" is already installed.
The last error :
[mythcat@fedora ~]$ sudo tpm2_startup
ERROR:tcti:src/tss2-tcti/tcti-device.c:455:Tss2_Tcti_Device_Init() Failed to open specified TCTI device file /dev/tpmrm0: No such file or directory 
ERROR:tcti:src/tss2-tcti/tctildr-dl.c:149:tcti_from_file() Could not initialize TCTI file: libtss2-tcti-device.so.0 
ERROR:tcti:src/tss2-tcti/tcti-device.c:455:Tss2_Tcti_Device_Init() Failed to open specified TCTI device file /dev/tpm0: Device or resource busy 
ERROR:tcti:src/tss2-tcti/tctildr-dl.c:149:tcti_from_file() Could not initialize TCTI file: libtss2-tcti-device.so.0 
ERROR:tcti:src/tss2-tcti/tcti-device.c:455:Tss2_Tcti_Device_Init() Failed to open specified TCTI device file /dev/tcm0: No such file or directory 
ERROR:tcti:src/tss2-tcti/tctildr-dl.c:149:tcti_from_file() Could not initialize TCTI file: libtss2-tcti-device.so.0 
WARNING:tcti:src/util-io/io.c:262:socket_connect() Failed to connect to host 127.0.0.1, port 2321: errno 111: Connection refused 
ERROR:tcti:src/tss2-tcti/tcti-swtpm.c:617:Tss2_Tcti_Swtpm_Init() Cannot connect to swtpm TPM socket 
ERROR:tcti:src/tss2-tcti/tctildr-dl.c:149:tcti_from_file() Could not initialize TCTI file: libtss2-tcti-swtpm.so.0 
WARNING:tcti:src/util-io/io.c:262:socket_connect() Failed to connect to host 127.0.0.1, port 2321: errno 111: Connection refused 
ERROR:tcti:src/tss2-tcti/tctildr-dl.c:149:tcti_from_file() Could not initialize TCTI file: libtss2-tcti-mssim.so.0 
ERROR:tcti:src/tss2-tcti/tctildr-dl.c:263:tctildr_get_default() No standard TCTI could be loaded 
ERROR:tcti:src/tss2-tcti/tctildr.c:477:tctildr_init_context_data() Failed to instantiate TCTI 
ERROR: Could not load tcti, got: "(null)"

Fedora 42 : Fedora game project with pygame and agentpy - part 003.

I have upgraded the source code with the following changes:
  • added agent with logic using the python agentpy module;
  • I increased the grid to 16 x 16;
  • I kept the win condition at 8 pieces aligned in any direction;
  • I added conditions for displaying the equality message;
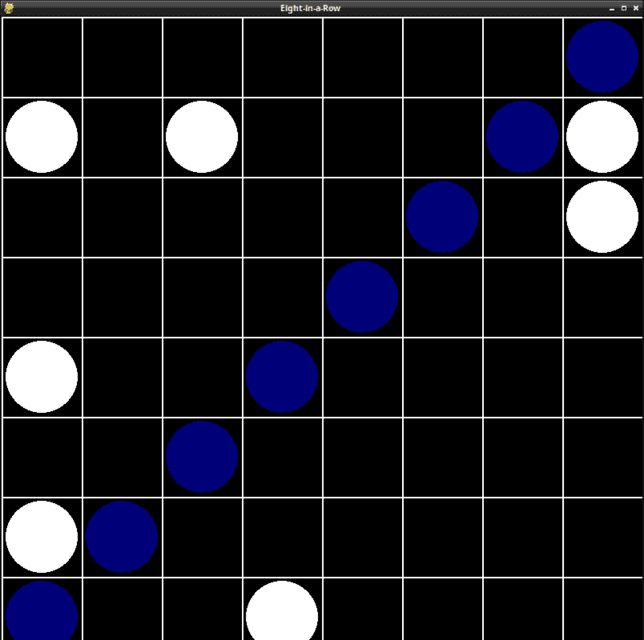
The game is hard to win, you can try on my pagure account.

Wednesday, September 25, 2024

Fedora 42 : Fedora game project with pygame and agentpy - part 002.

... and update from 8 in 8 with SVG file type.
The source code I used or you can find it on the pagure project:
import pygame
from pygame.math import Vector2
import random
import os 
username = os.getlogin()
# Initialize Pygame
pygame.init()
# Set up the display
width, height = 800, 800
screen = pygame.display.set_mode((width, height))
pygame.display.set_caption("Eight-in-a-Row")
# Font setup
font = pygame.font.Font(None, 74)
# Colors
WHITE = (255, 255, 255)
BLACK = (0, 0, 0)
BLUE = (0, 0, 120)
# Game board dimensions
BOARD_WIDTH = 8
BOARD_HEIGHT = 8

class Player:
    def __init__(self, color, is_computer=False):
        self.color = color
        self.pieces = set()
        self.is_computer = is_computer
        self.svg_image = self.load_svg_image()

    def add_piece(self, x, y):
        self.pieces.add((x, y))

    # def draw_pieces(self):
    #     for x, y in self.pieces:
    #         pygame.draw.circle(screen, self.color, 
    #                            (x * width // BOARD_WIDTH + width // (2 * BOARD_WIDTH), 
    #                             y * height // BOARD_HEIGHT + height // (2 * BOARD_HEIGHT)), 
    #                            min(width, height) // (2 * BOARD_WIDTH) - 5)
    
    def load_svg_image(self):
        if self.color == BLUE:
            svg_path = "penguin-svgrepo-com.svg"
        elif self.color == WHITE:
            svg_path = "cube-svgrepo-com.svg"
        else:
            svg_path = "cube-svgrepo-com.svg"
        return pygame.image.load(svg_path)

    def draw_pieces(self):
        piece_size = min(width, height) // (BOARD_WIDTH) - 10
        for x, y in self.pieces:
            pos = Vector2(x * width // BOARD_WIDTH + width // (2 * BOARD_WIDTH),
                          y * height // BOARD_HEIGHT + height // (2 * BOARD_HEIGHT))
            scaled_image = pygame.transform.scale(self.svg_image, (piece_size, piece_size))
            image_rect = scaled_image.get_rect(center=pos)
            screen.blit(scaled_image, image_rect)

    def make_move(self, board):
        if self.is_computer:
            empty_squares = [(x, y) for x in range(BOARD_WIDTH) for y in range(BOARD_HEIGHT) 
                             if (x, y) not in board[0] and (x, y) not in board[1]]
            if empty_squares:
                return random.choice(empty_squares)
        return None

def check_winner(player):
    directions = [(0, 1), (1, 0), (1, 1), (1, -1)]
    for x, y in player.pieces:
        for dx, dy in directions:
            if all((x + i*dx, y + i*dy) in player.pieces for i in range(8)):
                return True
    return False
    
def display_winner(winner):
    text = font.render(f"Player {winner} wins!", True, [145,190,190])
    text_rect = text.get_rect(center=(width // 2, height // 2))
    screen.blit(text, text_rect)
    pygame.display.flip()
    pygame.time.wait(3000)  # Display the message for 3 seconds

# Create players
player1 = Player(BLUE)
player2 = Player(WHITE, is_computer=True)
# Game loop
running = True
turn = 0
game_over = False

while running:
    for event in pygame.event.get():
        if event.type == pygame.QUIT:
            running = False
        elif event.type == pygame.MOUSEBUTTONDOWN and not game_over:
            if turn % 2 == 0:  # Human player's turn
                mouse_x, mouse_y = event.pos
                column = mouse_x // (width // BOARD_WIDTH)
                row = mouse_y // (height // BOARD_HEIGHT)
                
                if (column, row) not in player1.pieces and (column, row) not in player2.pieces:
                    player1.add_piece(column, row)
                    
                    if check_winner(player1):
                        # print("Player 1 wins!")
                        display_winner(username)
                        game_over = True
                    
                    turn += 1

    if not game_over and turn % 2 == 1:  # Computer player's turn
        move = player2.make_move((player1.pieces, player2.pieces))
        if move:
            player2.add_piece(*move)
            
            if check_winner(player2):
                # print("Player 2 (Computer) wins!")
                display_winner("Computer")
                game_over = True
            turn += 1

    screen.fill(BLACK)
    
    # Draw game board
    for i in range(BOARD_WIDTH + 1):
        pygame.draw.line(screen, WHITE, (i * width // BOARD_WIDTH, 0), (i * width // BOARD_WIDTH, height), 2)
    for i in range(BOARD_HEIGHT + 1):
        pygame.draw.line(screen, WHITE, (0, i * height // BOARD_HEIGHT), (width, i * height // BOARD_HEIGHT), 2)

    # Draw pieces
    player1.draw_pieces()
    player2.draw_pieces()
    pygame.display.flip()

pygame.quit()

Saturday, September 21, 2024

Fedora 42 : Fedora game project with pygame and agentpy - part 001.

I started a game project with the python packages pygame and agentpy in the Fedora 42 Linux distribution.
I used this version of Fedora:
[mythcat@fedora fedora_game]$ uname -a
Linux fedora 6.11.0-63.fc42.x86_64 #1 SMP PREEMPT_DYNAMIC Sun Sep 15 17:14:12 UTC 2024 x86_64 GNU/Linux
... and this python version:
Python 3.12.3 (main, Apr 17 2024, 00:00:00) [GCC 14.0.1 20240411 (Red Hat 14.0.1-0)] on linux
You can find it on my fedora pagure repo

Monday, June 10, 2024

Fedora 41 : Install portmaster.

Portmaster is a free and open-source application firewall that does the heavy lifting for you. Restore privacy and take back control over all your computer's network activity.
First, download the RPM package from the official website.
Use the dnf5 tool and install it.
The last step is to open, after restart Fedora, see the result on my openbox environment:

Friday, June 7, 2024

Fedora 41 : solving conky default configuration in openbox environment.

I installed Conky on an openbox environment and found an error, it doesn't display upload and download from the network correctly.
I had to use the ifconfig command to see the network interface and then I had to modify the default file.
The default configuration file can be found and edited with any text editor:
[root@fedora mythcat]# nano /etc/conky/conky.conf
Here's how it looks functionally.
-- Conky, a system monitor https://github.com/brndnmtthws/conky
--
-- This configuration file is Lua code. You can write code in here, and it will
-- execute when Conky loads. You can use it to generate your own advanced
-- configurations.
--
-- Try this (remove the `--`):
--
--   print("Loading Conky config")
--
-- For more on Lua, see:
-- https://www.lua.org/pil/contents.html

conky.config = {
    alignment = 'top_left',
    background = false,
    border_width = 1,
    cpu_avg_samples = 2,
    default_color = 'white',
    default_outline_color = 'white',
    default_shade_color = 'white',
    double_buffer = true,
    draw_borders = false,
    draw_graph_borders = true,
    draw_outline = false,
    draw_shades = false,
    extra_newline = false,
    font = 'DejaVu Sans Mono:size=12',
    gap_x = 60,
    gap_y = 60,
    minimum_height = 5,
    minimum_width = 5,
    net_avg_samples = 2,
    no_buffers = true,
    out_to_console = false,
    out_to_ncurses = false,
    out_to_stderr = false,
    out_to_x = true,
    own_window = true,
    own_window_class = 'Conky',
    own_window_type = 'desktop',
    show_graph_range = false,
    show_graph_scale = false,
    stippled_borders = 0,
    update_interval = 1.0,
    uppercase = false,
    use_spacer = 'none',
    use_xft = true,
}

conky.text = [[
${color grey}Info:$color ${scroll 32 Conky $conky_version - $sysname $nodename $kernel $machine}
$hr
${color grey}Uptime:$color $uptime
${color grey}Frequency (in MHz):$color $freq
${color grey}Frequency (in GHz):$color $freq_g
${color grey}RAM Usage:$color $mem/$memmax - $memperc% ${membar 4}
${color grey}Swap Usage:$color $swap/$swapmax - $swapperc% ${swapbar 4}
${color grey}CPU Usage:$color $cpu% ${cpubar 4}
${color grey}Processes:$color $processes  ${color grey}Running:$color $running_processes
$hr
${color grey}File systems:
 / $color${fs_used /}/${fs_size /} ${fs_bar 6 /}
${color cyan}Networking:
${color grey}Up: ${upspeed ens1} ${color grey} - Down: ${downspeed ens1}

$hr
${color grey}Name              PID     CPU%   MEM%
${color lightgrey} ${top name 1} ${top pid 1} ${top cpu 1} ${top mem 1}
${color lightgrey} ${top name 2} ${top pid 2} ${top cpu 2} ${top mem 2}
${color lightgrey} ${top name 3} ${top pid 3} ${top cpu 3} ${top mem 3}
${color lightgrey} ${top name 4} ${top pid 4} ${top cpu 4} ${top mem 4}
]]

Saturday, April 6, 2024

Fedora 40 : Fedora CoreOS - part 001.

The documentation for Fedora 40 CoreOS can be found on the official webpage.
I download the fedora-coreos-40.20240331.1.0-virtualbox.x86_64.ova file.
You can use double click to open with the VirtualBox application, see the next screenshot:
Fedora use ssh keys and a user named core, use these steps from the official webpage to change the password for this user.
The result will be this:
You need to use these steps to create a password based on the butane and ignition software to login with the ssh-rsa.

Thursday, April 4, 2024

Fedora 41 : Python and the Fedora Messaging Infrastructure - part 001.

Yesterday I tried to use Fedora Messaging.
You can find the documentation on the official page./div>
I created a working folder called FedoraMessaging:
[mythcat@fedora PythonProjects]$ mkdir FedoraMessaging
[mythcat@fedora PythonProjects]$ cd FedoraMessaging
You need to install the fedora-messaging and rabbitmq-server packages.
[root@fedora FedoraMessaging]# dnf5 install fedora-messaging
Updating and loading repositories:
Repositories loaded.
Package                             Arch    Version                       Repository         Size
Installing:                                                                                      
 fedora-messaging                   noarch  3.5.0-1.fc41                  rawhide        38.6 KiB
...
[root@fedora FedoraMessaging]# dnf install rabbitmq-server
At some point it will ask for a reboot.
You need to install the python package named fedora-messaging.
[root@fedora FedoraMessaging]# pip install --user fedora-messaging
Collecting fedora-messaging
...
Installing collected packages: pytz, incremental, wrapt, tomli, rpds-py, pyasn1, pika, hyperlink, constantly, attrs, 
referencing, pyasn1-modules, automat, twisted, jsonschema-specifications, service-identity, jsonschema, crochet, 
fedora-messaging
Successfully installed attrs-23.2.0 automat-22.10.0 constantly-23.10.4 crochet-2.1.1 fedora-messaging-3.5.0 
hyperlink-21.0.0 incremental-22.10.0 jsonschema-4.21.1 jsonschema-specifications-2023.12.1 pika-1.3.2 pyasn1-0.6.0 
pyasn1-modules-0.4.0 pytz-2024.1 referencing-0.34.0 rpds-py-0.18.0 service-identity-24.1.0 tomli-2.0.1 twisted-24.3.0 
wrapt-1.16.0
You need to start the broker:
[mythcat@fedora FedoraMessaging]$ sudo systemctl start rabbitmq-server
I used the source code from the documentation to test its functionality with a python script named hello_test.py.
from fedora_messaging import api, config

config.conf.setup_logging()
api.consume(lambda message: print(message))

from fedora_messaging import api, config

config.conf.setup_logging()
api.publish(api.Message(topic="hello by mythcat", body={"Hello": "world!"}))
I ran it and got this response:
[mythcat@fedora FedoraMessaging]$ python hello_test.py
[fedora_messaging.message INFO] Registering the 'base.message' key as the '<class 'fedora_messaging.message.Message'>' 
class in the Message class registry
[fedora_messaging.twisted.protocol INFO] Waiting for 0 consumer(s) to finish processing before halting
[fedora_messaging.twisted.protocol INFO] Finished canceling 0 consumers
[fedora_messaging.twisted.protocol INFO] Disconnect requested, but AMQP connection already gone
I created another python script named my_consumer.py, to check if this works:
from fedora_messaging import api, config
# Setup logging
config.conf.setup_logging()
# Define the callback function to process messages
def process_message(message):
    # Check if the message topic matches "hello by mythcat"
    if message.topic == "hello by mythcat":
        print(f"Received message: {message.body}")
    else:
        print(f"Ignoring message with topic: {message.topic}")
# Consume messages
api.consume(process_message)
I ran it and got this response:
[mythcat@fedora FedoraMessaging]$ python my_consumer.py
[fedora_messaging.twisted.protocol INFO] Successfully registered AMQP consumer Consumer(queue=amq.gen-9lKk7sGeYY5I40bdc5VrzQ,
callback=<function process_message at 0x7fdb0f5da160>)
[fedora_messaging.message INFO] Registering the 'base.message' key as the '<class 'fedora_messaging.message.Message'>'
class in the Message class registry
[fedora_messaging.twisted.consumer INFO] Consuming message from topic hello by mythcat 
(message id 800a1540-1e91-4b4a-a125-15e33eebb699)
Received message: {'Hello': 'world!'}
[fedora_messaging.twisted.consumer INFO] Successfully consumed message from topic hello by mythcat 
(message id 800a1540-1e91-4b4a-a125-15e33eebb699)
It can be seen that the answer is received and displayed correctly.

Tuesday, March 26, 2024

Fedora 40 : Fix emergency run mode - part 001.

Run this commands to see errors and all failed systemd units:
[root@fedora mythcat]# dmesg | grep err
[root@fedora mythcat]# systemctl status --failed --all
If you get an error like this:
Recovery unable to mount /home
... check the /etc/fstab file to see how your home is set.

Friday, March 22, 2024

News : Flutter on Fedora 40 - the run debug info.

The run command comes with info about the running process, see:
[mythcat@fedora examples]$ ../flutter/bin/flutter run
Launching lib/main.dart on Linux in debug mode...
Building Linux application...                                           
Syncing files to device Linux...                                 1,488ms

Flutter run key commands.
r Hot reload. 🔥🔥🔥
R Hot restart.
h List all available interactive commands.
d Detach (terminate "flutter run" but leave application running).
c Clear the screen
q Quit (terminate the application on the device).

A Dart VM Service on Linux is available at: http://127.0.0.1:38903/k8tmzU7n0NQ=/
The Flutter DevTools debugger and profiler on Linux is available at:
http://127.0.0.1:9100?uri=http://127.0.0.1:38903/k8tmzU7n0NQ=/
If you open that URL you will see this type of informations: