Pages

Saturday, February 13, 2021

Fedora 33 : Can be better? part 017.

Today I will show you how Fedora distro Linux can be better in terms of the LXDE environment.
Fedora team come with Fedora LXDE on Spins, see this intro:
LXDE, the "Lightweight X11 Desktop Environment", is an extremely fast, performant, and energy-saving desktop environment. It maintained by an international community of developers and comes with a beautiful interface, multi-language support, standard keyboard shortcuts, and additional features like tabbed file browsing.
Fedora does not have a defined environment because multiple work environments can be set.
Today, I will show you how to use the LXDE environment with Fedora can be improved.
I often use a simple environment in Linux because:
  • I have older hardware
  • their simplicity allows me to make my personal settings to be more efficient;
Here are some examples of how we can improve the LXDE environment:

Using the ObConf tool

ObConf now easily installs new themes that use the .obt Openbox theme archive format for distribution.
[root@desk mythcat]# dnf search obconf
...
obconf.x86_64 : A graphical configuration editor for the Openbox window manager
[root@desk mythcat]# dnf install obconf.x86_64
Last metadata expiration check: 0:25:25 ago on Sat 13 Feb 2021 11:49:09 AM EET.
Package obconf-2.0.4-17.20150213git63ec47.fc33.x86_64 is already installed.
Dependencies resolved.
Nothing to do.
Complete!

Windows open on the center screen.

You need to add this source code to the end of the file named lxde-rc.xml.
<application type="normal">
<position>
 <x>center</x>
 <y>center</y>
</position>
</application>
Depending on the keyboard and configuration you can set key combinations for different functions such as the Fn key.
The Fn key is the wakeup key when the machine is suspended.
If anyone wants to map it to other functions, then that's okay.
Let's see one example with the lxde-rc.xml file.
<keybindkey="XF86AudioRaiseVolume">
<actionname="Execute">
<command>amixersetMaster5%+unmute</command></action>
</keybind>
<keybindkey="XF86AudioLowerVolume">
<actionname="Execute">
<command>amixersetMaster5%-unmute</command></action>
</keybind>
<keybindkey="XF86MonBrightnessDown">
<actionname="Execute">
<command>xbacklight-20</command>
<startupnotify><enabled>yes</enabled><name>Decreasescreenbrightness</name></startupnotify></action>
</keybind>
<keybindkey="XF86MonBrightnessUp">
<actionname="Execute">
<command>xbacklight+20</command>
<startupnotify><enabled>yes</enabled><name>Increasescreenbrightness</name></startupnotify></action>
</keybind>
You can now run this command for the changes to take effect each time you edit the lxde-rc.xml file:
[mythcat@desk ~]$ openbox --reconfigure

Settings for users and languages.

[mythcat@desk ~]$ lxappearance 
[root@desk mythcat]# lxdm-config 
[root@desk mythcat]# setxkbmap -layout "us,ro" -option "grp:alt_shift_toggle".
In conclusion, there are enough settings that can be included by both the LXDE development team and Fedora team in a simpler way to configure the LXDE environment.
I would like to have in the LXDE environment from Fedora, the Fedora widget, the Fedora theme, Fedora Color.
The Fedora development team could effortlessly include its own utility to manage these settings for LXDE or other work environments.
Thursday, February 11, 2021

Fedora 33 : Meson build system.

Meson is a build system that is designed to be as user-friendly as possible without sacrificing performance. The main tool for this is a custom language that the user uses to describe the structure of his build. The main design goals of this language has been simplicity, clarity and conciseness. Much inspiration was drawn from the Python programming language, which is considered very readable, even to people who have not programmed in Python before., see the official webpage.
Let's test with an simple example on Fedora 33 distro.
First step, install this tool with DNF tool.
[root@desk mythcat]# dnf search meson
Last metadata expiration check: 2:20:41 ago on Thu 11 Feb 2021 08:39:26 PM EET.
============================== Name Exactly Matched: meson ==============================
meson.noarch : High productivity build system
[root@desk mythcat]# dnf install meson.noarch 
...
Installed:
  meson-0.55.3-1.fc33.noarch               ninja-build-1.10.2-1.fc33.x86_64              

Complete!
The next step is to create a C file with a simple example and one with the build file:
[mythcat@desk ~]$ mkdir CProjects
[mythcat@desk ~]$ cd CProjects/
[mythcat@desk CProjects]$ vi main.c
[mythcat@desk CProjects]$ vi meson.build
The C example file named main.c has this source code:
#include 

//
// main is where all program execution starts
//
int main(int argc, char **argv) {
  printf("Hello there.\n");
  return 0;
} 
The build file named meson.build comes with this content:
project('tutorial', 'c')
executable('demo', 'main.c') 
Use the meson with setup builddir and compile to build executable and run it.
[mythcat@desk CProjects]$ meson setup builddir
The Meson build system
Version: 0.56.2
Source dir: /home/mythcat/CProjects
Build dir: /home/mythcat/CProjects/builddir
Build type: native build
Project name: tutorial
Project version: undefined
C compiler for the host machine: cc (gcc 10.2.1 "cc (GCC) 10.2.1 20201125 (Red Hat 10.2.1-9)")
C linker for the host machine: cc ld.bfd 2.35-18
Host machine cpu family: x86_64
Host machine cpu: x86_64
Build targets in project: 1

Found ninja-1.10.2 at /bin/ninja
[mythcat@desk CProjects]$ cd builddir/
[mythcat@desk builddir]$ ls
build.ninja  compile_commands.json  meson-info	meson-logs  meson-private
[mythcat@desk builddir]$ meson compile
Found runner: ['/bin/ninja']
ninja: Entering directory `.'
[2/2] Linking target demo
[mythcat@desk builddir]$ ls
build.ninja  compile_commands.json  demo  demo.p  meson-info  meson-logs  meson-private
[mythcat@desk builddir]$ ./demo
Hello there.
You can see this run well.

Sunday, February 7, 2021

Fedora 33 : Running Zeek - part 001.

Zeek is often used as a network analysis tool but can also be deployed as an IDS known as Intrusion Detection System.
The full documentation can be found on this website page.
Let's install this tool on Fedora 33 distro.
[root@desk mythcat]# dnf search zeek
Last metadata expiration check: 0:18:02 ago on Sun 07 Feb 2021 11:21:35 AM EET.
No matches found.
[root@desk mythcat]# dnf config-manager --add-repo 
https://download.opensuse.org/repositories/security:zeek/Fedora_33/security:zeek.repo
Adding repo from: https://download.opensuse.org/repositories/security:zeek/Fedora_33/security:zeek.repo
[root@desk mythcat]# dnf install zeek
The Zeek Network Security Monitor. (Fedora_33)  105 kB/s | 128 kB     00:01    
Last metadata expiration check: 0:00:01 ago on Sun 07 Feb 2021 11:40:31 AM EET.
...
  Verifying        : zeekctl-3.2.3-1.1.x86_64                               8/8 

Installed:
  libbroker-devel-3.2.3-1.1.x86_64       libpcap-devel-14:1.9.1-6.fc33.x86_64  
  openssl-devel-1:1.1.1i-1.fc33.x86_64   zeek-3.2.3-1.1.x86_64                 
  zeek-core-3.2.3-1.1.x86_64             zeek-devel-3.2.3-1.1.x86_64           
  zeek-libcaf-devel-3.2.3-1.1.x86_64     zeekctl-3.2.3-1.1.x86_64              

Complete!
[root@desk mythcat]# whereis zeek
zeek: /opt/zeek/bin/zeek
[root@desk mythcat]# whereis zeekctl
zeekctl: /opt/zeek/bin/zeekctl
I found this informations into the documentation area:
ZeekControl is an interactive shell for easily operating/managing Zeek installations on a single system or even across multiple systems in a traffic-monitoring cluster.
A Minimal Starting Configuration
These are the basic configuration changes to make for a minimal ZeekControl installation that will manage a single Zeek instance on the localhost:
  • In $PREFIX/etc/node.cfg, set the right interface to monitor.
  • In $PREFIX/etc/networks.cfg, comment out the default settings and add the networks that Zeek will consider local to the monitored environment.
  • In $PREFIX/etc/zeekctl.cfg, change the MailTo email address to a desired recipient and the LogRotationInterval to a desired log archival frequency.
Next step is to configure and adjust your PATH environment variable:
[root@desk mythcat]# export PATH=/opt/zeek/bin:$PATH
[root@desk mythcat]# zeekctl

Welcome to ZeekControl 2.2.0

Type "help" for help.
...
Use install , start and diag commands on Zeek command line to check if the Zeek tool works fine.
If you received this error on diag command , then you need to set your network interface:
==== stderr.log
fatal error: problem with interface eth0 (pcap_error: SIOCGIFHWADDR: No such device (pcap_activate))
Let's fix this error using the files configuration:
[root@desk mythcat]# updatedb
[root@desk mythcat]# locate node.cfg
/opt/zeek/etc/node.cfg
[root@desk mythcat]# vi /opt/zeek/etc/node.cfg
I change the row with the interface= with my network interface.
You can find your interface with these commands:
[root@desk mythcat]# ip link show
1: lo:  mtu 65536 qdisc noqueue state UNKNOWN mode DEFAULT group default qlen 1000
...
[root@desk mythcat]# nmcli device status
DEVICE  TYPE      STATE                   CONNECTION 
...
Now I can run the zeekctl command an check if is all right.
And first issue reported by diag and zeekctl is this:
1612693272.168741 Reporter::WARNING Your interface is likely receiving invalid TCP and UDP checksums, most likely from NIC checksum offloading. By default, packets with invalid checksums are discarded by Zeek unless using the -C command-line option or toggling the 'ignore_checksums' variable. Alternatively, disable checksum offloading by the network adapter to ensure Zeek analyzes the actual checksums that are transmitted. /opt/zeek/share/zeek/base/misc/find-checksum-offloading.zeek, line 54
You can see this tool can provide good information for users.

Fedora 33 : C# and Google A.P.I .

In this tutorial, I will show you how to use C # with Google A.P.I. on Fedora Linux. 
You can find more C # tutorials written by me on the web. 
This tutorial was added here by me because it is used with Fedora 33 distro. 
You will need to set an authentication key in your google account, see the credentials page
I used Fedora Linux to install the NuGet command:
[root@desk mythcat]# dnf install nuget 
...
Installed:
  nuget-2.8.7-11.fc33.x86_64                                                    
Complete!
Use this command to install it:
[mythcat@desk CSharpProjects]$ nuget install Google.Apis.Discovery.v1 
Attempting to resolve dependency 'Google.Apis (= 1.10.0)'.
Attempting to resolve dependency 'Google.Apis.Core (≥ 1.10.0)'.
...
Attempting to resolve dependency 'Google.Apis (≥ 1.49.0)'.
'Google.Apis' already has a dependency defined for 'Google.Apis.Core'.
Create a basic C# project and test it:
[mythcat@desk CSharpProjects]$ mkdir booksAPI && cd booksAPI
[mythcat@desk booksAPI]$ dotnet new console
Getting ready...
...
[mythcat@desk booksAPI]$ dotnet run
Hello World!
Add Google A.P.I. to this project:
[mythcat@desk booksAPI]$ dotnet add package Google.Apis.Discovery.v1 --version 1.49.0
  Determining projects to restore...
log  : Restored /home/mythcat/CSharpProjects/booksAPI/booksAPI.csproj (in 8.86 sec).
Change the default project source code with this example and add your Google key:
using System;
using System.Threading.Tasks;

using Google.Apis.Discovery.v1;
using Google.Apis.Discovery.v1.Data;
using Google.Apis.Services;
namespace booksAPI
{
    class Program
    {
    [STAThread]
        static void Main(string[] args)
        {
            Console.WriteLine("Discovery API Sample");
            Console.WriteLine("====================");
            try
            {
                new Program().Run().Wait();
            }
            catch (AggregateException ex)
            {
                foreach (var e in ex.InnerExceptions)
                {
                    Console.WriteLine("ERROR: " + e.Message);
                }
            }
            Console.WriteLine("Press any key to continue...");
            Console.ReadKey();
        }

        private async Task Run()
        {
            // Create the service.
            var service = new DiscoveryService(new BaseClientService.Initializer
                {
                    ApplicationName = "Discovery Sample",
                    ApiKey="...",
                });

            // Run the request.
            Console.WriteLine("Executing a list request...");
            var result = await service.Apis.List().ExecuteAsync();

            // Display the results.
            if (result.Items != null)
            {
                foreach (DirectoryList.ItemsData api in result.Items)
                {
                    Console.WriteLine(api.Id + " - " + api.Title);
                }
            }
        }
    }
}
I used my key and this is the result of the run project:
[mythcat@desk booksAPI]$ dotnet run
Discovery API Sample
====================
Executing a list request...
abusiveexperiencereport:v1 - Abusive Experience Report API
acceleratedmobilepageurl:v1 - Accelerated Mobile Pages (AMP) URL API
accessapproval:v1 - Access Approval API
accesscontextmanager:v1beta - Access Context Manager API
...

Sunday, January 31, 2021

Fedora 33 : Roblox and Wine.

Because I tried to install this platform, I will show you what works and what doesn't. 
At this moment Roblox Player cannot be run with Wine. 
I tested two ways to run it.
First is the roblox-linux-wrapper and the second is the direct way to install RobloxPlayerLauncher.exe.
The roblox-linux-wrapper works but you will get this error
The install process is simple:
[mythcat@desk ~]$ git clone https://github.com/roblox-linux-wrapper/roblox-linux-wrapper.git
Cloning into 'roblox-linux-wrapper'...
remote: Enumerating objects: 17, done.
remote: Counting objects: 100% (17/17), done.
remote: Compressing objects: 100% (16/16), done.
remote: Total 1471 (delta 7), reused 4 (delta 1), pack-reused 1454
Receiving objects: 100% (1471/1471), 380.74 KiB | 274.00 KiB/s, done.
Resolving deltas: 100% (901/901), done.

[mythcat@desk ~]$ whereis wine
wine: /usr/bin/wine /usr/lib/wine /usr/lib64/wine /usr/share/wine /usr/share/man/man1/wine.1.gz

[mythcat@desk ~]$ roblox-linux-wrapper/rlw
> main: Sourcing /home/mythcat/roblox-linux-wrapper/data/rlw-core.sh
> wineinitialize: sourcing /home/mythcat/.rlw/wine_choice
Another way is to download the EXE file and run it with Wine.
[mythcat@desk ~]$ wget http://setup.rbxcdn.com/RobloxPlayerLauncher.exe
wine RobloxPlayerLauncher.exe 
...
You can try to start a game on browser , select the Roblox Player and will get the same error. A good news is about Roblox Studio, this works very well:
[mythcat@desk ~]$ wget https://setup.rbxcdn.com/RobloxStudioLauncherBeta.exe
[mythcat@desk ~]$ wine RobloxStudioLauncherBeta.exe
My video card NVIDIA Corporation GT218 [GeForce 210] (rev a2) is not very good with this application , but works.

Saturday, January 30, 2021

Fedora 33 : The new Wine 6.0.

The new released of Wine 6.0 comes with this intro:
The Wine team is proud to announce that the stable release of Wine 6.0 is now available. This release represents a year of development effort and over 8,300 individual changes. It contains a large number of improvements that are listed in the release notes below. The areas of major changes are:
- Core modules in PE format.
- Vulkan backend for WineD3D.
- DirectShow and Media Foundation support.
- Text console redesign. ...

About Wine:
Wine (originally an acronym for "Wine Is Not an Emulator") is a compatibility layer capable of running Windows applications on several POSIX-compliant operating systems, such as Linux, macOS, BSD. Instead of simulating internal Windows logic like a virtual machine or emulator, Wine translates Windows API calls into POSIX calls on-the-fly, eliminating the performance and memory penalties of other methods and allowing you to cleanly integrate Windows applications into your desktop.

I used the Wine repo to install easily this software:
[root@desk mythcat]# dnf config-manager --add-repo https://dl.winehq.org/wine-builds/fedora/33/winehq.repo
Adding repo from: https://dl.winehq.org/wine-builds/fedora/33/winehq.repo
[root@desk mythcat]# dnf install wine
WineHQ packages                                 1.8 MB/s | 1.2 MB     00:00    
Dependencies resolved.
================================================================================
 Package                       Arch   Version                     Repo     Size
================================================================================
Installing:
 wine                          x86_64 6.0-1.fc33                  updates  13 k
Installing dependencies:
 SDL2                          i686   2.0.14-1.fc33               updates 589 k
 cdparanoia-libs               i686   10.2-34.fc33                fedora   56 k
 gd                            i686   2.3.0-3.fc33                fedora  142 k
 graphene                      i686   1.10.2-4.fc33               fedora   71 k
 gstreamer1-plugins-base       i686   1.18.2-1.fc33               updates 2.1 M
 ...
  wine-opencl-6.0-1.fc33.x86_64                                                 
  wine-pulseaudio-6.0-1.fc33.i686                                               
  wine-pulseaudio-6.0-1.fc33.x86_64                                             
  wine-small-fonts-6.0-1.fc33.noarch                                            
  wine-symbol-fonts-6.0-1.fc33.noarch                                           
  wine-system-fonts-6.0-1.fc33.noarch                                           
  wine-systemd-6.0-1.fc33.noarch                                                
  wine-tahoma-fonts-6.0-1.fc33.noarch                                           
  wine-times-new-roman-fonts-6.0-1.fc33.noarch                                  
  wine-twain-6.0-1.fc33.i686                                                    
  wine-twain-6.0-1.fc33.x86_64                                                  
  wine-webdings-fonts-6.0-1.fc33.noarch                                         
  wine-wingdings-fonts-6.0-1.fc33.noarch                                        

Complete! 
You can build it from source code:
[mythcat@desk ~]$ cd wine-6.0/
[mythcat@desk wine-6.0]$ ls
aclocal.m4  configure.ac   fonts    LICENSE.OLD  nls	   server
ANNOUNCE    COPYING.LIB    include  loader	 po	   tools
AUTHORS     dlls	   libs     MAINTAINERS  programs  VERSION
configure   documentation  LICENSE  Makefile.in  README
Wine uses a virtual C: drive and you need to configure it with this command:
[mythcat@desk ~]$ winecfg
wine: created the configuration directory '/home/mythcat/.wine'
002c:fixme:winediag:LdrInitializeThunk wine-staging 6.0 is a testing version containing experimental patches.
...
This starts a new window where you can set the wine software.
Also, you can locate the virtual C: drive at:
[mythcat@desk ~]$ ls -la .wine/drive_c/
total 8
drwxr-xr-x  7 mythcat mythcat  124 Jan 30 11:56  .
drwxr-xr-x  4 mythcat mythcat  117 Jan 30 12:03  ..
drwxr-xr-x  3 mythcat mythcat   23 Jan 30 11:56  ProgramData
drwxr-xr-x  6 mythcat mythcat   97 Jan 30 11:56 'Program Files'
drwxr-xr-x  6 mythcat mythcat   97 Jan 30 11:56 'Program Files (x86)'
drwxr-xr-x  4 mythcat mythcat   35 Jan 30 11:56  users
drwxr-xr-x 18 mythcat mythcat 4096 Jan 30 11:57  windows
-rw-r--r--  1 mythcat mythcat    9 Jan 30 11:56  .windows-serial
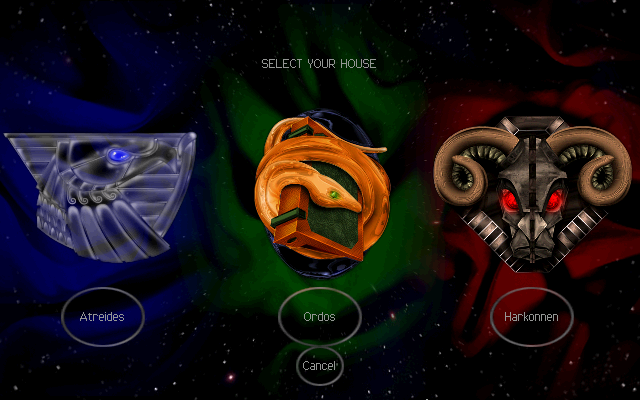
I tested with my favorite old game Dune 2000 from this webpage
Just unzip it and run wine with right-click on DUNE2000.EXE and select Open With and Wine Windows Program Loader.
The game runs it well:
Dune 2000 gane

You can read about Fedora Linux distro and Wine software on this official MediaWiki page.

Tuesday, January 19, 2021

Fedora 33 : Create a simple GUI Button on Unity 3D.

It is very useful to create applications in the Fedora 33 Linux distribution with the Unity 3D game engine.
In today's tutorial, I will show you how to build the simplest GUI with C# and a dynamic button.
To create a button dynamically you need to use GUI.Button.
Open Unity 3D new project in your Fedora 33 distro.
Add a new Game Object by right click and select Create Empty.
Select Game Object use Add Component to add a New script and name it create_button.
Open it and add this source code:
using UnityEngine;
using UnityEngine.UI;
using System.Collections;
 
public class create_button : MonoBehaviour {
   
    
    void OnGUI() 
        {    
            if (GUI.Button(new Rect(10, 10, 300, 20), "Test - Dynamically button")) 
            {    
                Debug.Log("Test button");
            }
            
        }
}
If you run the Unity project you will see a basic Unity 3D button, see the next image: