Pages

Sunday, January 31, 2021

Fedora 33 : Roblox and Wine.

Because I tried to install this platform, I will show you what works and what doesn't. 
At this moment Roblox Player cannot be run with Wine. 
I tested two ways to run it.
First is the roblox-linux-wrapper and the second is the direct way to install RobloxPlayerLauncher.exe.
The roblox-linux-wrapper works but you will get this error
The install process is simple:
[mythcat@desk ~]$ git clone https://github.com/roblox-linux-wrapper/roblox-linux-wrapper.git
Cloning into 'roblox-linux-wrapper'...
remote: Enumerating objects: 17, done.
remote: Counting objects: 100% (17/17), done.
remote: Compressing objects: 100% (16/16), done.
remote: Total 1471 (delta 7), reused 4 (delta 1), pack-reused 1454
Receiving objects: 100% (1471/1471), 380.74 KiB | 274.00 KiB/s, done.
Resolving deltas: 100% (901/901), done.

[mythcat@desk ~]$ whereis wine
wine: /usr/bin/wine /usr/lib/wine /usr/lib64/wine /usr/share/wine /usr/share/man/man1/wine.1.gz

[mythcat@desk ~]$ roblox-linux-wrapper/rlw
> main: Sourcing /home/mythcat/roblox-linux-wrapper/data/rlw-core.sh
> wineinitialize: sourcing /home/mythcat/.rlw/wine_choice
Another way is to download the EXE file and run it with Wine.
[mythcat@desk ~]$ wget http://setup.rbxcdn.com/RobloxPlayerLauncher.exe
wine RobloxPlayerLauncher.exe 
...
You can try to start a game on browser , select the Roblox Player and will get the same error. A good news is about Roblox Studio, this works very well:
[mythcat@desk ~]$ wget https://setup.rbxcdn.com/RobloxStudioLauncherBeta.exe
[mythcat@desk ~]$ wine RobloxStudioLauncherBeta.exe
My video card NVIDIA Corporation GT218 [GeForce 210] (rev a2) is not very good with this application , but works.

Saturday, January 30, 2021

Fedora 33 : The new Wine 6.0.

The new released of Wine 6.0 comes with this intro:
The Wine team is proud to announce that the stable release of Wine 6.0 is now available. This release represents a year of development effort and over 8,300 individual changes. It contains a large number of improvements that are listed in the release notes below. The areas of major changes are:
- Core modules in PE format.
- Vulkan backend for WineD3D.
- DirectShow and Media Foundation support.
- Text console redesign. ...

About Wine:
Wine (originally an acronym for "Wine Is Not an Emulator") is a compatibility layer capable of running Windows applications on several POSIX-compliant operating systems, such as Linux, macOS, BSD. Instead of simulating internal Windows logic like a virtual machine or emulator, Wine translates Windows API calls into POSIX calls on-the-fly, eliminating the performance and memory penalties of other methods and allowing you to cleanly integrate Windows applications into your desktop.

I used the Wine repo to install easily this software:
[root@desk mythcat]# dnf config-manager --add-repo https://dl.winehq.org/wine-builds/fedora/33/winehq.repo
Adding repo from: https://dl.winehq.org/wine-builds/fedora/33/winehq.repo
[root@desk mythcat]# dnf install wine
WineHQ packages                                 1.8 MB/s | 1.2 MB     00:00    
Dependencies resolved.
================================================================================
 Package                       Arch   Version                     Repo     Size
================================================================================
Installing:
 wine                          x86_64 6.0-1.fc33                  updates  13 k
Installing dependencies:
 SDL2                          i686   2.0.14-1.fc33               updates 589 k
 cdparanoia-libs               i686   10.2-34.fc33                fedora   56 k
 gd                            i686   2.3.0-3.fc33                fedora  142 k
 graphene                      i686   1.10.2-4.fc33               fedora   71 k
 gstreamer1-plugins-base       i686   1.18.2-1.fc33               updates 2.1 M
 ...
  wine-opencl-6.0-1.fc33.x86_64                                                 
  wine-pulseaudio-6.0-1.fc33.i686                                               
  wine-pulseaudio-6.0-1.fc33.x86_64                                             
  wine-small-fonts-6.0-1.fc33.noarch                                            
  wine-symbol-fonts-6.0-1.fc33.noarch                                           
  wine-system-fonts-6.0-1.fc33.noarch                                           
  wine-systemd-6.0-1.fc33.noarch                                                
  wine-tahoma-fonts-6.0-1.fc33.noarch                                           
  wine-times-new-roman-fonts-6.0-1.fc33.noarch                                  
  wine-twain-6.0-1.fc33.i686                                                    
  wine-twain-6.0-1.fc33.x86_64                                                  
  wine-webdings-fonts-6.0-1.fc33.noarch                                         
  wine-wingdings-fonts-6.0-1.fc33.noarch                                        

Complete! 
You can build it from source code:
[mythcat@desk ~]$ cd wine-6.0/
[mythcat@desk wine-6.0]$ ls
aclocal.m4  configure.ac   fonts    LICENSE.OLD  nls	   server
ANNOUNCE    COPYING.LIB    include  loader	 po	   tools
AUTHORS     dlls	   libs     MAINTAINERS  programs  VERSION
configure   documentation  LICENSE  Makefile.in  README
Wine uses a virtual C: drive and you need to configure it with this command:
[mythcat@desk ~]$ winecfg
wine: created the configuration directory '/home/mythcat/.wine'
002c:fixme:winediag:LdrInitializeThunk wine-staging 6.0 is a testing version containing experimental patches.
...
This starts a new window where you can set the wine software.
Also, you can locate the virtual C: drive at:
[mythcat@desk ~]$ ls -la .wine/drive_c/
total 8
drwxr-xr-x  7 mythcat mythcat  124 Jan 30 11:56  .
drwxr-xr-x  4 mythcat mythcat  117 Jan 30 12:03  ..
drwxr-xr-x  3 mythcat mythcat   23 Jan 30 11:56  ProgramData
drwxr-xr-x  6 mythcat mythcat   97 Jan 30 11:56 'Program Files'
drwxr-xr-x  6 mythcat mythcat   97 Jan 30 11:56 'Program Files (x86)'
drwxr-xr-x  4 mythcat mythcat   35 Jan 30 11:56  users
drwxr-xr-x 18 mythcat mythcat 4096 Jan 30 11:57  windows
-rw-r--r--  1 mythcat mythcat    9 Jan 30 11:56  .windows-serial
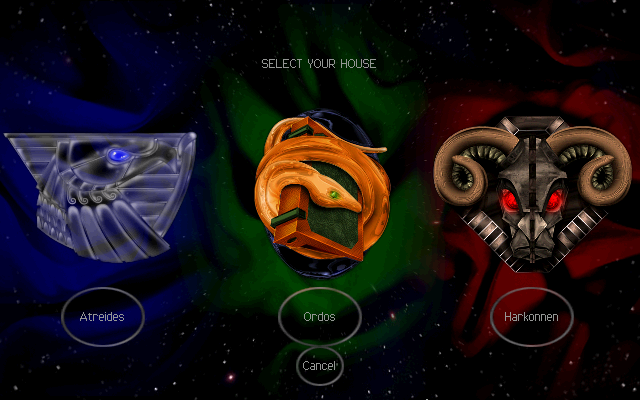
I tested with my favorite old game Dune 2000 from this webpage
Just unzip it and run wine with right-click on DUNE2000.EXE and select Open With and Wine Windows Program Loader.
The game runs it well:
Dune 2000 gane

You can read about Fedora Linux distro and Wine software on this official MediaWiki page.

Tuesday, January 19, 2021

Fedora 33 : Create a simple GUI Button on Unity 3D.

It is very useful to create applications in the Fedora 33 Linux distribution with the Unity 3D game engine.
In today's tutorial, I will show you how to build the simplest GUI with C# and a dynamic button.
To create a button dynamically you need to use GUI.Button.
Open Unity 3D new project in your Fedora 33 distro.
Add a new Game Object by right click and select Create Empty.
Select Game Object use Add Component to add a New script and name it create_button.
Open it and add this source code:
using UnityEngine;
using UnityEngine.UI;
using System.Collections;
 
public class create_button : MonoBehaviour {
   
    
    void OnGUI() 
        {    
            if (GUI.Button(new Rect(10, 10, 300, 20), "Test - Dynamically button")) 
            {    
                Debug.Log("Test button");
            }
            
        }
}
If you run the Unity project you will see a basic Unity 3D button, see the next image:

Friday, January 15, 2021

Fedora 33 : Using the finch chat program.

Finch is a TUI (text user interface) IM client for Linux which uses libpurple.
This is very useful when you want to chat and don't have an environment to install Fedora on.
Finch is built using the ncurses toolkit, which is a library designed especially to built text user interfaces.
This program lets you sign on to Jabber, GoogleTalk, IRC, and other IM networks. 
After this was built the Pidgin application.
Let's install it with the DNF tool:
[root@desk mythcat]# dnf install finch.x86_64
...
Installed:
  finch-2.14.1-2.fc33.x86_64                             libgnt-2.14.0-3.fc33.x86_64                            

Complete!
You can find all information using the man command:
[mythcat@desk ~]$ man finch 
You can run it easy with this command:
[mythcat@desk ~]$ finch
After that, you can see the windows form for your account.
You can see one example with my IRC account:
If not you can select it by pressing the keys: Alt+A and select Accounts.
Use the Tab key and select Modify.
The new window form lets you set your account.
In the next image, you can see some settings for my IRC account.
Another important element is that this interface can be customized using the file named .gntrc.
Open it with your editor, I used vi editor:
[mythcat@desk ~]$ vi ~/.gntrc
I make these changes to use the mouse:
[general]
mouse = 1
Although the manual page says the mouse support is still experimental.
I install the GPM - a cut and paste utility and mouse server for virtual consoles.
[root@desk mythcat]# dnf install gpm.x86_64 
...
[root@desk mythcat]# systemctl status gpm
● gpm.service - Console Mouse manager
     Loaded: loaded (/usr/lib/systemd/system/gpm.service; enabled; vendor prese>
     Active: inactive (dead)
...
[root@desk mythcat]# systemctl enable gpm 
[root@desk mythcat]# systemctl status gpm 
● gpm.service - Console Mouse manager
     Loaded: loaded (/usr/lib/systemd/system/gpm.service; enabled; vendor prese>
     Active: inactive (dead) since Fri 2021-01-15 15:35:56 EET; 6min ago
   Main PID: 15241 (code=exited, status=0/SUCCESS)
        CPU: 2ms

Jan 15 15:35:32 desk systemd[1]: Starting Console Mouse manager...
Jan 15 15:35:32 desk /usr/sbin/gpm[15314]: O0o.oops(): [daemon/check_uniqueness>
Jan 15 15:35:32 desk systemd[1]: Started Console Mouse manager.
Jan 15 15:35:32 desk /usr/sbin/gpm[15314]: gpm is already running as pid 15241
The GPM can be configureted to set your mouse settings.
I restart my Fedora 33 Linux distro and works very well with the mouse.

Tuesday, December 29, 2020

Fedora 33 : Fixes and changes for wordpress - part 001.

If you have the latest version of WordPress installed, then you may encounter this error when trying to add a new page or post.
Publishing failed. The response is not a valid JSON response.
The problem is with how to edit posts.
One solution would be to install this plugin.
The process of installing the new WordPress or making changes does not allow you to add new plugins to the Plugins menu.
Download the Classic Editor plugin to unzip and then copy it to the plugins folder.
[root@desk mythcat]# cp -r -f /home/mythcat/classic-editor/ /usr/share/wordpress/wp-content/plugins/
Activate this plugin and now you can create and edit pages and posts in WordPress.

Friday, December 25, 2020

Fedora 33 : Use Visual Code on root account.

Sometimes creating or modifying files that have root permissions is required.
I use the following command to run Visual Code with these permissions:
sudo code --user-data-dir="~/.vscode-root"

Thursday, December 24, 2020

Fedora 33 : Install wordpress on Fedora distro.

For those who are celebrating the winter holidays with the Linux operating system, I have created this little tutorial...
The first step - update and upgrade the Fedora 33 Linux distro.
[root@desk mythcat]# dnf update
...
Nothing to do.
Complete!
[root@desk mythcat]# dnf upgrade
...
Nothing to do.
Complete!
Install all packages for WordPress package:
[root@desk mythcat]# dnf install @"Web Server" php-mysqlnd mariadb-server
Last metadata expiration check: 1:10:28 ago on Thu 24 Dec 2020 12:59:20 PM EET.
Package php-mysqlnd-7.4.13-1.fc33.x86_64 is already installed.
No match for group package "powerpc-utils"
No match for group package "lsvpd"
Dependencies resolved.
...
Complete!
Finds the packages providing for WordPress.
[root@desk mythcat]# dnf provides wordpress
Last metadata expiration check: 1:13:24 ago on Thu 24 Dec 2020 12:59:20 PM EET.
wordpress-5.5.1-1.fc33.noarch : Blog tool and publishing platform
Repo        : fedora
Matched from:
Provide    : wordpress = 5.5.1-1.fc33

wordpress-5.6-1.fc33.noarch : Blog tool and publishing platform
Repo        : updates
Matched from:
Provide    : wordpress = 5.6-1.fc33
Install WordPress with DNF tool:
[root@desk mythcat]# dnf install wordpress
...
  Verifying        : php-simplepie-1.5.4-3.fc33.noarch                      7/7 

Installed:
  libc-client-2007f-26.fc33.x86_64      php-IDNA_Convert-0.8.0-14.fc33.noarch   
  php-getid3-1:1.9.20-2.fc33.noarch     php-imap-7.4.13-1.fc33.x86_64           
  php-phpmailer6-6.1.8-1.fc33.noarch    php-simplepie-1.5.4-3.fc33.noarch       
  wordpress-5.6-1.fc33.noarch          

Complete!
Allow firewall in case it is running on your system.
[root@desk mythcat]# firewall-cmd --add-port=80/tcp --permanent
success
[root@desk mythcat]# firewall-cmd --reload
success
If SELinux is running, run the commands to allow database and sendmail:
[root@desk mythcat]# setsebool -P httpd_can_network_connect_db=1
[root@desk mythcat]# setsebool -P httpd_can_sendmail=1
Enable systemctl services for WordPress:
[root@desk mythcat]# systemctl start httpd
...
[root@desk mythcat]# systemctl enable httpd
...
[root@desk mythcat]# systemctl enable mariadb
...
[root@desk mythcat]# systemctl start mariadb
...
Set up the MySQL service for WordPress:
[root@desk mythcat]# mysql_secure_installation

NOTE: RUNNING ALL PARTS OF THIS SCRIPT IS RECOMMENDED FOR ALL MariaDB
      SERVERS IN PRODUCTION USE!  PLEASE READ EACH STEP CAREFULLY!

In order to log into MariaDB to secure it, we'll need the current
password for the root user. If you've just installed MariaDB, and
haven't set the root password yet, you should just press enter here.

Enter current password for root (enter for none): 
OK, successfully used password, moving on...

Setting the root password or using the unix_socket ensures that nobody
can log into the MariaDB root user without the proper authorisation.

You already have your root account protected, so you can safely answer 'n'.

Switch to unix_socket authentication [Y/n] n
 ... skipping.

You already have your root account protected, so you can safely answer 'n'.

Change the root password? [Y/n] n
 ... skipping.

By default, a MariaDB installation has an anonymous user, allowing anyone
to log into MariaDB without having to have a user account created for
them.  This is intended only for testing, and to make the installation
go a bit smoother.  You should remove them before moving into a
production environment.

Remove anonymous users? [Y/n] Y
 ... Success!

Normally, root should only be allowed to connect from 'localhost'.  This
ensures that someone cannot guess at the root password from the network.

Disallow root login remotely? [Y/n] Y
 ... Success!

By default, MariaDB comes with a database named 'test' that anyone can
access.  This is also intended only for testing, and should be removed
before moving into a production environment.

Remove test database and access to it? [Y/n] Y
 - Dropping test database...
 ... Success!
 - Removing privileges on test database...
 ... Success!

Reloading the privilege tables will ensure that all changes made so far
will take effect immediately.

Reload privilege tables now? [Y/n] Y
 ... Success!

Cleaning up...

All done!  If you've completed all of the above steps, your MariaDB
installation should now be secure.

Thanks for using MariaDB!
Create a database named mysite for WordPress:
[root@desk mythcat]# mysqladmin create mysite -u root -p 
Enter password: 
[root@desk mythcat]# mysql -u root -p 
Enter password: 
Welcome to the MariaDB monitor.  Commands end with ; or \g.
Your MariaDB connection id is 25
Server version: 10.4.17-MariaDB MariaDB Server

Copyright (c) 2000, 2018, Oracle, MariaDB Corporation Ab and others.

Type 'help;' or '\h' for help. Type '\c' to clear the current input statement.

MariaDB [(none)]> SHOW DATABASES;
+--------------------+
| Database           |
+--------------------+
| information_schema |
| mysite             |
| mysql              |
| performance_schema |
+--------------------+
4 rows in set (0.000 sec)

MariaDB [(none)]> grant all privileges on mysite.* to testadmin@localhost identified by 'TESTtest!';
Query OK, 0 rows affected (0.019 sec)

MariaDB [(none)]> flush privileges;
Query OK, 0 rows affected (0.001 sec)

MariaDB [(none)]> quit;
Bye
Set WordPress default configuration file named wp-config.php:
[root@desk mythcat]# vim /etc/wordpress/wp-config.php
This source code show you to set wp-config.php for localhost install:
define( 'DB_NAME', 'mysite' );

/** MySQL database username */
define( 'DB_USER', 'testadmin' );

/** MySQL database password */
define( 'DB_PASSWORD', 'TESTtest!' );

/** MySQL hostname */
define( 'DB_HOST', 'localhost' );
Restart the httpd service:
[root@desk mythcat]# systemctl restart httpd
Open URL to set WordPress to set the last steps of this install process:
http://localhost/wordpress/