Pages

Thursday, September 5, 2019

Fedora 30 : Huion graphics tablet installation.

This is an old tutorial I wrote a few days ago. You need to install the last kernel driver development and dkms according to this website.
[root@desk mythcat]# dnf install -y "kernel-devel-uname-r == $(uname -r)"
Fedora Modular 30 - x86_64                                                          14 kB/s |  25 kB     00:01    
Fedora Modular 30 - x86_64 - Updates                                                28 kB/s |  23 kB     00:00    
google-chrome                                                                      8.8 kB/s | 1.3 kB     00:00    
RPM Fusion for Fedora 30 - Free - Updates                                           12 kB/s | 6.8 kB     00:00    
RPM Fusion for Fedora 30 - Free - Updates                                          338 kB/s | 341 kB     00:01    
RPM Fusion for Fedora 30 - Free                                                     34 kB/s |  11 kB     00:00    
RPM Fusion for Fedora 30 - Nonfree - Updates                                       8.7 kB/s | 6.6 kB     00:00    
RPM Fusion for Fedora 30 - Nonfree - Updates                                        50 kB/s |  45 kB     00:00    
RPM Fusion for Fedora 30 - Nonfree                                                  15 kB/s |  11 kB     00:00    
Fedora 30 - x86_64 - VirtualBox                                                    356  B/s | 181  B     00:00    
Package kernel-devel-5.2.9-200.fc30.x86_64 is already installed.
Dependencies resolved.
Nothing to do.
Complete!
[root@desk mythcat]# dnf install -y dkms
Last metadata expiration check: 0:01:10 ago on Sat 31 Aug 2019 12:29:01 PM EEST.
Package dkms-2.6.1-3.fc30.noarch is already installed.
Dependencies resolved.
Nothing to do.
Complete!
Let's see if this works:
[root@desk mythcat]# xinput
⎡ Virtual core pointer                          id=2    [master pointer  (3)]
⎜   ↳ Virtual core XTEST pointer                id=4    [slave  pointer  (2)]
⎜   ↳ PixArt USB Optical Mouse                  id=8    [slave  pointer  (2)]
⎜   ↳ PenTablet  Pen (0)                        id=11   [slave  pointer  (2)]
⎣ Virtual core keyboard                         id=3    [master keyboard (2)]                                                
    ↳ Virtual core XTEST keyboard               id=5    [slave  keyboard (3)]                                                
    ↳ Power Button                              id=6    [slave  keyboard (3)]                                                
    ↳ Power Button                              id=7    [slave  keyboard (3)]                                                
    ↳ AT Translated Set 2 keyboard              id=9    [slave  keyboard (3)]  
If not work test the modules:
[root@desk mythcat]# modprobe -r hid-kye hid-uclogic hid-polostar hid-viewsonic
modprobe: FATAL: Module hid-polostar not found.
[root@desk mythcat]# modprobe -r hid-kye hid-uclogic  hid-viewsonic
You can use the official GitHub project:
wget https://github.com/DIGImend/digimend-kernel-drivers/releases/download/v10/digimend-kernel-drivers-10.tar.gz
tar xf digimend-kernel-drivers-10.tar.gz
cd digimend-kernel-drivers-10
sudo dnf install -y "kernel-devel-uname-r == $(uname -r)" dkms
sudo make dkms_install
Wednesday, September 4, 2019

Fedora 30 : About the Jupyter lab tool.

The tutorial for today is about Jupiter Lab and Fedora 30. You can see an old tutorial with Fedora 29 here.
The JupyterLab is the next-generation web-based user interface for Project Jupyter.
This can be installed using conda, pip or pipenv.
I used pip3 tool for instalation process on Fedora 30 distro:
[mythcat@desk ~]$ pip3 install jupyterlab --user
...
Successfully installed Send2Trash-1.5.0 attrs-19.1.0 backcall-0.1.0 bleach-3.1.0 defusedxml-0.6.0 
ipykernel-5.1.2 ipython-7.8.0 ipython-genutils-0.2.0 jedi-0.15.1 json5-0.8.5 jsonschema-3.0.2 
jupyter-client-5.3.1 jupyter-core-4.5.0 jupyterlab-1.1.1 jupyterlab-server-1.0.6 mistune-0.8.4 
nbconvert-5.6.0 nbformat-4.4.0 notebook-6.0.1 pandocfilters-1.4.2 parso-0.5.1 pexpect-4.7.0 
pickleshare-0.7.5 prometheus-client-0.7.1 prompt-toolkit-2.0.9 ptyprocess-0.6.0 pyrsistent-0.15.4 
pyzmq-18.1.0 terminado-0.8.2 testpath-0.4.2 tornado-6.0.3 traitlets-4.3.2 wcwidth-0.1.7 
webencodings-0.5.1
[mythcat@desk ~]$ jupyter notebook --version
6.0.1
This tool browsers can be used with :Firefox, Chrome and Safari.
The tool can be start with this command:
[mythcat@desk ~]$ jupyter lab
[I 19:53:05.527 LabApp] Writing notebook server cookie secret to ...
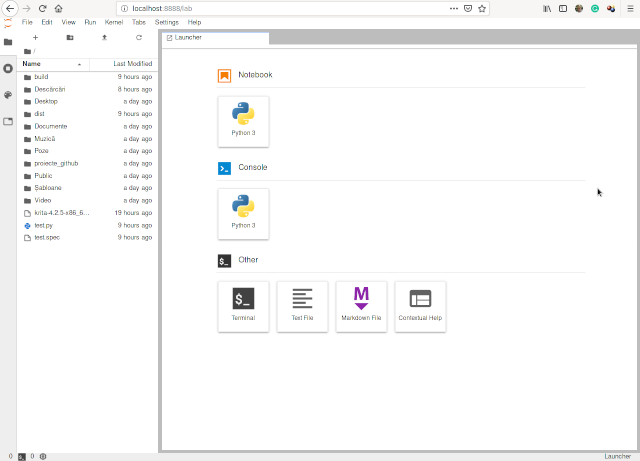
The default browser will open a new tab and show the interface for this tool, see screenshot:
If you install a new python module then you need to close and reopen the tool.
You can run every row command with Shift+Enter keys.
When you want to close it just close the browser tab and press Ctrl+C keys.
Shutdown this notebook server (y/[n])? y
[C 20:09:00.058 LabApp] Shutdown confirmed
[I 20:09:00.304 LabApp] Shutting down 0 kernels
 To see additional kernels follow this link. The Fedora 30 comes with this kernels for Jupyter using the dnf tool:
[root@desk mythcat]# dnf search jupyter | grep kernel
Last metadata expiration check: 0:57:13 ago on Mi 04 sep 2019 19:46:15 +0300.
polymake-jupyter.noarch : Jupyter kernel for polymake
gap-pkg-jupyterkernel.noarch : Jupyter kernel written in GAP
python3-jupyter-c-kernel.noarch : Minimalistic C kernel for Jupyter
gap-pkg-jupyterkernel-doc.noarch : Jupyter kernel for GAP documentation
python3-jupyter-kernel-test.noarch : Machinery for testing Jupyter kernels via
python3-jupyroot.x86_64 : ROOT Jupyter kernel
python3-metakernel.noarch : Metakernel for Jupyter
python3-ipykernel.noarch : IPython Kernel for Jupyter
python3-octave-kernel.noarch : A Jupyter kernel for Octave
python3-metakernel-bash.noarch : A Bash kernel for Jupyter/IPython
python3-metakernel-python.noarch : A Python kernel for Jupyter/IPython
python3-spyder-kernels.noarch : Jupyter kernels for the Spyder console
python3-metakernel-echo.noarch : A simple echo kernel for Jupyter/IPython
R-IRkernel.noarch : Native R Kernel for the 'Jupyter Notebook'
Another feature of Jupyter is the ability to run it as a presentation server:
[mythcat@desk ~]$ jupyter nbconvert --generate-config
Writing default config to: /home/mythcat/.jupyter/jupyter_nbconvert_config.py
[mythcat@desk ~]$ cat /home/mythcat/.jupyter/jupyter_nbconvert_config.py
# Configuration file for jupyter-nbconvert.

#------------------------------------------------------------------------------
# Application(SingletonConfigurable) configuration
#------------------------------------------------------------------------------

## This is an application.
Change jupyter_nbconvert_config.py file by adding your settings. For example:
## Accept connections from all IPs
c.ServePostProcessor.ip = '*'

## Do not open the browser automatically
c.ServePostProcessor.open_in_browser = False
After you work with jupyter you can save it with a name like Test001 and run this command:
[mythcat@desk ~]$ jupyter nbconvert "Test001.ipynb" --to slides --post serve[NbConvertApp] 
Converting notebook Test001.ipynb to slides
[NbConvertApp] Writing 278626 bytes to Test001.slides.html
[NbConvertApp] Redirecting reveal.js requests to https://cdnjs.cloudflare.com/ajax/libs/reveal.js/3.5.0
Serving your slides at http://*:8000/Test001.slides.html
Use Control-C to stop this server
The result of the HTML presentation can be see at http://localhost:8000/Test001.slides.html#.

Fedora 30 : The last Krita version.

Today I will show you how to use the last version of Krita with Fedora 30 distro. First, download the app image application Krita from the official website. The AppImage is a format for distributing portable software on Linux without needing superuser permissions to install the application. In the folder where is the download you need to set it executable:
[mythcat@desk ~]$ chmod +x krita-4.2.5-x86_64.appimage 
[mythcat@desk ~]$ ./krita-4.2.5-x86_64.appimage 
This version 4.2.5 work very well with Fedora 30 distro.

Tuesday, September 3, 2019

Fedora 30 : Few commands for Fedora distro.

In this tutorial, I will show these commands for Fedora distro and what information can provide to users. First is lspci:
[root@desk mythcat]# lspci 
...
05:00.1 Audio device: NVIDIA Corporation High Definition Audio Controller (rev a1)
[root@desk mythcat]# echo 1 > /sys/bus/pci/devices/0000\:0
0000:00:00.0/ 0000:00:1b.0/ 0000:00:1c.4/ 0000:00:1f.2/ 0000:05:00.0/
0000:00:02.0/ 0000:00:1c.0/ 0000:00:1d.0/ 0000:00:1f.3/ 0000:05:00.1/
0000:00:16.0/ 0000:00:1c.2/ 0000:00:1e.0/ 0000:02:00.0/ 
0000:00:1a.0/ 0000:00:1c.3/ 0000:00:1f.0/ 0000:03:00.0/ 
[root@desk mythcat]# echo 1 > /sys/bus/pci/devices/0000\:05\:00.1/remove
[root@desk mythcat]# lspci 
...
05:00.0 VGA compatible controller: NVIDIA Corporation GT218 [GeForce 210] (rev a2)
[root@desk mythcat]# echo 1 > /sys/bus/pci/rescan
[root@desk mythcat]# lspci -x -s 05:00.0
05:00.0 VGA compatible controller: NVIDIA Corporation GT218 [GeForce 210] (rev a2)
00: de 10 65 0a 07 04 10 00 a2 00 00 03 01 00 80 00
10: 00 00 00 f9 0c 00 00 d0 00 00 00 00 0c 00 00 ee
20: 00 00 00 00 01 df 00 00 00 00 00 00 42 38 11 13
30: 00 00 00 00 60 00 00 00 00 00 00 00 0c 01 00 00

[root@desk mythcat]# lspci -x -s 05:00.1
05:00.1 Audio device: NVIDIA Corporation High Definition Audio Controller (rev a1)
00: de 10 e3 0b 06 00 10 00 a1 00 03 04 01 00 80 00
10: 00 00 00 fa 00 00 00 00 00 00 00 00 00 00 00 00
20: 00 00 00 00 00 00 00 00 00 00 00 00 42 38 11 13
30: 00 00 00 00 60 00 00 00 00 00 00 00 05 02 00 00
The next is dmesg: This NVIDIA Audio Controller detection has this output on dmesg:
[root@desk mythcat]# dmesg | grep 05:00.1
[    0.375902] pci 0000:05:00.1: [10de:0be3] type 00 class 0x040300
[    0.375929] pci 0000:05:00.1: reg 0x10: [mem 0xfaffc000-0xfaffffff]
[    0.376002] pci 0000:05:00.1: enabling Extended Tags
[ 2077.961694] pci 0000:05:00.1: [10de:0be3] type 00 class 0x040300
[ 2077.961730] pci 0000:05:00.1: reg 0x10: [mem 0xfaffc000-0xfaffffff]
[ 2077.962138] pci 0000:05:00.1: BAR 0: assigned [mem 0xfa000000-0xfa003fff]
[ 2423.644523] pci 0000:05:00.1: [10de:0be3] type 00 class 0x040300
[ 2423.644559] pci 0000:05:00.1: reg 0x10: [mem 0xfa000000-0xfa003fff]
[ 2423.644968] pci 0000:05:00.1: BAR 0: assigned [mem 0xfa000000-0xfa003fff]
[ 2517.259902] pci 0000:05:00.1: [10de:0be3] type 00 class 0x040300
[ 2517.259939] pci 0000:05:00.1: reg 0x10: [mem 0xfa000000-0xfa003fff]
[ 2517.260342] pci 0000:05:00.1: BAR 0: assigned [mem 0xfa000000-0xfa003fff]
The echo command can show information or set some issues :
[root@desk mythcat]# echo 1 > /sys/bus/pci/devices/0000:05:00.1/remove
[root@desk mythcat]# lspci -x -s 05:00.1
[root@desk mythcat]# 
Let's see
[root@desk mythcat]# lspci -v | grep -A7 -i "audio"
00:1b.0 Audio device: Intel Corporation 6 Series/C200 Series Chipset Family High Definition Audio 
Controller (rev 05)
        Subsystem: Gigabyte Technology Co., Ltd Device a002
        Flags: bus master, fast devsel, latency 0, IRQ 3
        Memory at fbff4000 (64-bit, non-prefetchable) [size=16K]
        Capabilities: [50] Power Management version 2
        Capabilities: [60] MSI: Enable- Count=1/1 Maskable- 64bit+
        Capabilities: [70] Express Root Complex Integrated Endpoint, MSI 00
        Capabilities: [100] Virtual Channel
--
05:00.1 Audio device: NVIDIA Corporation High Definition Audio Controller (rev a1)
        Subsystem: eVga.com. Corp. Device 1311
        Flags: bus master, fast devsel, latency 0, IRQ 5
        Memory at faffc000 (32-bit, non-prefetchable) [size=16K]
        Capabilities: [60] Power Management version 3
        Capabilities: [68] MSI: Enable- Count=1/1 Maskable- 64bit+
        Capabilities: [78] Express Endpoint, MSI 00
The systemctl can help with Fedora settings:
[root@desk mythcat]# systemctl status alsa-state.service
● alsa-state.service - Manage Sound Card State (restore and store)
   Loaded: loaded (/usr/lib/systemd/system/alsa-state.service; static; vendor preset: disabled)
   Active: inactive (dead)
[root@desk mythcat]# systemctl start alsa-state.service
[root@desk mythcat]# systemctl status alsa-state.service
● alsa-state.service - Manage Sound Card State (restore and store)
   Loaded: loaded (/usr/lib/systemd/system/alsa-state.service; static; vendor preset: disabled)
   Active: active (running) since Thu 2019-08-29 13:53:58 EEST; 1s ago
 Main PID: 2951 (alsactl)
    Tasks: 1 (limit: 1942)
   Memory: 1.3M
   CGroup: /system.slice/alsa-state.service
           └─2951 /usr/sbin/alsactl -s -n 19 -c -E ALSA_CONFIG_PATH=/etc/alsa/alsactl.conf 
--initfile=/lib/alsa/init/00main >

Aug 29 13:53:58 desk systemd[1]: Started Manage Sound Card State (restore and store).
Aug 29 13:53:58 desk alsactl[2951]: alsactl 1.1.9 daemon started
Aug 29 13:53:58 desk alsactl[2951]: /usr/sbin/alsactl: load_state:1735No soundcards found...
[root@desk mythcat]# systemctl status alsa-restore.service
● alsa-restore.service - Save/Restore Sound Card State
   Loaded: loaded (/usr/lib/systemd/system/alsa-restore.service; static; vendor preset: disabled)
   Active: inactive (dead)
[root@desk mythcat]# systemctl start alsa-restore.service
[root@desk mythcat]# systemctl status alsa-restore.service
● alsa-restore.service - Save/Restore Sound Card State
   Loaded: loaded (/usr/lib/systemd/system/alsa-restore.service; static; vendor preset: disabled)
   Active: inactive (dead)

Aug 29 13:58:53 desk systemd[1]: Condition check resulted in Save/Restore Sound Card State being skipped.
The hostnamectl command for Fedora workstations:
[root@desk mythcat]# hostnamectl set-hostname  new_hostname
The last is the common dnf command:
[root@desk mythcat]# dnf

Saturday, August 31, 2019

Fedora 30 : Rollback to Fedora 30.

In this tutorial, I will show you how to rollback from a bad distro update of Fedora 31 to the old one Fedora 30.
If you follow this tutorial and you got errors then your dnf tool will have problems with update process.
After I follow the tutorial I got many packages and errors.
I try to fix with this but not work:
[root@desk mythcat]# dnf system-upgrade download --refresh --releasever=31
--setopt=module_platform_id=platform:f31 --skip-broken
Before you continue to ensure that your system is fully upgraded by running "dnf
--refresh upgrade". Do you want to continue [y/N]: y
...
Because the Fedora 31 is not available I need to roll back to my old Fedora 30. This are steps I used to fix this issue:
[root@desk mythcat]# pkcon refresh force -c -1
[root@desk mythcat]# dnf --releasever=30 --allowerasing downgrade fedora
[root@desk mythcat]# dnf clean all --releasever=32
[root@desk mythcat]# dnf clean all --releasever=31
[root@desk mythcat]# dnf clean all --releasever=30
The pkcon tool refresh the cached information about available updates and set the maximum acceptable age for cached metadata, in seconds.
The option of dnf tool clean all --releasever=32 will clean all packages from fc32.
I used this command to see what packages with errors and the repo with problems:
[root@desk mythcat]# dnf --releasever=30 --allowerasing downgrade fedora
...
The result was rawhide repo and I remove it:
[root@desk mythcat]# ls -l /etc/yum.repos.d/
[root@desk mythcat]# rm /etc/yum.repos.d/fedora-rawhide.repo 
[root@desk mythcat]# rm /etc/yum.repos.d/fedora-rawhide-modular.repo 
After that I reboot my distro and I used dnfdragora with my repos to test it.

Friday, August 30, 2019

Fedora 30 : DNF history.

This option of the tool DNF can help you to see and rollback by transaction history. NOTE: This option not work if you use the system-upgrade to another version of the distro.
[root@desk mythcat]# dnf
usage: dnf [options] COMMAND

List of Main Commands:

...
history                   display, or use, the transaction history
... 
This command displays DNF transaction history starting from the latest transaction on top of the listing.
[root@desk mythcat]# dnf history 
ID     | Command line             | Date and time    | Action(s)      | Altered
-------------------------------------------------------------------------------
    64 | groupupdate Minimal Inst | 2019-08-29 21:59 | Install        |    2   
    63 | groupupdate Minimal Inst | 2019-08-29 21:59 | Install        |    2   
To display information about this transaction use this command:
[root@desk mythcat]# dnf history info 64
Transaction ID : 64
Begin time     : Thu 29 Aug 2019 09:59:52 PM EEST
Begin rpmdb    : 1643:6a997d9fa53488ec0003727cb0394b18b6b4deaf
End time       : Thu 29 Aug 2019 09:59:53 PM EEST (1 seconds)
End rpmdb      : 1643:6a997d9fa53488ec0003727cb0394b18b6b4deaf
User           : Catalin George Festila 
Return-Code    : Success
Releasever     : 30
Command Line   : groupupdate Minimal Install
Packages Altered:
    Install @core                
    Install @minimal-environment 
To rollback the latest transaction use this:
[root@desk mythcat]# dnf history undo 64

Thursday, August 22, 2019

Fedora 30 : Set up the Linux Malware Detect.

If you have an SELinux warning detection then the details you can see how can be fixed:
[mythcat@desk ~]$ su
Password: 
[root@desk mythcat]# ausearch -c 'systemd' --raw | audit2allow -M my-systemd
******************** IMPORTANT ***********************
To make this policy package active, execute:

semodule -i my-systemd.pp

[root@desk mythcat]# semodule -X 300 -i my-systemd.pp
This tool comes with three modes that the monitor can be executed with and they relate to what will be monitored.
These modes are USERS|PATHS|FILES.
The options break down as follows:
  • USERS: The users option will take the homedirs of all system users that are above inotify_minuid and monitor them.If inotify_webdir is set then the users webdir, if it exists, will only be monitored;
  • PATHS: A comma spaced list of paths to monitor;
  • FILE: A line spaced file list of paths to monitor
$ maldet --monitor users
$ maldet --monitor /root/initial-setup-ks.cfg
$ maldet --monitor /home/mythcat
Let's test the USERS option:
[mythcat@desk maldetect-1.6.4]$ maldet --monitor users
Linux Malware Detect v1.6.4
            (C) 2002-2019, R-fx Networks 
            (C) 2019, Ryan MacDonald 
This program may be freely redistributed under the terms of the GNU GPL v2

maldet(7958): {mon} could not find inotifywait command, install yum package inotify-tools or 
download from https://github.com/rvoicilas/inotify-tools/wiki/


[root@desk maldetect-1.6.4]# dnf search inotify-tools
Last metadata expiration check: 0:01:39 ago on Wed 21 Aug 2019 11:09:22 PM EEST.
============================================ Name Exactly Matched: inotify-tools ======
inotify-tools.i686 : Command line utilities for inotify
inotify-tools.x86_64 : Command line utilities for inotify
================================================ Name Matched: inotify-tools ======
inotify-tools-devel.i686 : Headers and libraries for building apps that use libinotifytools
inotify-tools-devel.x86_64 : Headers and libraries for building apps that use libinotifytools
[root@desk maldetect-1.6.4]# dnf install inotify-tools.x86_64
...
Installed:
  inotify-tools-3.14-16.fc30.x86_64                                                                                          

Complete!
[root@desk maldetect-1.6.4]# maldet --monitor users
Linux Malware Detect v1.6.4
            (C) 2002-2019, R-fx Networks 
            (C) 2019, Ryan MacDonald 
This program may be freely redistributed under the terms of the GNU GPL v2

maldet(973): {mon} set inotify max_user_watches to 16384
maldet(973): {mon} added /dev/shm to inotify monitoring array
maldet(973): {mon} added /var/tmp to inotify monitoring array
maldet(973): {mon} added /tmp to inotify monitoring array
maldet(973): {mon} starting inotify process on 3 paths, this might take awhile...
maldet(973): {mon} inotify startup successful (pid: 1800)
maldet(973): {mon} inotify monitoring log: /usr/local/maldetect/logs/inotify_log