Pages

Sunday, January 6, 2013

Deadlock make with Unity - Linux 32 and 64.

Another game for Linux users: Deadlock.
Also, the Windows and OSX users can play this game using the web browser with the Unity plugin.
Recommended:

- Intel Core-2-Quad 2.4GHz or similar
- 2 Go Ram
- DX9 3D video card such as Nvidia GTX280 or Radeon HD5850 or newer.
You need to have the GLIBCXX_3.4.11 under Linux OS.
Deadlock website

Wednesday, January 2, 2013

Vulnerability? google paypal facebook and internal ip


Do you have any idea about an Internal IP Address or a Private IP Address that too assigned for Multinational Companies? Yeah, today we are gonna discuss about Internal IP or Private IP address Disclosure.
Disclosure of an Internal IP like 192.168.*.* or 172.16.*.* , can really Impact? Most security researchers call it as "bull shit" vulnerability. But when it comes to impact calculation even if the server is behind a firewall or NAT, an attacker can see internal IP of the remote host and this may be used to further attacks.
Read more here.

Linux - Fedora and Android make read-only file system.

I don't know what is the problem with Linux - Fedora and Android OS.
After I put my USB cable seam Fedora make from write disk to read-only.
Maybe the Android when scan the device set to read-only.
So you can get some error like this when you use the chown command:
chown: changing ownership of ...: Read-only file system
That can be one big problem when you want to copy files on your tablet.
I found a solution, just use remount.
# mount -o rw,remount /media/disk
If you want to make read-only, use:
# mount -o ro,remount /media/disk
That will solve this issue.

Wednesday, December 26, 2012

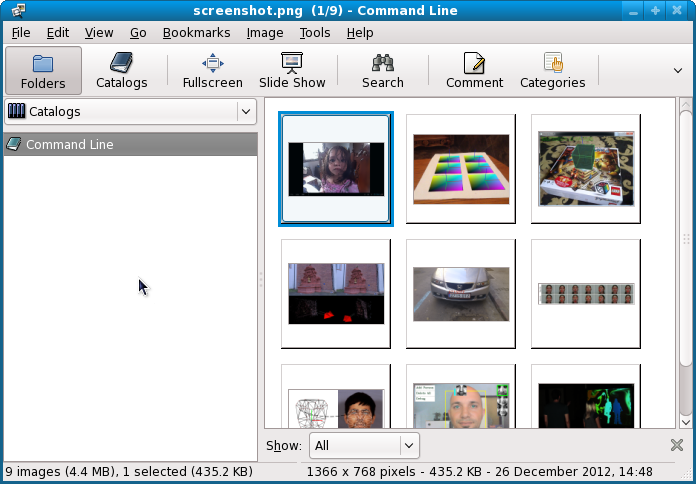
News: Tips and tricks: recursive show images

The "Mastering OpenCV with Practical Computer Vision Projects" book is done and published!
Also: including a screenshot of each project...
This will be the main issue.
... to see the screenshot from each project
...and also to find a way for any file to use
Let's take the book and source code:
$ git clone git://github.com/MasteringOpenCV/code.git
Go to the main folder: $ cd code and use this:
code]$ ls 
Chapter1_AndroidCartoonifier     Chapter7_HeadPoseEstimation
Chapter2_iPhoneAR                Chapter8_FaceRecognition
Chapter3_MarkerlessAR            Chapter9_FluidInteractionUsingKinect
Chapter4_StructureFromMotion     LICENSE.txt
Chapter5_NumberPlateRecognition  README.md
Chapter6_NonRigidFaceTracking
If we use the tree Linux command the result will be:
.
|-- Chapter1_AndroidCartoonifier
|   |-- Cartoonifier_Android
|   |   |-- AndroidManifest.xml
|   |   |-- jni
|   |   |   |-- Android.mk
|   |   |   |-- Application.mk
|   |   |   `-- jni_part.cpp
|   |   |-- project.properties
|   |   |-- res
|   |   |   |-- drawable
|   |   |   |   `-- icon.png
|   |   |   `-- values
|   |   |       `-- strings.xml
|   |   `-- src
|   |       `-- com
|   |           `-- Cartoonifier
|   |               |-- CartoonifierApp.java
|   |               |-- CartoonifierView.java
|   |               `-- CartoonifierViewBase.java
|   |-- Cartoonifier_Desktop
|   |   |-- CMakeLists.txt
|   |   |-- ImageUtils.h
|   |   |-- ImageUtils_0.7.cpp
|   |   |-- cartoon.cpp
|   |   |-- cartoon.h
|   |   `-- main_desktop.cpp
|   |-- README.txt
|   `-- screenshot.png
|-- Chapter2_iPhoneAR
We need something to find the absolute path and give that to gthumb to run it.
First, find the screenshot:
 code]$ ls -d  $PWD/**/*.png
/home/free-tutorials/code/Chapter1_AndroidCartoonifier/screenshot.png
/home/free-tutorials/code/Chapter2_iPhoneAR/screenshot.png
/home/free-tutorials/code/Chapter3_MarkerlessAR/screenshot.png
/home/free-tutorials/code/Chapter4_StructureFromMotion/screenshot.png
/home/free-tutorials/code/Chapter5_NumberPlateRecognition/screenshot.png
/home/free-tutorials/code/Chapter6_NonRigidFaceTracking/screenshot.png
/home/free-tutorials/code/Chapter7_HeadPoseEstimation/screenshot.png
/home/free-tutorials/code/Chapter8_FaceRecognition/screenshot.png
/home/free-tutorials/code/Chapter9_FluidInteractionUsingKinect/screenshot.png
Now will run gthumb with all these images:
code]$ ls -d  $PWD/**/*.png | xargs gthumb 
Tuesday, December 18, 2012

ImageMagick resize with preserve aspect ratio.

ImageMagick is used to change images.
In this case, I will show how to resize images and preserve aspect ratio:
...with height: 600 pixels
convert  -resize x600 *.png
...with width: 600 pixels
convert  -resize 600x *.png
If you know more about ImageMagick send me one email.