Pages

Sunday, June 27, 2021

Fedora 34 : Install evolution tool.

Evolution is a personal information management application that provides integrated mail, calendaring and address book functionality, see the wiki gnome page.
[root@desk mythcat]# dnf search evolution
Last metadata expiration check: 3:46:10 ago on Sun 27 Jun 2021 10:18:50 AM EEST.
======================= Name Exactly Matched: evolution ========================
evolution.x86_64 : Mail and calendar client for GNOME
... 
[root@desk mythcat]# dnf install evolution.x86_64
Last metadata expiration check: 3:48:05 ago on Sun 27 Jun 2021 10:18:50 AM EEST.
Dependencies resolved.
================================================================================
 Package                  Arch        Version                Repository    Size
================================================================================
Installing:
 evolution                x86_64      3.40.2-1.fc34          updates      3.7 M
Installing dependencies:
 evolution-langpacks      noarch      3.40.2-1.fc34          updates      5.6 M
 highlight                x86_64      3.60-3.fc34            fedora       887 k
 libytnef                 x86_64      1:1.9.3-5.fc34         fedora        39 k

Transaction Summary
================================================================================
Install  4 Packages

Total download size: 10 M
Installed size: 56 M
Is this ok [y/N]: y
...
Installed:
  evolution-3.40.2-1.fc34.x86_64    evolution-langpacks-3.40.2-1.fc34.noarch   
  highlight-3.60-3.fc34.x86_64      libytnef-1:1.9.3-5.fc34.x86_64             

Complete!
The consfiguration of email account is easy.
I used my yahoo account.
The yahoo mail server ask me a token, but I close and I login again and work well.
You can see a video tutorial from my youtube channel.

Fedora 34 : ASP.NET Core application - part 001.

This tutorial is about creating an ASP project on Fedora 34 Linux distro.
Let's create a folder for a new ASP project:
[mythcat@desk ~]$ cd CSharpProjects/
[mythcat@desk CSharpProjects]$ mkdir ASPProjects
[mythcat@desk CSharpProjects]$ cd ASPProjects/
[mythcat@desk ASPProjects]$ dotnet new web -o ASP001
The template "ASP.NET Core Empty" was created successfully.

Processing post-creation actions...
Running 'dotnet restore' on ASP001/ASP001.csproj...
  Determining projects to restore...
  Restored /home/mythcat/CSharpProjects/ASPProjects/ASP001/ASP001.csproj (in 152 ms).
Restore succeeded.
In the ASP001 folder project will run these commands:
[mythcat@desk ASPProjects]$ cd ASP001/
[mythcat@desk ASP001]$ dotnet restore
  Determining projects to restore...
  All projects are up-to-date for restore.
[mythcat@desk ASP001]$ dotnet run
Building...
info: Microsoft.Hosting.Lifetime[14]
      Now listening on: https://localhost:5001
This program will show
info: Microsoft.Hosting.Lifetime[14] Now listening on: http://localhost:5000 info: Microsoft.Hosting.Lifetime[0] Application started. Press Ctrl+C to shut down. info: Microsoft.Hosting.Lifetime[0] Hosting environment: Development info: Microsoft.Hosting.Lifetime[0] Content root path: /home/mythcat/CSharpProjects/ASPProjects/ASP001 ^Cinfo: Microsoft.Hosting.Lifetime[0] Application is shutting down...
This program will show on browser localhost the text: Hello World!
With the dotnet restore command, we download the necessary dependencies.
It calls into NuGet - .NET package manager to restore the tree of dependencies.
Let's see the files from this project:
[mythcat@desk ASP001]$ ls
appsettings.Development.json  ASP001.csproj  obj	 Properties
appsettings.json	      bin	     Program.cs
[mythcat@desk ASP001]$ cat Program.cs 
using System;
using Microsoft.AspNetCore.Builder;
using Microsoft.Extensions.Hosting;

var builder = WebApplication.CreateBuilder(args);
var app = builder.Build();

if (app.Environment.IsDevelopment())
{
    app.UseDeveloperExceptionPage();
}

app.MapGet("/", (Func<string>)(() => "Hello World!"));

app.Run();
[mythcat@desk ASP001]$ cat ASP001.csproj 
...
This is the most simple tutorial about the ASP project.

Saturday, June 19, 2021

Fedora 34 : Test with the new .NET 6.0 SDK.

Now Fedora 34 distro comes integrated in the repo with DotNet 5.
Today I tested DotNet 6.
Let's create a new folder for the .NET 6.0 SDK .
[mythcat@desk ~]$ mkdir -p $HOME/dotnet
[mythcat@desk ~]$ cd dotnet/
First open your browser and download the .NET 6.0 SDK from the official website.
[mythcat@desk dotnet]$ ls
dotnet-sdk-6.0.100-preview.5.21302.13-linux-x64.tar.gz
Use the following commands to extract the SDK and make the commands available at the terminal.
[mythcat@desk dotnet]$ tar zxf dotnet-sdk-6.0.100-preview.5.21302.13-linux-x64.tar.gz  -C $HOME/dotnet
[mythcat@desk dotnet]$ export DOTNET_ROOT=$HOME/dotnet
[mythcat@desk dotnet]$ export PATH=$PATH:$HOME/dotnet
Let's see the content of the dotnet folder:
[mythcat@desk dotnet]$ ls
dotnet							sdk
dotnet-sdk-6.0.100-preview.5.21302.13-linux-x64.tar.gz	sdk-manifests
host							shared
LICENSE.txt						templates
packs							ThirdPartyNotices.txt
Let's run the binary dotnet from this folder:
[mythcat@desk dotnet]$ ./dotnet --version
6.0.100-preview.5.21302.13 
I added to PATH into .bashrc file:
[mythcat@desk dotnet]$cat ~/.bashrc 
export PS1="[\u@\h \W]\$ "
PATH=$PATH:$HOME/dotnet

Friday, June 18, 2021

Fedora 34 : Defragmenting an XFS file system with xfs_fsr.

The xfs_fsr tool improves the organization of mounted filesystems.
The XFS is an extent-based file system, it is usually unnecessary to defragment a whole file system
I can use this command to Defragmenting my XFS file system.
[root@desk mythcat]# xfs_fsr /dev/mapper/fedora-root -v -d
...
set temp attr
DEBUG: fsize=6774 blsz_dio=6656 d_min=512 d_max=2147483136 pgsz=4096
Temporary file has 1 extents (2 in original)
extents before:2 after:1 DONE ino=95047551
ino=95050118
ino=95050118 extents=2 can_save=1 tmp=/.fsr/ag14/tmp10249
orig forkoff 288, temp forkoff 0
orig forkoff 288, temp forkoff 296
orig forkoff 288, temp forkoff 288
set temp attr
DEBUG: fsize=6541 blsz_dio=6144 d_min=512 d_max=2147483136 pgsz=4096
Temporary file has 1 extents (2 in original)
extents before:2 after:1 DONE ino=95050118
This is all about this command.

Wednesday, June 16, 2021

Fedora 34 : The grubby command line tool.

The grubby command line tool used to configure bootloader menu entries across multiple architectures.
All information can be find with the manual linux commands:
[root@desk mythcat]# man grubby
Let's see some simple examples.
This command can list all the installed kernel:
[root@desk mythcat]# grubby --info=ALL | grep ^kernel
kernel="/boot/vmlinuz-5.12.10-300.fc34.x86_64"
kernel="/boot/vmlinuz-5.12.8-300.fc34.x86_64"
kernel="/boot/vmlinuz-0-rescue-fc76db87af524282b0c7e05a9c5d18f4
To get more details on the installed kernel:
[root@desk mythcat]# grubby --info="/boot/vmlinuz-$(uname -r)"
index=0
kernel="/boot/vmlinuz-5.12.10-300.fc34.x86_64"
args="ro resume=/dev/mapper/fedora-swap rd.lvm.lv=fedora/root rd.lvm.lv=fedora/swap rhgb quiet splash 
acpi_osi=Linux"
root="/dev/mapper/fedora-root"
initrd="/boot/initramfs-5.12.10-300.fc34.x86_64.img"
title="Fedora (5.12.10-300.fc34.x86_64) 34 (MATE-Compiz)"
id="fc76db87af524282b0c7e05a9c5d18f4-5.12.10-300.fc34.x86_64"
Add selinux=0 to the kernel with this tool:
[root@desk mythcat]# grubby --update-kernel ALL --args selinux=0
Let's see if is added:
[root@desk mythcat]# grubby --info="/boot/vmlinuz-$(uname -r)"
index=0
kernel="/boot/vmlinuz-5.12.10-300.fc34.x86_64"
args="ro resume=/dev/mapper/fedora-swap rd.lvm.lv=fedora/root rd.lvm.lv=fedora/swap rhgb quiet splash 
acpi_osi=Linux selinux=0"
root="/dev/mapper/fedora-root"
initrd="/boot/initramfs-5.12.10-300.fc34.x86_64.img"
title="Fedora (5.12.10-300.fc34.x86_64) 34 (MATE-Compiz)"
id="fc76db87af524282b0c7e05a9c5d18f4-5.12.10-300.fc34.x86_64"
Remove the selinux=0 option from the bootloader with this tool:
[root@desk mythcat]# grubby --update-kernel ALL --remove-args selinux
Let's see if is removed:
[root@desk mythcat]# grubby --info="/boot/vmlinuz-$(uname -r)"
index=0
kernel="/boot/vmlinuz-5.12.10-300.fc34.x86_64"
args="ro resume=/dev/mapper/fedora-swap rd.lvm.lv=fedora/root rd.lvm.lv=fedora/swap rhgb quiet splash 
acpi_osi=Linux"
root="/dev/mapper/fedora-root"
initrd="/boot/initramfs-5.12.10-300.fc34.x86_64.img"
title="Fedora (5.12.10-300.fc34.x86_64) 34 (MATE-Compiz)"
id="fc76db87af524282b0c7e05a9c5d18f4-5.12.10-300.fc34.x86_64"
You can see is removed.
Get the index number of all the installed kernels:
[root@desk mythcat]# grubby --info=ALL | grep -E "^kernel|^index"
index=0
kernel="/boot/vmlinuz-5.12.10-300.fc34.x86_64"
index=1
kernel="/boot/vmlinuz-5.12.8-300.fc34.x86_64"
index=2
kernel="/boot/vmlinuz-0-rescue-fc76db87af524282b0c7e05a9c5d18f4"
I can set the default kernel by index with this tool:
[root@desk mythcat]# grubby --set-default-index=1
These are not all features of this command.

Tuesday, June 15, 2021

Fedora 34 : The uresourced resource tool.

The uresourced tool is a daemon that will give resource allocations to active graphical users.
You can enable easy with systemctl command:
[root@desk mythcat]# systemctl status uresourced
○ uresourced.service - User resource assignment daemon
     Loaded: loaded (/usr/lib/systemd/system/uresourced.service; disabled; vend>
     Active: inactive (dead)

[root@desk mythcat]# systemctl enable uresourced
Created symlink /etc/systemd/system/user@.service.wants/uresourced.service → 
/usr/lib/systemd/system/uresourced.service.
[root@desk mythcat]# systemctl start  uresourced
[root@desk mythcat]# systemctl status uresourced
● uresourced.service - User resource assignment daemon
...

Sunday, June 13, 2021

Fedora 34 : Linux tool to prevent OOM Killer.

The OOM Killer or Out of Memory Killer is a process that the Linux kernel employs when the system is critically low on memory
This situation occurs because processes on the server are consuming a large amount of memory, and the system requires more memory for its processes and to allocate to other processes.
A simple example with OOM Killer: if will swap out the desktop environment, drop the whole page cache, and empty every buffer before it will ultimately kill a process.
This tool named earlyoom is a simple, stable, and tiny OOM prevention daemon.
That is written in C and is the best choice for old servers.
It has minimum dependencies and can work with the oldest kernels.
The earlyoom checks the amount of available memory and free swap up.
This command causes memory consumption, and the process will exits before OOM occurs if this tool works.
The tool can be installed with the following command:
[root@desk mythcat]# dnf install earlyoom
Last metadata expiration check: 0:38:00 ago on Sun 13 Jun 2021 11:38:22 AM EEST.
Package earlyoom-1.6.2-3.fc34.x86_64 is already installed.
Dependencies resolved.
Nothing to do.
Complete!
You can see all options for this tool with this command:
[root@desk mythcat]# earlyoom -h
earlyoom 1.6.2
Usage: earlyoom [OPTION]...
Then the service is activated with:
[root@desk mythcat]# systemctl enable --now earlyoom
My configuration file for this tool is:
[root@desk mythcat]# vim  /etc/default/earlyoom
EARLYOOM_ARGS="-r 1 -m 1 -s 5 -M 1514244 --prefer '^Web Content$' 
--avoid '^(dnf|packagekitd|gnome-shell|gnome-session-c|gnome-session-b|lightdm|
sddm|sddm-helper|gdm|gdm-wayland-ses|gdm-session-wor|gdm-x-session|Xorg|Xwayland|
systemd|systemd-logind|dbus-daemon|dbus-broker|cinnamon|cinnamon-sessio|kwin_x11|
kwin_wayland|plasmashell|ksmserver|plasma_session|startplasma-way|xfce4-session|
mate-session|marco|lxqt-session|openbox|cryptsetup)$'"
You can check the status of the service to be active:
[root@desk mythcat]# systemctl status earlyoom
...
Active: active (running) since 
... 
You can test it easily with these commands:
[root@desk mythcat]# sudo swapoff -a
[root@desk mythcat]# tail /dev/zero
Terminated
The process tail must occupy the entire available RAM on the system, this will low your system and after the earlyoom tool freeing the RAM all works well.
To see the tool on work, use the command:
[root@desk mythcat]# earlyoom 
earlyoom 1.6.2
mem total: 7899 MiB, swap total: 7898 MiB
sending SIGTERM when mem <= 10.00% and swap <= 10.00%,
        SIGKILL when mem <=  5.00% and swap <=  5.00%
mem avail:  4742 of  7899 MiB (60.04%), swap free: 7898 of 7898 MiB (100.00%)
mem avail:  4751 of  7899 MiB (60.15%), swap free: 7898 of 7898 MiB (100.00%)
mem avail:  4754 of  7899 MiB (60.19%), swap free: 7898 of 7898 MiB (100.00%)

Thursday, June 10, 2021

Fedora 34 : Fix conflicts are between the version of the packages.

You can have conflicts are between the version of the packages, see this example:
[root@desk mythcat]# dnf update --refresh
file /usr/share/doc/gstreamer1-plugins-good/README from install of 
gstreamer1-plugins-good-1.19.1-1.fc34.i686 conflicts with file from package 
gstreamer1-plugins-good-1.18.4-2.fc34.x86_64
This command will fix conflicts are between the version of the packages:
[root@desk mythcat]# dnf remove --duplicates
...
 gstreamer1                          i686    1.19.1-1.fc34       updates  1.4 M
Reinstalling:
 gst-editing-services                x86_64  1.19.1-1.fc34       updates  608 k
     replacing  gst-editing-services.x86_64 1.18.4-1.fc34
 gstreamer1                          x86_64  1.19.1-1.fc34       updates  1.3 M
     replacing  gstreamer1.x86_64 1.18.4-2.fc34
 gstreamer1-plugins-bad-free         x86_64  1.19.1-1.fc34       updates  2.6 M
     replacing  gstreamer1-plugins-bad-free.x86_64 1.18.4-1.fc34
 gstreamer1-plugins-bad-free-extras  x86_64  1.19.1-1.fc34       updates  422 k
     replacing  gstreamer1-plugins-bad-free-extras.x86_64 1.18.4-1.fc34
 gstreamer1-plugins-ugly-free        x86_64  1.19.1-1.fc34       updates  103 k
     replacing  gstreamer1-plugins-ugly-free.x86_64 1.18.4-1.fc34
 gucharmap                           x86_64  13.0.8-1.fc34       updates  514 k
     replacing  gucharmap.x86_64 13.0.7-1.fc34
 gucharmap-libs                      x86_64  13.0.8-1.fc34       updates  1.2 M
     replacing  gucharmap-libs.x86_64 13.0.7-1.fc34
 kernel-headers                      x86_64  5.12.9-300.fc34     updates  1.2 M
     replacing  kernel-headers.x86_64 5.12.5-300.fc34
...
The next command will update you Linux distro:
[root@desk mythcat]# dnf update --refresh
Copr repo for dotnet owned by @dotnet-sig       5.1 kB/s | 3.3 kB     00:00    
Adobe Systems Incorporated                      7.6 kB/s | 2.9 kB     00:00    
Fedora 34 - x86_64                               58 kB/s |  26 kB     00:00    
Fedora 34 - x86_64 - Updates                     41 kB/s |  23 kB     00:00    
google-chrome                                   9.0 kB/s | 1.3 kB     00:00    
RPM Fusion for Fedora 34 - Free                  16 kB/s | 7.9 kB     00:00    
RPM Fusion for Fedora 34 - Free - Updates        18 kB/s | 7.9 kB     00:00    
RPM Fusion for Fedora 34 - Nonfree               21 kB/s | 8.0 kB     00:00    
RPM Fusion for Fedora 34 - Nonfree - Updates     13 kB/s | 8.0 kB     00:00    
The Zeek Network Security Monitor. (Fedora_33)  6.6 kB/s | 1.7 kB     00:00    
Visual Studio Code                              6.0 kB/s | 3.0 kB     00:00    
WineHQ packages                                 9.3 kB/s | 3.2 kB     00:00    
Dependencies resolved.
...
 gstreamer1-plugins-good-1.19.1-1.fc34.i686  
...

Wednesday, June 9, 2021

Fedora 34 : Programming with the ncurses library - part 003.

This is a simple example with ncurses library to see how can define an array and used with random colors:
This example is build with this command:
[mythcat@desk ncursesProject]$ gcc test_008.c -o test_008 -lncurses
This is source code:
#include <ncurses.h>
#include <stdlib.h> 

int main(void) {
    
    initscr();
    
    start_color();
    
    char colors[8][20] = {
    "COLOR_BLACK",
    "COLOR_RED",
    "COLOR_GREEN",
    "COLOR_YELLOW",
    "COLOR_BLUE",
    "COLOR_MAGENTA",
    "COLOR_CYAN",
    "COLOR_WHITE"
    };
    
    int n;
    for ( n=0 ; n<16 ; ++n )
    {
        int aleator1 = rand() % 256 + 1;
        int result1 = *colors[aleator1];
        int aleator2 = rand() % 256 + 1;
        int result2 = *colors[aleator2];
        //printw("%d",result1);
        init_pair(n, result1, result2);
        attron(COLOR_PAIR(n));
        printw("Hello word!\n");
    }
    
    refresh();

    getch();

    endwin();
}

Saturday, June 5, 2021

Fedora 34 : Neix feed reader.

neix is a simple, work in progress terminal feed reader for all common RSS/Atom feeds on the web out there.
Let't install from the GitHub repository.
[mythcat@desk ~]$ git clone https://github.com/tomschwarz/neix.git  
Cloning into 'neix'...
remote: Enumerating objects: 2574, done.
remote: Counting objects: 100% (365/365), done.
remote: Compressing objects: 100% (274/274), done.
remote: Total 2574 (delta 189), reused 198 (delta 77), pack-reused 2209
Receiving objects: 100% (2574/2574), 26.07 MiB | 6.27 MiB/s, done.
Resolving deltas: 100% (1529/1529), done.
[mythcat@desk ~]$ cd neix
[mythcat@desk neix]$ cmake .
-- The C compiler identification is GNU 11.1.1
-- The CXX compiler identification is GNU 11.1.1
-- Detecting C compiler ABI info
-- Detecting C compiler ABI info - done
-- Check for working C compiler: /bin/cc - skipped
-- Detecting C compile features
-- Detecting C compile features - done
-- Detecting CXX compiler ABI info
-- Detecting CXX compiler ABI info - done
...
-- Found Curses: /usr/lib64/libncursesw.so  
-- Configuring done
-- Generating done
-- Build files have been written to: /home/mythcat/neix
[mythcat@desk neix]$ make 
Scanning dependencies of target neixParser
[  5%] Building CXX object CMakeFiles/neixParser.dir/src/parser/FactoryParser.cpp.o
...
[ 89%] Built target neixFeed
Scanning dependencies of target neix
[ 94%] Building CXX object CMakeFiles/neix.dir/src/main.cpp.o
[100%] Linking CXX executable bin/neix
[100%] Built target neix
[mythcat@desk neix]$ sudo make install
[sudo] password for mythcat: 
[ 26%] Built target neixParser
[ 42%] Built target neixConfig
[ 57%] Built target neixApplication
[ 73%] Built target neixHelper
[ 89%] Built target neixFeed
[100%] Built target neix
Install the project...
-- Install configuration: ""
-- Installing: /usr/local/bin/neix
-- Installing: /usr/local/share/man/man1/neix.1
-- Installing: /usr/local/share/neix/neix.conf
-- Installing: /usr/local/share/neix/feeds.conf
Let's run it:
[mythcat@desk neix]$ neix 
[neix] Starting version v0.1.5
[neix] Loading configuration files
[neix] Loading feeds 
[neix] Launch TUI 
Use feeds.conf to set the list of feeds you want to read.
This is a screenshot with the result of the build:

Saturday, May 29, 2021

Fedora 34 : Upgrade to the last version Fedora 34 Linux distro.

Today I upgraded from the fedora 33 version to the new Fedora 34 Linux distro version.
Here are the commands I used to upgrade this Linux distro:
[root@desk mythcat]# dnf upgrade 
[root@desk mythcat]# dnf --refresh upgrade
[root@desk mythcat]# dnf system-upgrade reboot
The whole process will require a restart and then continue with the following commands:
[root@desk mythcat]# dnf install dnf-plugin-system-upgrade --best
[root@desk mythcat]# dnf system-upgrade download --refresh --releasever=34 --allowerasing --skip-broken
[root@desk mythcat]# dnf system-upgrade reboot
[root@desk mythcat]# rpm --rebuilddb
[root@desk mythcat]# dnf distro-sync --setopt=deltarpm=0
[root@desk mythcat]# dnf install rpmconf
[root@desk mythcat]# rpmconf -a
[root@desk mythcat]# reboot
You can find this version on the official webpage.

Tuesday, May 25, 2021

Fedora 33 : Programming with the ncurses library - part 002.

Another example with this library, see the screenshot:

#include <ncurses.h&gt 

WINDOW *win;
int startx, starty, width, height;
int cport;


WINDOW *makewin(int h, int w, int y, int x)
{
    WINDOW *lwin;

    lwin = newwin(h, w, y, x);
    box(lwin, 0 , 0);
    wrefresh(lwin);

    return lwin;
}

void dewin(WINDOW *lwin)
{
    wborder(lwin, ' ', ' ', ' ', ' ', ' ', ' ', ' ', ' ');
    wrefresh(lwin);
    delwin(lwin);
}

void getInput(){
    win = makewin(height, width, starty, startx);
    wbkgd(win, COLOR_PAIR(1));
    mvwprintw(win, 0, 8, "Question 1 : ");
    mvwprintw(win, 2, 4, "What is your age?");
    mvwprintw(win, 3, 4, "dd/mm/yy:");
    wrefresh(win);
    wscanw(win, "%d", &cport);
}

int main()
{
    initscr();
    cbreak();
    keypad(stdscr, TRUE);
    start_color();
    init_pair(1,COLOR_WHITE, COLOR_BLACK);
    init_pair(2,COLOR_WHITE, COLOR_BLUE);
    bkgd(COLOR_PAIR(2));
    refresh();
    
    height = 6;
    width = 30;
    starty = (LINES - height) / 2;
    startx = (COLS - width) / 2;
    
    getInput();
    getch();

    dewin(win);
    endwin();
    return 0;
}

Sunday, May 23, 2021

Fedora 33 : Programming with the ncurses library - part 001.

I started learning C and C ++ many years ago. Around 2004, the virtualization and S.D.K. class system for the Windows operating system confused me and was not to my advantage. Later I realized that it is more advantageous and faster to create your own tools with other programming languages. It turned out that I'm right and today I'm going to show you how simple it is to use C programming on the Linux Fedora 33 distro.
This library is easy to install on the Fedora Linux distro:
[root@desk mythcat]# dnf install ncurses-devel
Last metadata expiration check: 2:33:29 ago on Sun 23 May 2021 07:15:17 PM EEST.
Package ncurses-devel-6.2-3.20200222.fc33.x86_64 is already installed.
Package ncurses-devel-6.2-3.20200222.fc33.i686 is already installed.
Dependencies resolved.
Nothing to do.
Complete!
I created a folder and with the vim editor, I created my file called test_001.c for the first test.
[mythcat@desk ~]$ mkdir ncursesProject
[mythcat@desk ~]$ cd ncursesProject/
[mythcat@desk ncursesProject]$ vim test_001.c
This is the content to initiate and display a simple text with this library:
#include <ncurses.h>
 
int main(void){ 
        initscr();                      /* start curses mode */
        printw("Hello World !");        /* print Hello World */
        refresh();                      /* send to the real screen */
        getch();                        /* wait for user input */
        endwin();                       /* end curses mode */
        return 0;
} 
I used cc and gcc commands for C compilers to test this example and it works great:
[mythcat@desk ncursesProject]$ cc -o test_001 test_001.c -lncurses
[mythcat@desk ncursesProject]$ ls -l
total 32
-rwxr-xr-x 1 mythcat mythcat 25312 May 23 22:14 test_001
-rw-r--r-- 1 mythcat mythcat   386 May 23 22:14 test_001.c
[mythcat@desk ncursesProject]$ ./test_001 
[mythcat@desk ncursesProject]$ gcc -o test_001_gcc test_001.c -lncurses
[mythcat@desk ncursesProject]$ ./test_001_gcc 
#include <ncurses.h>

int main() { 
    // create the pointer to the window
    WINDOW *w;
    // define the data
    char list[4][8] = { "","Festila", "George", "Catalin"};
    char item[8];
    int ch, i = 0, width = 8;
    initscr(); // initialize Ncurses
    // create the new window with ncurses
    w = newwin( 6, 11, 0, 0 ); 
    box( w, 0, 0 ); // sets default borders for the window
    // now print all the menu items and highlight the first one
    for(i=0; i<4; i++) 
        {
        if( i != 0 ) 
            // highlights the first item.
            wattron( w, A_STANDOUT ); 
        else
            // highlights the next item.
            wattroff( w, A_STANDOUT );
            sprintf(item, "%-8s",  list[i]);
            mvwprintw( w, i+1, 2, "%s", item );
            //wrefresh( w );
        }
        wrefresh( w ); // update the terminal screen
        i = 0;
        noecho(); // disable echoing of characters on the screen
        keypad( w, TRUE ); // enable keyboard input for the window.
        curs_set(0); // hide the default screen cursor.
        
    // get the input if is not q key presed then run
    while(( ch = wgetch(w)) != 'q')
    { 
        // right pad with spaces to make the items appear with even width.
        sprintf(item, "%-8s",  list[i]); 
        mvwprintw( w, i+1, 2, "%s", item ); 

        // use a variable to increment or decrement the value based on the input.
        switch( ch ) 
        {
            case KEY_UP:
            i--; // increment 
            // stop the number of count list items -1
            i = ( i<0 ) ? 3 : i;
            break;
            case KEY_DOWN:
            i++; // increment
            // stop the number of count list items 
            i = ( i>2 ) ? 3 : i;
            break;
        }
    
        // now highlight the next item in the list.
        wattron( w, A_STANDOUT );
        sprintf(item, "%-8s",  list[i]);
        mvwprintw( w, i+1, 2, "%s", item);
        wattroff( w, A_STANDOUT );
    }
    // delete window
    delwin( w );
    // stop the window
    endwin();
}
This is the result:

Fedora 33 : Wordpress application desktop by Automattic tested on linux.

This application come for Android , Desktop and Mobile.
You can see this application on this website.
This is an screenshot with the application run it on Fedora Linux distro:
Download it unarchive and used like this:
[mythcat@desk ~]$ cd wordpress.com-linux-x64-6.14.0/
[mythcat@desk wordpress.com-linux-x64-6.14.0]$ ls -la
total 176264
drwxrwxrwx    5 mythcat mythcat      4096 Apr 30 14:23 .
drwx------. 104 mythcat mythcat     12288 May 23 12:29 ..
-rwxrwxrwx    1 mythcat mythcat    124662 Apr 30 14:23 chrome_100_percent.pak
-rwxrwxrwx    1 mythcat mythcat    187289 Apr 30 14:23 chrome_200_percent.pak
-rwxrwxrwx    1 mythcat mythcat   4743960 Apr 30 14:23 chrome-sandbox
-rwxrwxrwx    1 mythcat mythcat  10527632 Apr 30 14:23 icudtl.dat
-rwxrwxrwx    1 mythcat mythcat    249240 Apr 30 14:23 libEGL.so
-rwxrwxrwx    1 mythcat mythcat   3064616 Apr 30 14:23 libffmpeg.so
-rwxrwxrwx    1 mythcat mythcat   6990656 Apr 30 14:23 libGLESv2.so
-rwxrwxrwx    1 mythcat mythcat   3908248 Apr 30 14:23 libvk_swiftshader.so
-rwxrwxrwx    1 mythcat mythcat   6710080 Apr 30 14:23 libvulkan.so
-rwxrwxrwx    1 mythcat mythcat      1060 Apr 30 14:23 LICENSE.electron.txt
-rwxrwxrwx    1 mythcat mythcat   4562357 Apr 30 14:23 LICENSES.chromium.html
drwxrwxrwx    2 mythcat mythcat      4096 Apr 30 14:23 locales
drwxrwxrwx    3 mythcat mythcat        17 Apr 30 14:23 resources
-rwxrwxrwx    1 mythcat mythcat   5035565 Apr 30 14:23 resources.pak
-rwxrwxrwx    1 mythcat mythcat     51449 Apr 30 14:23 snapshot_blob.bin
drwxrwxrwx    2 mythcat mythcat        43 Apr 30 14:23 swiftshader
-rwxrwxrwx    1 mythcat mythcat    172276 Apr 30 14:23 v8_context_snapshot.bin
-rwxrwxrwx    1 mythcat mythcat       107 Apr 30 14:23 vk_swiftshader_icd.json
-rwxrwxrwx    1 mythcat mythcat 134100640 Apr 30 14:23 wpcom
[mythcat@desk wordpress.com-linux-x64-6.14.0]$ ./wpcom 
{"name":"calypso","hostname":"desk","pid":9931,"reqId":"066e63b4-d04c-4210-af52-6419e4a156fb","level":30,
"method":"GET","status":200,"length":"12940","url":"/post/null","duration":66.718,
"httpVersion":"1.1","env":"desktop","userAgent":"Chrome 87","rawUserAgent":"Mozilla/5.0 (X11; Linux x86_64)
AppleWebKit/537.36 (KHTML, like Gecko) WordPressDesktop/6.14.0 Chrome/87.0.4280.67 Electron/11.0.4 
Safari/537.36","remoteAddr":"127.0.0.1","msg":"request finished","time":"2021-05-23T09:48:44.683Z","v":0}
{"name":"calypso","hostname":"desk","pid":9931,"reqId":"6da5223a-07e0-4202-8ab0-e28940a54fbc","level":30, ...
I send my issue on GitHub for this application.
... more information on the official blog ...

Sunday, May 16, 2021

Fedora 33 : Firebase command-line interface.

This tutorial is about Firebase command-line interface and Fedora 33 Linux DIstro.
I used npm tool:
...
npm notice Run npm install -g npm@7.13.0 to update!
... 
I updated the npm to the last version with this command:
[mythcat@desk ~]$ sudo  npm install -g npm@7.13.0 

changed 14 packages, and audited 255 packages in 4s

found 0 vulnerabilities
This command will install firebase-tools:
[mythcat@desk ~]$ sudo npm install -g firebase-tools
npm WARN deprecated har-validator@5.1.5: this library is no longer supported
npm WARN deprecated request@2.88.2: request has been deprecated, 
see https://github.com/request/request/issues/3142

added 711 packages, and audited 712 packages in 2m

found 0 vulnerabilities
[mythcat@desk ~]$ firebase --version
9.10.2
[mythcat@desk ~]$ firebase login
i  Firebase optionally collects CLI usage and error reporting information to help improve our products. 
Data is collected in accordance with Google's privacy policy (https://policies.google.com/privacy) and 
is not used to identify you.

? Allow Firebase to collect CLI usage and error reporting information? Yes
i  To change your data collection preference at any time, run `firebase logout` and log in again.

Visit this URL on this device to log in:
https://accounts.google.com/o/oauth2/auth?client_id=...

Waiting for authentication...

✔  Success! Logged in as ...gmail.com
After you set in the browser, you will see this:
Another way for the signin process is this command:
[mythcat@desk ~]$ firebase login:ci
In this moment I can use firebase command to see my projects:
[mythcat@desk ~]$ firebase projects:list
✔ Preparing the list of your Firebase projects
┌──────────────────────┬────────────────────┬────────────────┬──────────────────────┐
│ Project Display Name │ Project ID         │ Project Number │ Resource Location ID │
├──────────────────────┼────────────────────┼────────────────┼──────────────────────┤
...
└──────────────────────┴────────────────────┴────────────────┴──────────────────────┘

3 project(s) total.
This command connect your local project files to your Firebase project and let you to initialize a new Firebase project or use an existing one.
[mythcat@desk ~]$ firebase init hosting

     ######## #### ########  ######## ########     ###     ######  ########
     ##        ##  ##     ## ##       ##     ##  ##   ##  ##       ##
     ######    ##  ########  ######   ########  #########  ######  ######
     ##        ##  ##    ##  ##       ##     ## ##     ##       ## ##
     ##       #### ##     ## ######## ########  ##     ##  ######  ########

You're about to initialize a Firebase project in this directory:

  /home/mythcat

Before we get started, keep in mind:

  * You are initializing your home directory as a Firebase project


=== Project Setup

First, let's associate this project directory with a Firebase project.
You can create multiple project aliases by running firebase use --add, 
but for now we'll just set up a default project.

? Please select an option: (Use arrow keys)
❯ Use an existing project 
  Create a new project 
  Add Firebase to an existing Google Cloud Platform project 
  Don't set up a default project 
After you make changes you can deploy to your site, run the following command:
✔  Firebase initialization complete!
...
[mythcat@desk ~]$ firebase deploy --only hosting
...
More about Firebase and CLI can be read on the official website.

Saturday, May 8, 2021

Fedora 33 : Simple installation of the TeamViewer utility.

TeamViewer is a comprehensive, remote access, remote control and remote support solution that works with almost every desktop and mobile platform, including Windows, macOS, Android, and iOS.
Clean the files from your system.
[root@desk mythcat]# dnf clean all
76 files removed
Get the wget tool for download:
[root@desk mythcat]# dnf -y install wget
Get the rmp file:
[root@desk mythcat]# wget https://download.teamviewer.com/download/linux/teamviewer.x86_64.rpm
--2021-05-08 16:44:17--  
https://download.teamviewer.com/download/linux/teamviewer.x86_64.rpm
Resolving download.teamviewer.com (download.teamviewer.com)... 104.16.62.16, 104.16.63.16, 
2606:4700::6810:3f10, ...
...
Connecting to dl.teamviewer.com (dl.teamviewer.com)|104.16.62.16|:443... connected.
HTTP request sent, awaiting response... 200 OK
Length: 15280308 (15M) [application/x-redhat-package-manager]
Saving to: ‘teamviewer.x86_64.rpm’

teamviewer.x86_64.rp 100%[=====================>]  14.57M  16.6MB/s    in 0.9s    

2021-05-08 16:44:19 (16.6 MB/s) - ‘teamviewer.x86_64.rpm’ saved [15280308/15280308] 
I already installed the package to talk to my son.
[root@desk mythcat]# dnf -y install teamviewer.x86_64.rpm
Last metadata expiration check: 0:04:58 ago on Sat 08 May 2021 04:40:17 PM EEST.
Package teamviewer-15.17.6-0.x86_64 is already installed.
Dependencies resolved.
Nothing to do.
Complete! 
The next step is to import the key from TeamViewer team development:
[root@desk mythcat]# wget https://download.teamviewer.com/download/linux/signature/TeamViewer2017.asc
...
[root@desk mythcat]# gpg --import TeamViewer2017.asc 
...
gpg:               imported: 1
Team view does not solve the basic security problems I face every day, it only offers a remote connection.

Tuesday, May 4, 2021

Fedora 33 : The new aureport tool.

The aureport Linux tool allows you to generate summary and columnar reports on the events recorded in log files.
You can see some simple examples with this tool:
[root@desk mythcat]# aureport --tty -ts today

TTY Report
===============================================
# date time event auid term sess comm data
===============================================
<no events of interest were found>

[root@desk mythcat]# aureport --start 12/31/2020 00:00:00 --end 04/05/2021 00:00:01

Summary Report
======================
Range of time in logs: 10/17/2020 22:30:47.765 - 04/04/2021 23:38:30.089
Selected time for report: 12/31/2020 00:00:00 - 04/05/2021 00:00:01
Number of changes in configuration: 76792
Number of changes to accounts, groups, or roles: 11
Number of logins: 10
Number of failed logins: 16
Number of authentications: 460
Number of failed authentications: 59
Number of users: 3
Number of terminals: 16
Number of host names: 3
Number of executables: 56
Number of commands: 76
Number of files: 0
Number of AVC's: 0
Number of MAC events: 0
Number of failed syscalls: 0
Number of anomaly events: 375
Number of responses to anomaly events: 0
Number of crypto events: 35
Number of integrity events: 0
Number of virt events: 0
Number of keys: 0
Number of process IDs: 6104
Number of events: 112473

[root@desk mythcat]# aureport -x --summary

Executable Summary Report
=================================
total  file
=================================
128351  (null)
42192  /usr/lib/systemd/systemd
3348  /usr/bin/sudo
1733  /usr/bin/su
971  /snap/anbox/186/usr/bin/anbox
754  /usr/libexec/lxdm-session
702  /usr/lib/systemd/systemd-update-utmp
311  /opt/google/chrome/chrome
119  /usr/sbin/sshd
113  /usr/bin/login
104  /opt/teamviewer/tv_bin/teamviewerd
88  /usr/sbin/runuser
84  /usr/sbin/unix_chkpwd
69  /usr/sbin/auditd
55  /usr/sbin/atd
55  /usr/sbin/auditctl
37  /usr/lib/polkit-1/polkit-agent-helper-1
...
1  /home/mythcat/blender-2.83.12-linux64/blender
...

[root@desk mythcat]# aureport -x | less

Executable Report
====================================
# date time exe term host auid event
====================================
1. 10/17/2020 22:30:47 (null) (none) ? -1 392
2. 10/17/2020 22:30:54 /usr/lib/systemd/systemd ? ? -1 395
3. 10/17/2020 22:31:14 /usr/lib/systemd/systemd ? ? -1 401
4. 10/17/2020 22:31:17 /usr/lib/systemd/systemd ? ? -1 402
5. 10/17/2020 22:31:20 /usr/lib/systemd/systemd ? ? -1 403
6. 10/17/2020 22:31:33 /usr/lib/systemd/systemd ? ? -1 406
7. 10/17/2020 22:31:37 /usr/lib/systemd/systemd ? ? -1 413
8. 10/17/2020 22:31:57 /usr/lib/systemd/systemd ? ? -1 415
9. 10/17/2020 22:32:45 (null) (none) ? -1 421
...

[root@desk mythcat]# aureport -t

Log Time Range Report
=====================
/var/log/audit/audit.log.4: 10/17/2020 22:30:47.765 - 12/21/2020 15:07:09.820
/var/log/audit/audit.log.3: 12/21/2020 15:07:19.925 - 01/30/2021 12:35:50.328
/var/log/audit/audit.log.2: 01/30/2021 12:37:35.586 - 03/08/2021 08:43:18.974
/var/log/audit/audit.log.1: 03/08/2021 08:43:19.034 - 04/27/2021 22:13:39.212
/var/log/audit/audit.log: 04/27/2021 22:13:39.217 - 05/04/2021 21:30:01.648

[root@desk mythcat]# aureport --login --summary -i

Login Summary Report
============================
total  auid
============================
15  unset
10  mythcat
1  unknown(767779) 

Friday, April 30, 2021

Fedora 33 : Start using the Grunt tool.

Grunt is a tool that allows us to automatically run any set of tasks.
This tool solve minification and concatenation issues.
This tutorial is a simple intro with this tool.
[mythcat@desk ~]$ npm install
npm WARN saveError ENOENT: no such file or directory, open '/home/mythcat/package.json'
npm WARN enoent ENOENT: no such file or directory, open '/home/mythcat/package.json'
npm WARN mythcat No description
npm WARN mythcat No repository field.
npm WARN mythcat No README data
npm WARN mythcat No license field.

up to date in 1.017s
found 0 vulnerabilities
I install easy with npm tool:
[mythcat@desk ~]$ sudo npm install -g grunt-cli
[sudo] password for mythcat: 
/usr/local/bin/grunt -> /usr/local/lib/node_modules/grunt-cli/bin/grunt
+ grunt-cli@1.4.2
added 58 packages from 71 contributors in 8.981s


   ╭────────────────────────────────────────────────────────────────╮
   │                                                                │
   │      New major version of npm available! 6.13.4 → 7.11.2       │
   │   Changelog: https://github.com/npm/cli/releases/tag/v7.11.2   │
   │               Run npm install -g npm to update!                │
   │                                                                │
   ╰────────────────────────────────────────────────────────────────╯

Let's update it:
[mythcat@desk ~]$ sudo npm install -g npm 
Each time grunt is run, it looks for a locally installed Grunt using nodes required by the system.
A typical setup will involve adding two files to your project: package.json and the Gruntfile.
These are the Grunt plugins used :
  • Load Grunt Tasks (load-grunt-tasks) 
  • Time Grunt (time-grunt) 
  • PHPLint (grunt-phplint) 
  • JSHint (grunt-contrib-jshint) 
  • Uglify (grunt-contrib-uglify) 
  • Sass (grunt-sass) 
  • Watch (grunt-contrib-watch)
Let's start it with:
[root@desk wordpress]# npm init
This utility will walk you through creating a package.json file.
It only covers the most common items, and tries to guess sensible defaults.

See `npm help init` for definitive documentation on these fields
and exactly what they do.

Use `npm install pkg` afterwards to install a package and
save it as a dependency in the package.json file.

Press ^C at any time to quit.
package name: (wordpress) 
version: (1.0.0) 
description: 
entry point: (index.js) 
test command: 
git repository: 
keywords: 
author: 
license: (ISC) 
About to write to /usr/share/wordpress/package.json:

{
  "name": "wordpress",
  "version": "1.0.0",
  "description": "",
  "main": "index.js",
  "scripts": {
    "test": "echo \"Error: no test specified\" && exit 1"
  },
  "author": "",
  "license": "ISC"
}


Is this OK? (yes) yes
[root@desk wordpress]# ls
index.php	    wp-comments-post.php  wp-includes	     wp-settings.php
package.json	    wp-config.php	  wp-links-opml.php  wp-signup.php
wp-activate.php     wp-config-sample.php  wp-load.php	     wp-trackback.php
wp-admin	    wp-content		  wp-login.php	     xmlrpc.php
wp-blog-header.php  wp-cron.php		  wp-mail.php
You can see I set the name of the package: wordpress
[root@desk wordpress]# npm install wordpress --save-dev

added 4 packages, and audited 5 packages in 4s

found 0 vulnerabilities 
The Grunt package will be the first thing to add to your project.
[root@desk wordpress]# npm install grunt --save-dev

added 101 packages, and audited 106 packages in 8s

7 packages are looking for funding
  run `npm fund` for details

found 0 vulnerabilities
The npm fund option provides more visibility to npm users on what dependencies are actively looking for ways to fund their work.
[root@desk wordpress]# npm fund
wordpress@1.0.0
├── https://github.com/sponsors/isaacs
│   └── glob@7.1.6, rimraf@3.0.2
├── https://github.com/sponsors/ljharb
│   └── resolve@1.20.0, is-core-module@2.3.0
├── https://github.com/sponsors/jonschlinkert
│   └── picomatch@2.2.3
└─┬ https://github.com/chalk/chalk?sponsor=1
  │ └── chalk@4.1.1
  └── https://github.com/chalk/ansi-styles?sponsor=1
      └── ansi-styles@4.3.0
You can set to false and run again the command:
[root@desk wordpress]# npm config set fund false --global
[root@desk wordpress]# npm config set fund false 
[root@desk wordpress]# npm install grunt --save-dev

up to date, audited 106 packages in 2s

found 0 vulnerabilities 
The easiest way to add Grunt and grunt_plugins from https://gruntjs.com/plugins is to use this command:
npm install grunt_plugins --save-dev
After each install, you can check the file package.json and see if is updated.
I install these packages:
[root@desk wordpress]# npm install grunt-contrib-uglify grunt-contrib-cssmin grunt-contrib-watch --save-dev

added 58 packages, and audited 164 packages in 8s

found 0 vulnerabilities 
Create a file called Gruntfile.js in the project root:
[root@desk wordpress]# touch Gruntfile.js
[root@desk wordpress]# vim Gruntfile.js 
Add this source code to the file.
module.exports = function(grunt) {

    // Project configuration.
    grunt.initConfig({
        pkg: grunt.file.readJSON('package.json'),
        uglify: {
            options: {
                banner: '/*! <%= pkg.name %> <%= grunt.template.today("yyyy-mm-dd") %> */\n'
            },
            build: {
                src: 'src/js/scripts.js',
                dest: 'js/scripts.min.js'
            }
        },
        cssmin: {
            minify: {
                src: 'src/css/style.css',
                dest: 'css/style.min.css'
            }
        },
        watch: {
            uglify: {
                files: 'src/js/scripts.js',
                tasks: ['uglify']
            },
            cssmin: {
                files: 'src/css/style.css',
                tasks: ['cssmin']
            }
        }
    });

    // Load the plugin that provides the "uglify" task.
    grunt.loadNpmTasks('grunt-contrib-uglify');
    // Load the plugin that provides the "cssmin" task.
    grunt.loadNpmTasks('grunt-contrib-cssmin');
    // Load the plugin that provides the "watch" task.
    grunt.loadNpmTasks('grunt-contrib-watch');

    // Uglify task
    grunt.registerTask('scripts', ['uglify']);
    // CSSMin task
    grunt.registerTask('styles', ['cssmin']);
    // Default task(s).
    grunt.registerTask('default', ['uglify', 'cssmin', 'watch']);
    console.log('... runnning grunt');
    };
Because I create in the setting file some paths the next commands will create paths for these.
[root@desk wordpress]# mkdir src
[root@desk wordpress]# mkdir src/js
[root@desk wordpress]# mkdir src/css
[root@desk wordpress]# touch src/js/scripts.js
[root@desk wordpress]# touch src/css/style.css 
I can see the grunt version.
[mythcat@desk wordpress]$ grunt default -V
grunt-cli v1.4.2
grunt v1.4.0 
Now I can run the command grunt or with a specific task named default.
[root@desk wordpress]# grunt 
... runnning grunt
Running "uglify:build" (uglify) task
>> 1 file created 0 B → 29 B

Running "cssmin:minify" (cssmin) task
>> 1 file created. 92 B → 76 B

Running "watch" task
Waiting...
You can see the default task contains both uglify and the cssmin tasks.
If one module is not installed then you can see this type of message:
[root@desk wordpress]# grunt 
...Local Npm module "grunt-contrib-sass" not found. Is it installed?
Let's install it:
[root@desk wordpress]# npm install grunt-contrib-sass

added 17 packages, and audited 186 packages in 10s

found 0 vulnerabilities
I tried to make changes to the configuration file but it is very restrictive. Most attempts failed.

Tuesday, April 27, 2021

Fedora 33 : Test Days - test the kernel.

Test Days are often focused on testing Changes planned for an upcoming Fedora release, but they also regularly test important areas of the Fedora distribution, like upgrades, internationalization, graphical drivers, desktop environments, kernel updates, and others., see the Test Days webpage.
In today's tutorial I will show you how to test the kernel, see the kernel test week webpage.
Fedora contains the following kernel packages:
kernel — Contains the kernel for single, multicore and multiprocessor systems.
kernel-debug — Contains a kernel with numerous debugging options enabled for kernel diagnosis, at the expense of reduced performance.
kernel-devel — Contains the kernel headers and makefiles sufficient to build modules against the kernel package.
kernel-debug-devel — Contains the development version of the kernel with numerous debugging options enabled for kernel diagnosis, at the expense of reduced performance.
kernel-headers — Includes the C header files that specify the interface between the Linux kernel and user-space libraries and programs. The header files define structures and constants that are needed for building most standard programs.
linux-firmware — Contains all of the firmware files that are required by various devices to operate.
perf — This package contains supporting scripts and documentation for the perf tool shipped in each kernel image subpackage.
kernel-abi-whitelists — Contains information pertaining to the Fedora kernel ABI, including a lists of kernel symbols that are needed by external Linux kernel modules and a dnf plug-in to aid enforcement.
kernel-tools — Contains tools for manipulating the Linux kernel and supporting documentation.
You can see all events from Test Days on this webpage.
First, you need to install koji tool:
[root@desk mythcat]# dnf install koji.
Last metadata expiration check: 1:42:23 ago on Tue 27 Apr 2021 07:08:25 PM EEST.
Package koji-1.24.0-1.fc33.noarch is already installed.
Dependencies resolved.
Nothing to do.
Complete!
The koji tool is the software that builds RPM packages for the Fedora project.
This command show all available kernel builds:
[root@desk mythcat]# koji list-builds --package=kernel --after="2021-04-09"
Build                                                    Built by          State
-------------------------------------------------------  ----------------  ----------------
kernel-5.11.13-100.fc32                                  jforbes           COMPLETE
kernel-5.11.13-200.fc33                                  jforbes           COMPLETE
kernel-5.11.13-300.fc34                                  jforbes           COMPLETE
kernel-5.11.14-100.fc32                                  jforbes           COMPLETE
kernel-5.11.14-200.fc33                                  jforbes           COMPLETE
kernel-5.11.14-300.fc34                                  jforbes           COMPLETE
kernel-5.11.15-100.fc32                                  jforbes           COMPLETE
kernel-5.11.15-200.fc33                                  jforbes           COMPLETE
kernel-5.11.15-300.fc34                                  jforbes           COMPLETE
kernel-5.11.16-100.fc32                                  jforbes           COMPLETE
kernel-5.11.16-200.fc33                                  jforbes           COMPLETE
kernel-5.11.16-300.fc34                                  jforbes           COMPLETE
kernel-5.12.0-0.rc7.189.eln110                           jforbes           COMPLETE
kernel-5.12.0-0.rc7.189.fc35                             jforbes           COMPLETE
kernel-5.12.0-0.rc7.20210416git7e25f40eab52.191.fc35     jforbes           COMPLETE
kernel-5.12.0-0.rc8.191.eln110                           jforbes           COMPLETE
kernel-5.12.0-0.rc8.191.fc35                             jforbes           COMPLETE
kernel-5.12.0-0.rc8.20210423git7af08140979a.193.eln110   jforbes           COMPLETE
kernel-5.12.0-0.rc8.20210423git7af08140979a.193.fc35     jforbes           COMPLETE
kernel-5.12.0-198.eln110                                 jforbes           CANCELED
kernel-5.12.0-198.fc35                                   jforbes           COMPLETE
I download the kernel:
[root@desk mythcat]# koji download-build --arch=x86_64 kernel-5.12.0-198.fc35
Downloading: kernel-debug-5.12.0-198.fc35.x86_64.rpm
[====================================] 100% 243.62 KiB / 243.62 KiB
Downloading: kernel-modules-internal-5.12.0-198.fc35.x86_64.rpm
[====================================] 100% 399.58 KiB / 399.58 KiB
Downloading: kernel-debug-modules-internal-5.12.0-198.fc35.x86_64.rpm
[====================================] 100% 422.61 KiB / 422.61 KiB
Downloading: kernel-debug-modules-extra-5.12.0-198.fc35.x86_64.rpm
[====================================] 100% 2.28 MiB / 2.28 MiB
Downloading: kernel-modules-extra-5.12.0-198.fc35.x86_64.rpm
[====================================] 100% 2.19 MiB / 2.19 MiB
Downloading: kernel-5.12.0-198.fc35.x86_64.rpm
[====================================] 100% 243.52 KiB / 243.52 KiB
Downloading: kernel-debug-core-5.12.0-198.fc35.x86_64.rpm
[====================================] 100% 35.78 MiB / 35.78 MiB
Downloading: kernel-modules-5.12.0-198.fc35.x86_64.rpm
[====================================] 100% 31.24 MiB / 31.24 MiB
Downloading: kernel-core-5.12.0-198.fc35.x86_64.rpm
[====================================] 100% 33.92 MiB / 33.92 MiB
Downloading: kernel-debug-modules-5.12.0-198.fc35.x86_64.rpm
[====================================] 100% 31.97 MiB / 31.97 MiB
Downloading: kernel-devel-5.12.0-198.fc35.x86_64.rpm
[====================================] 100% 14.51 MiB / 14.51 MiB
Downloading: kernel-debug-devel-5.12.0-198.fc35.x86_64.rpm
[====================================] 100% 14.62 MiB / 14.62 MiB
The last step is update your kernel and see if is working well:
[root@desk mythcat]# dnf update kernel-*.rpm
Last metadata expiration check: 2:01:14 ago on Tue 27 Apr 2021 07:08:25 PM EEST.
The same or higher version of kernel is already installed, cannot update it.
The same or higher version of kernel-core is already installed, cannot update it.
Package kernel-debug not installed, cannot update it.
...
Dependencies resolved.
========================================================================================================
 Package                                  Arch        Version                  Repository          Size
========================================================================================================
Installing:
 kernel                                   x86_64      5.12.0-198.fc35          @commandline       244 k
 kernel-core                              x86_64      5.12.0-198.fc35          @commandline        34 M
 kernel-devel                             x86_64      5.12.0-198.fc35          @commandline        15 M
 kernel-modules                           x86_64      5.12.0-198.fc35          @commandline        31 M
 kernel-modules-extra                     x86_64      5.12.0-198.fc35          @commandline       2.2 M
Installing dependencies:
 bison                                    x86_64      3.6.4-3.fc33             fedora             860 k
 flex                                     x86_64      2.6.4-5.fc33             fedora             311 k
Removing:
 kernel                                   x86_64      5.11.14-200.fc33         @updates             0  
 kernel-core                              x86_64      5.11.14-200.fc33         @updates            74 M
 kernel-devel                             x86_64      5.11.14-200.fc33         @updates            56 M
 kernel-modules                           x86_64      5.11.14-200.fc33         @updates            30 M
 kernel-modules-extra                     x86_64      5.11.14-200.fc33         @updates           1.9 M
Removing dependent packages:
 kmod-nvidia-5.11.14-200.fc33.x86_64      x86_64      3:465.24.02-1.fc33       @@commandline       44 M

Transaction Summary
========================================================================================================
Install  7 Packages
Remove   6 Packages

Total size: 83 M
Total download size: 1.1 M
Is this ok [y/N]: y
...
Installed:
  bison-3.6.4-3.fc33.x86_64                             flex-2.6.4-5.fc33.x86_64                       
  kernel-5.12.0-198.fc35.x86_64                         kernel-core-5.12.0-198.fc35.x86_64             
  kernel-devel-5.12.0-198.fc35.x86_64                   kernel-modules-5.12.0-198.fc35.x86_64          
  kernel-modules-extra-5.12.0-198.fc35.x86_64          
Removed:
  kernel-5.11.14-200.fc33.x86_64                                                                        
  kernel-core-5.11.14-200.fc33.x86_64                                                                   
  kernel-devel-5.11.14-200.fc33.x86_64                                                                  
  kernel-modules-5.11.14-200.fc33.x86_64                                                                
  kernel-modules-extra-5.11.14-200.fc33.x86_64                                                          
  kmod-nvidia-5.11.14-200.fc33.x86_64-3:465.24.02-1.fc33.x86_64                                         

Complete!
If you want to see kernel packages are installed, execute this command:
[root@desk mythcat]# dnf list installed "kernel-*"
Installed Packages
kernel-core.x86_64                                 5.11.15-200.fc33                        @updates     
kernel-core.x86_64                                 5.11.16-200.fc33                        @updates     
kernel-core.x86_64                                 5.12.0-198.fc35                         @@commandline
kernel-devel.x86_64                                5.11.15-200.fc33                        @updates     
kernel-devel.x86_64                                5.11.16-200.fc33                        @updates     
kernel-devel.x86_64                                5.12.0-198.fc35                         @@commandline
kernel-headers.x86_64                              5.11.16-200.fc33                        @updates     
kernel-modules.x86_64                              5.11.15-200.fc33                        @updates     
kernel-modules.x86_64                              5.11.16-200.fc33                        @updates     
kernel-modules.x86_64                              5.12.0-198.fc35                         @@commandline
kernel-modules-extra.x86_64                        5.11.15-200.fc33                        @updates     
kernel-modules-extra.x86_64                        5.11.16-200.fc33                        @updates     
kernel-modules-extra.x86_64                        5.12.0-198.fc35                         @@commandline
kernel-srpm-macros.noarch                          1.0-3.fc33                              @fedora    

Saturday, April 24, 2021

Fedora 33 : Installing Discord software in Fedora Linux.

Today I installed discord software on Fedora 33 Linux distro and it works very well.
As you know this is a software widely used by users.
Discord is a VoIP, instant messaging and digital distribution platform designed for creating communities. Users communicate with voice calls, video calls, text messaging, media and files in private chats or as part of communities called "servers".[note 1] Servers are a collection of persistent chat rooms and voice chat channels. Discord runs on Windows, macOS, Android, iOS, iPadOS, Linux, and in web browsers. As of July 21, 2019, the service has over 250 million users.[9] , see Wikipedia.
Installation is very simple using the DNF utility...
[root@desk mythcat]# dnf install discord.x86_64
Last metadata expiration check: 0:08:52 ago on Sat 24 Apr 2021 07:55:22 PM EEST.
Dependencies resolved.
================================================================================
 Package       Arch       Version           Repository                     Size
================================================================================
Installing:
 discord       x86_64     0.0.14-1.fc33     rpmfusion-nonfree-updates      54 M
Installing dependencies:
 libcxx        x86_64     11.0.0-1.fc33     updates                       252 k
 libcxxabi     x86_64     11.0.0-1.fc33     updates                        84 k

Transaction Summary
================================================================================
Install  3 Packages

Total download size: 54 M
Installed size: 173 M
Is this ok [y/N]: y
Downloading Packages:
(1/3): libcxxabi-11.0.0-1.fc33.x86_64.rpm       273 kB/s |  84 kB     00:00    
(2/3): libcxx-11.0.0-1.fc33.x86_64.rpm          404 kB/s | 252 kB     00:00    
(3/3): discord-0.0.14-1.fc33.x86_64.rpm         9.5 MB/s |  54 MB     00:05    
--------------------------------------------------------------------------------
Total                                           8.5 MB/s |  54 MB     00:06     
Running transaction check
Transaction check succeeded.
Running transaction test
Transaction test succeeded.
Running transaction
  Preparing        :                                                        1/1 
  Installing       : libcxxabi-11.0.0-1.fc33.x86_64                         1/3 
  Installing       : libcxx-11.0.0-1.fc33.x86_64                            2/3 
  Installing       : discord-0.0.14-1.fc33.x86_64                           3/3 
  Running scriptlet: discord-0.0.14-1.fc33.x86_64                           3/3 
  Verifying        : libcxx-11.0.0-1.fc33.x86_64                            1/3 
  Verifying        : libcxxabi-11.0.0-1.fc33.x86_64                         2/3 
  Verifying        : discord-0.0.14-1.fc33.x86_64                           3/3 

Installed:
  discord-0.0.14-1.fc33.x86_64             libcxx-11.0.0-1.fc33.x86_64          
  libcxxabi-11.0.0-1.fc33.x86_64          

Complete!

Tuesday, April 20, 2021

Fedora 33 : The YARA tool for Linux security - part 002.

YARA rules are a way of identifying malware or other issues by creating rules that look for certain characteristics.
This tool was originally developed by Victor Alvarez of Virustotal and is mainly used in malware research and detection.
It was developed with the idea to describe patterns that identify particular strains or entire families of malware.
Let's install it on Fedora 33 Linux distro.
[root@desk mythcat]# dnf search malware
Last metadata expiration check: 0:41:28 ago on Tue 20 Apr 2021 09:50:27 PM EEST.
=========================== Summary Matched: malware ===========================
yara.i686 : Pattern matching Swiss knife for malware researchers
yara.x86_64 : Pattern matching Swiss knife for malware researchers
[root@desk mythcat]# dnf install yara.x86_64
...
Installed:
  yara-4.0.2-2.fc33.x86_64                                                      

Complete!
You can see the help of this tool.
[mythcat@desk ~]$ yara -h
You can create your rules or use these default rules from GitHub.
I download it with git tool:
[mythcat@desk ~]$ git clone https://github.com/Yara-Rules/rules
This is a simple example for detect suspicious strings into bin folder with Linux commands:
[mythcat@desk ~]$ sudo yara rules/utils/suspicious_strings.yar /bin/
[sudo] password for mythcat: 
Misc_Suspicious_Strings /bin//bash
Misc_Suspicious_Strings /bin//sh
Misc_Suspicious_Strings /bin//brotli
Antivirus /bin//mkbundle
Misc_Suspicious_Strings /bin//openssl
Misc_Suspicious_Strings /bin//unzip
Misc_Suspicious_Strings /bin//zipinfo
Misc_Suspicious_Strings /bin//ps
VMWare_Detection /bin//lscpu
Qemu_Detection /bin//lscpu
VMWare_Detection /bin//lsblk
VMWare_Detection /bin//broadwayd
Qemu_Detection /bin//grub2-editenv
Misc_Suspicious_Strings /bin//abrt-retrace-client
Qemu_Detection /bin//grub2-mkstandalone
Qemu_Detection /bin//grub2-mkimage
Qemu_Detection /bin//grub2-mknetdir
...
YARA detection can be easily bypassed since YARA only does pattern/string/signature matching where a more effective method of detecting malware is available and this is a limitation of YARA.
You can see my previous old tutorial about YARA and Fedora 25.

Tuesday, April 13, 2021

Fedora 33 : First steps with manim.

Manim is an engine for precise programmatic animations, designed for creating explanatory math videos like 3Blue1Brown
The documentation can be found on this webpage
First, install with the DNF tool all packages:
[root@desk manim_Projects]# dnf install cairo-devel pango-devel ffmpeg python3-devel 
texlive-scheme-medium texlive-standalone.noarch texlive-collection-latexextra.noarch

Last metadata expiration check: 2:19:22 ago on Tue 13 Apr 2021 08:20:03 PM EEST.
Package cairo-devel-1.16.0-9.fc33.x86_64 is already installed.
Package pango-devel-1.48.4-1.fc33.x86_64 is already installed.
Package ffmpeg-4.3.2-2.fc33.x86_64 is already installed.
Package python3-devel-3.9.2-1.fc33.x86_64 is already installed.
Package texlive-scheme-medium-9:svn54074-35.fc33.noarch is already installed.
Package texlive-standalone-9:svn47136-35.fc33.noarch is already installed.
Package texlive-collection-latexextra-9:svn54851-35.fc33.noarch is already installed.
Dependencies resolved.
Nothing to do.
Complete!
Use pip tool to install manim and manimlib.
[mythcat@desk manim_Projects]$ pip install manim
...
[mythcat@desk manim_Projects]$ pip install manimlib
...
You can use --user option argument. A default example from the doc area can be a good test.
from manim import * 

config.background_color = DARK_GRAY
class MovingFrame(Scene):
     def construct(self):
        # Write equations
        equation = MathTex("2x^2-5x+2", "=", "(x-2)(2x-1)")

        # Create animation
        self.play(Write(equation))

        # Add moving frames
        framebox1 = SurroundingRectangle(equation[0], buff=.1)
        framebox2 = SurroundingRectangle(equation[2], buff=.1)

        # Create animations
        self.play(Create(framebox1))  # creating the frame

        self.wait()
        # replace frame 1 with frame 2
        self.play(ReplacementTransform(framebox1, framebox2))
    
        self.wait()
I run it well:
[mythcat@desk manim_Projects]$ /home/mythcat/.local/bin/manim -pl -ql -i follow_me_textxt.py 
This is the result:

Sunday, April 11, 2021

Fedora 34 : Testing the new Fedora 34 beta.

Approaching the release date for Fedora Linux 34, the development team has included a number of testing steps.
For each test stage, some events were set up in which users participate and test the new Fedora distribution. Here are these see events.
Here is a screenshot with the virtualization test step for the ISO file called Fedora 34: x86_64 DVD ISO Beta! from the official page:

Fedora 33 : Use hw-probe to collect hardware details .

This is a project to anonymously collect hardware details of Linux-powered computers over the world and help people collaboratively debug hardware-related issues, check for Linux compatibility and find drivers. 
Probe your computer in order to participate in the project and discover your hardware in detail. Share your probes with Linux developers to debug and fix problems with your computer. 

First, install the hw-probe package with the DNF Linux tool:
[root@desk mythcat]# dnf search hw-probe
Last metadata expiration check: 0:03:35 ago on Sun 11 Apr 2021 03:10:31 PM EEST.
======================== Name Exactly Matched: hw-probe ========================
hw-probe.noarch : Check operability of computer hardware and find drivers
[root@desk mythcat]# dnf install hw-probe.noarch
Last metadata expiration check: 0:03:52 ago on Sun 11 Apr 2021 03:10:31 PM EEST.
Dependencies resolved.
================================================================================
 Package             Architecture  Version                 Repository      Size
================================================================================
Installing:
 hw-probe            noarch        1.5-4.fc33              fedora          93 k
Installing dependencies:
 hdparm              x86_64        9.58-4.fc33             fedora          95 k
 hwinfo              x86_64        21.68-2.fc33            fedora          88 k
 hwinfo-libs         x86_64        21.68-2.fc33            fedora         872 k
 libx86emu           x86_64        3.1-2.fc33              fedora          69 k
 sysstat             x86_64        12.3.1-3.fc33           fedora         433 k
Installing weak dependencies:
 acpica-tools        x86_64        20200925-1.fc33         updates        960 k

Transaction Summary
================================================================================
Install  7 Packages

Total download size: 2.5 M
Installed size: 8.6 M
Is this ok [y/N]: y
...
This tool can be used easy:
[root@desk mythcat]# sudo -E hw-probe -all -upload
WARNING: 'edid-decode' package is not installed
Probe for hardware ... Ok
Reading logs ... Ok
Uploaded to DB, Thank you!

Probe URL: https://linux-hardware.org/?probe=7b4c090391
You can see my hardware on the link result.

Fedora 33 : Using the mutt software with Yahoo.

Mutt is a small but very powerful text-based mail client for Unix operating systems. In this tutorial, I configure mutt with yahoo to read mail account and send mails.
[root@desk mythcat]# dnf install mutt
Last metadata expiration check: 0:04:13 ago on Sat 10 Apr 2021 09:23:41 PM EEST.
Dependencies resolved.
================================================================================
 Package         Arch      Version                             Repository  Size
================================================================================
Installing:
 mutt            x86_64    5:2.0.5-1.fc33                      updates    1.9 M
Installing dependencies:
 tokyocabinet    x86_64    1.4.48-16.fc33                      fedora     506 k
 urlview         x86_64    0.9-28.20131022git08767a.fc33       fedora      31 k

Transaction Summary
================================================================================
Install  3 Packages

Total download size: 2.4 M
Installed size: 8.6 M
Is this ok [y/N]: y
...
Installed:
  mutt-5:2.0.5-1.fc33.x86_64                                                    
  tokyocabinet-1.4.48-16.fc33.x86_64                                            
  urlview-0.9-28.20131022git08767a.fc33.x86_64                                  

Complete!
The mutt should be compiled with support for tls, you can see all of these with this command:
[root@desk ~]# mutt -v | grep tls
Configure options: '--build=x86_64-redhat-linux-gnu' '--host=x86_64-redhat-linux-gnu' 
...ode>
Let's create all settings for the mutt software with vi editor:
[root@desk mythcat]# vi ~/.muttrc
set imap_user = "catafest@yahoo.com"
set imap_pass = "your-generate-app-password"
set smtp_url = "smtp://catafest@yahoo.com@smtp.mail.yahoo.com:587"
set smtp_pass = "your-generate-app-password"
set from = "catafest@yahoo.com"
set realname = "Catalin George Festila"
set folder = "imaps://catafest@yahoo.com@imap.mail.yahoo.com:993"
set spoolfile = "+INBOX"
set postponed="+[Yahoo]/Drafts"
set header_cache = "~/.mutt/cache/headers"
set message_cachedir = "~/.mutt/cache/bodies"
set certificate_file = "~/.mutt/certificates"
set move = no
set sort = 'threads'
set sort_aux = 'last-date-received'
set imap_check_subscribed
set ssl_force_tls = yes
set abort_nosubject = no
set mail_check = 60
set timeout = 10
set sort = "reverse-date-received"
set signature = "~/.mutt/signature"
set copy = no
set imap_keepalive = 900
Then use this command to run it:
[root@desk ~]# mutt
See the result:

Thursday, March 18, 2021

Fedora 33 : The balenaEtcher tool.

You can flash OS images to SD cards & USB drives, safely and easily with this balenaEtcher.
You can flash from a file, URL, or clone a drive.
I download the AppImage and I run it easily on Fedora with an ISO Linux image antiX for an old laptop.
[mythcat@desk ~]$ ./balenaEtcher-1.5.116-x64.AppImage 
ready-to-show: 1816.354ms
Checking for update
Update for version 1.5.116 is not available (latest version: 1.5.116, downgrade is disallowed).
...

Monday, March 8, 2021

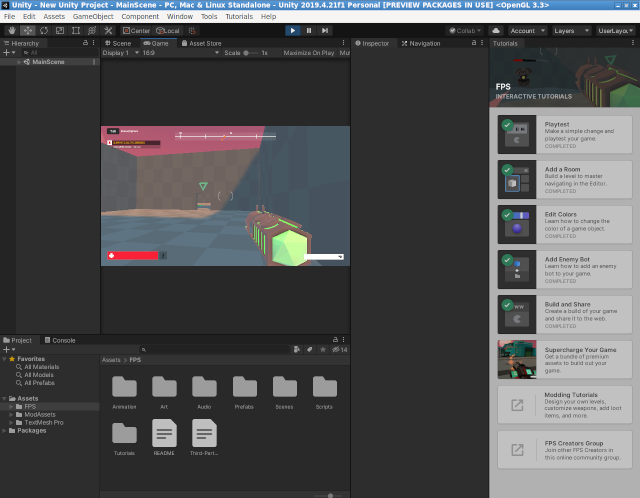
Fedora 33 : Unity FPS Microgame.

Today I tested the FPS Microgame from learning area of Unity 3D with Fedora linux distro.
The project works great even my hardware is old.
This is an screenshot of the running process of the project.

Sunday, March 7, 2021

Fedora 33 : Electron based terminal named Hyper.

Hyper is an Electron-based terminal built on HTML/CSS/JS.
About Electron is an open-source software framework developed and maintained by GitHub.
The original Hyper renderer was based on the DOM, and now Hyper 3 use Electron from V1 to V3 and is tested with V4.
You can install multiple plugins and themes to make your work easier.
The install process is easy, just download the RPM package and use the DNF tool to install it:
[root@desk mythcat]# dnf install Downloads/hyper-3.0.2.x86_64.rpm 
Last metadata expiration check: 0:14:49 ago on Sun 07 Mar 2021 11:22:49 AM EET.
Dependencies resolved.
================================================================================
 Package        Architecture    Version             Repository             Size
================================================================================
Installing:
 hyper          x86_64          3.0.2-3440          @commandline           37 M

Transaction Summary
================================================================================
Install  1 Package

Total size: 37 M
Installed size: 141 M
Is this ok [y/N]: y
Downloading Packages:
Running transaction check
Transaction check succeeded.
Running transaction test
Transaction test succeeded.
Running transaction
  Preparing        :                                                        1/1 
  Installing       : hyper-3.0.2-3440.x86_64                                1/1 
  Running scriptlet: hyper-3.0.2-3440.x86_64                                1/1 
  Verifying        : hyper-3.0.2-3440.x86_64                                1/1 

Installed:
  hyper-3.0.2-3440.x86_64                                                       

Complete!
The Hyper terminal is installed on the LXDE main menu on the Other submenu.
You can find more information on the official webpage.
The next image is a screenshot from my Fedora 33 distro with Hyper terminal.

Sunday, February 28, 2021

Fedora 33 : Unity Platformer Microgame 2D.

This Microgame Template is a classic 2D platform game that you can mod and make your own. Check out the Creative Mods to tweak the project and add your own levels, while learning the basics of Unity. Viewing from the Learn tab in the Unity Hub? Click Download Project > Open Project to automatically open it in Unity. Viewing from the Unity Learn website? Simply go to the Learn tab in the Unity Hub and search for this Microgame, or manually import it via the Asset Store link below.
I download the Unity Editor and Unity Hub AppImage.
I run the UnityHub.AppImage and I set the path of Unity Editor into settings area.
I login with my Unity account and on learning area in UnityHub application I download the Platformer Microgame.
I select to follow the tutorial on Unity I.D.E. environment.
You can see in the next screenshot how this works:

Saturday, February 27, 2021

Fedora 33 : Local 5.9.9 by flywheel for WordPress sites.

Build WordPress sites faster than ever before Local is built for speed and simplicity. We’ve spent years designing Local to make building, testing and deploying WordPress sites a breeze.
Basically this is a standalone local development application.
You can add locally all you need for your WordPress website:
  • SSH & WP-CLI;
  • simple root SSH access to individual sites;
  • mailcatcher;
  • view, test, and debug mail sending;
  • log files;
  • PHP, NGINX, and MySQL logs available;
I download the rpm package from the official website and I install it with the DNF tool.
[root@desk Downloads]# dnf install local-5.9.9-linux.rpm 
...
Installed:
  local-5.9.9-20210215.1.x86_64  ncurses-compat-libs-6.2-3.20200222.fc33.x86_64
  nss-tools-3.60.1-1.fc33.x86_64

Complete! 
Now you can start from the LXDE main menu environment.
You can use addons available for Local, see this webpage.
You can see in the next video tutorial from the official youtube how this works.

Friday, February 26, 2021

Fedora 33 : Bash script for GitHub to fix bad commit branch.

One mistake is to have changed in the [master] branch instead of [mymain]. This can be fixed with this bash script:
# check the branch that you committed to by accident, in this case, is master
git checkout master

# reset the branch back one commit
git reset --soft HEAD^

# use stash to record the current state of the working directory
git stash

# checkout the branch it should be in, in this case, is mymain
git checkout mymain

# apply the stash
git stash apply

# commit the changes 
git commit -am "main commit"

# then push the changes to our main branch
git push origin mymain

# checkout the original branch, in this case, is master
git checkout master

# the last step is to force push the commit deletion to the original branch.
git push --force origin master
Hope this help's !!

Saturday, February 13, 2021

Fedora 33 : Can be better? part 017.

Today I will show you how Fedora distro Linux can be better in terms of the LXDE environment.
Fedora team come with Fedora LXDE on Spins, see this intro:
LXDE, the "Lightweight X11 Desktop Environment", is an extremely fast, performant, and energy-saving desktop environment. It maintained by an international community of developers and comes with a beautiful interface, multi-language support, standard keyboard shortcuts, and additional features like tabbed file browsing.
Fedora does not have a defined environment because multiple work environments can be set.
Today, I will show you how to use the LXDE environment with Fedora can be improved.
I often use a simple environment in Linux because:
  • I have older hardware
  • their simplicity allows me to make my personal settings to be more efficient;
Here are some examples of how we can improve the LXDE environment:

Using the ObConf tool

ObConf now easily installs new themes that use the .obt Openbox theme archive format for distribution.
[root@desk mythcat]# dnf search obconf
...
obconf.x86_64 : A graphical configuration editor for the Openbox window manager
[root@desk mythcat]# dnf install obconf.x86_64
Last metadata expiration check: 0:25:25 ago on Sat 13 Feb 2021 11:49:09 AM EET.
Package obconf-2.0.4-17.20150213git63ec47.fc33.x86_64 is already installed.
Dependencies resolved.
Nothing to do.
Complete!

Windows open on the center screen.

You need to add this source code to the end of the file named lxde-rc.xml.
<application type="normal">
<position>
 <x>center</x>
 <y>center</y>
</position>
</application>
Depending on the keyboard and configuration you can set key combinations for different functions such as the Fn key.
The Fn key is the wakeup key when the machine is suspended.
If anyone wants to map it to other functions, then that's okay.
Let's see one example with the lxde-rc.xml file.
<keybindkey="XF86AudioRaiseVolume">
<actionname="Execute">
<command>amixersetMaster5%+unmute</command></action>
</keybind>
<keybindkey="XF86AudioLowerVolume">
<actionname="Execute">
<command>amixersetMaster5%-unmute</command></action>
</keybind>
<keybindkey="XF86MonBrightnessDown">
<actionname="Execute">
<command>xbacklight-20</command>
<startupnotify><enabled>yes</enabled><name>Decreasescreenbrightness</name></startupnotify></action>
</keybind>
<keybindkey="XF86MonBrightnessUp">
<actionname="Execute">
<command>xbacklight+20</command>
<startupnotify><enabled>yes</enabled><name>Increasescreenbrightness</name></startupnotify></action>
</keybind>
You can now run this command for the changes to take effect each time you edit the lxde-rc.xml file:
[mythcat@desk ~]$ openbox --reconfigure

Settings for users and languages.

[mythcat@desk ~]$ lxappearance 
[root@desk mythcat]# lxdm-config 
[root@desk mythcat]# setxkbmap -layout "us,ro" -option "grp:alt_shift_toggle".
In conclusion, there are enough settings that can be included by both the LXDE development team and Fedora team in a simpler way to configure the LXDE environment.
I would like to have in the LXDE environment from Fedora, the Fedora widget, the Fedora theme, Fedora Color.
The Fedora development team could effortlessly include its own utility to manage these settings for LXDE or other work environments.

Thursday, February 11, 2021

Fedora 33 : Meson build system.

Meson is a build system that is designed to be as user-friendly as possible without sacrificing performance. The main tool for this is a custom language that the user uses to describe the structure of his build. The main design goals of this language has been simplicity, clarity and conciseness. Much inspiration was drawn from the Python programming language, which is considered very readable, even to people who have not programmed in Python before., see the official webpage.
Let's test with an simple example on Fedora 33 distro.
First step, install this tool with DNF tool.
[root@desk mythcat]# dnf search meson
Last metadata expiration check: 2:20:41 ago on Thu 11 Feb 2021 08:39:26 PM EET.
============================== Name Exactly Matched: meson ==============================
meson.noarch : High productivity build system
[root@desk mythcat]# dnf install meson.noarch 
...
Installed:
  meson-0.55.3-1.fc33.noarch               ninja-build-1.10.2-1.fc33.x86_64              

Complete!
The next step is to create a C file with a simple example and one with the build file:
[mythcat@desk ~]$ mkdir CProjects
[mythcat@desk ~]$ cd CProjects/
[mythcat@desk CProjects]$ vi main.c
[mythcat@desk CProjects]$ vi meson.build
The C example file named main.c has this source code:
#include 

//
// main is where all program execution starts
//
int main(int argc, char **argv) {
  printf("Hello there.\n");
  return 0;
} 
The build file named meson.build comes with this content:
project('tutorial', 'c')
executable('demo', 'main.c') 
Use the meson with setup builddir and compile to build executable and run it.
[mythcat@desk CProjects]$ meson setup builddir
The Meson build system
Version: 0.56.2
Source dir: /home/mythcat/CProjects
Build dir: /home/mythcat/CProjects/builddir
Build type: native build
Project name: tutorial
Project version: undefined
C compiler for the host machine: cc (gcc 10.2.1 "cc (GCC) 10.2.1 20201125 (Red Hat 10.2.1-9)")
C linker for the host machine: cc ld.bfd 2.35-18
Host machine cpu family: x86_64
Host machine cpu: x86_64
Build targets in project: 1

Found ninja-1.10.2 at /bin/ninja
[mythcat@desk CProjects]$ cd builddir/
[mythcat@desk builddir]$ ls
build.ninja  compile_commands.json  meson-info	meson-logs  meson-private
[mythcat@desk builddir]$ meson compile
Found runner: ['/bin/ninja']
ninja: Entering directory `.'
[2/2] Linking target demo
[mythcat@desk builddir]$ ls
build.ninja  compile_commands.json  demo  demo.p  meson-info  meson-logs  meson-private
[mythcat@desk builddir]$ ./demo
Hello there.
You can see this run well.

Sunday, February 7, 2021

Fedora 33 : Running Zeek - part 001.

Zeek is often used as a network analysis tool but can also be deployed as an IDS known as Intrusion Detection System.
The full documentation can be found on this website page.
Let's install this tool on Fedora 33 distro.
[root@desk mythcat]# dnf search zeek
Last metadata expiration check: 0:18:02 ago on Sun 07 Feb 2021 11:21:35 AM EET.
No matches found.
[root@desk mythcat]# dnf config-manager --add-repo 
https://download.opensuse.org/repositories/security:zeek/Fedora_33/security:zeek.repo
Adding repo from: https://download.opensuse.org/repositories/security:zeek/Fedora_33/security:zeek.repo
[root@desk mythcat]# dnf install zeek
The Zeek Network Security Monitor. (Fedora_33)  105 kB/s | 128 kB     00:01    
Last metadata expiration check: 0:00:01 ago on Sun 07 Feb 2021 11:40:31 AM EET.
...
  Verifying        : zeekctl-3.2.3-1.1.x86_64                               8/8 

Installed:
  libbroker-devel-3.2.3-1.1.x86_64       libpcap-devel-14:1.9.1-6.fc33.x86_64  
  openssl-devel-1:1.1.1i-1.fc33.x86_64   zeek-3.2.3-1.1.x86_64                 
  zeek-core-3.2.3-1.1.x86_64             zeek-devel-3.2.3-1.1.x86_64           
  zeek-libcaf-devel-3.2.3-1.1.x86_64     zeekctl-3.2.3-1.1.x86_64              

Complete!
[root@desk mythcat]# whereis zeek
zeek: /opt/zeek/bin/zeek
[root@desk mythcat]# whereis zeekctl
zeekctl: /opt/zeek/bin/zeekctl
I found this informations into the documentation area:
ZeekControl is an interactive shell for easily operating/managing Zeek installations on a single system or even across multiple systems in a traffic-monitoring cluster.
A Minimal Starting Configuration
These are the basic configuration changes to make for a minimal ZeekControl installation that will manage a single Zeek instance on the localhost:
  • In $PREFIX/etc/node.cfg, set the right interface to monitor.
  • In $PREFIX/etc/networks.cfg, comment out the default settings and add the networks that Zeek will consider local to the monitored environment.
  • In $PREFIX/etc/zeekctl.cfg, change the MailTo email address to a desired recipient and the LogRotationInterval to a desired log archival frequency.
Next step is to configure and adjust your PATH environment variable:
[root@desk mythcat]# export PATH=/opt/zeek/bin:$PATH
[root@desk mythcat]# zeekctl

Welcome to ZeekControl 2.2.0

Type "help" for help.
...
Use install , start and diag commands on Zeek command line to check if the Zeek tool works fine.
If you received this error on diag command , then you need to set your network interface:
==== stderr.log
fatal error: problem with interface eth0 (pcap_error: SIOCGIFHWADDR: No such device (pcap_activate))
Let's fix this error using the files configuration:
[root@desk mythcat]# updatedb
[root@desk mythcat]# locate node.cfg
/opt/zeek/etc/node.cfg
[root@desk mythcat]# vi /opt/zeek/etc/node.cfg
I change the row with the interface= with my network interface.
You can find your interface with these commands:
[root@desk mythcat]# ip link show
1: lo:  mtu 65536 qdisc noqueue state UNKNOWN mode DEFAULT group default qlen 1000
...
[root@desk mythcat]# nmcli device status
DEVICE  TYPE      STATE                   CONNECTION 
...
Now I can run the zeekctl command an check if is all right.
And first issue reported by diag and zeekctl is this:
1612693272.168741 Reporter::WARNING Your interface is likely receiving invalid TCP and UDP checksums, most likely from NIC checksum offloading. By default, packets with invalid checksums are discarded by Zeek unless using the -C command-line option or toggling the 'ignore_checksums' variable. Alternatively, disable checksum offloading by the network adapter to ensure Zeek analyzes the actual checksums that are transmitted. /opt/zeek/share/zeek/base/misc/find-checksum-offloading.zeek, line 54
You can see this tool can provide good information for users.

Fedora 33 : C# and Google A.P.I .

In this tutorial, I will show you how to use C # with Google A.P.I. on Fedora Linux. 
You can find more C # tutorials written by me on the web. 
This tutorial was added here by me because it is used with Fedora 33 distro. 
You will need to set an authentication key in your google account, see the credentials page
I used Fedora Linux to install the NuGet command:
[root@desk mythcat]# dnf install nuget 
...
Installed:
  nuget-2.8.7-11.fc33.x86_64                                                    
Complete!
Use this command to install it:
[mythcat@desk CSharpProjects]$ nuget install Google.Apis.Discovery.v1 
Attempting to resolve dependency 'Google.Apis (= 1.10.0)'.
Attempting to resolve dependency 'Google.Apis.Core (≥ 1.10.0)'.
...
Attempting to resolve dependency 'Google.Apis (≥ 1.49.0)'.
'Google.Apis' already has a dependency defined for 'Google.Apis.Core'.
Create a basic C# project and test it:
[mythcat@desk CSharpProjects]$ mkdir booksAPI && cd booksAPI
[mythcat@desk booksAPI]$ dotnet new console
Getting ready...
...
[mythcat@desk booksAPI]$ dotnet run
Hello World!
Add Google A.P.I. to this project:
[mythcat@desk booksAPI]$ dotnet add package Google.Apis.Discovery.v1 --version 1.49.0
  Determining projects to restore...
log  : Restored /home/mythcat/CSharpProjects/booksAPI/booksAPI.csproj (in 8.86 sec).
Change the default project source code with this example and add your Google key:
using System;
using System.Threading.Tasks;

using Google.Apis.Discovery.v1;
using Google.Apis.Discovery.v1.Data;
using Google.Apis.Services;
namespace booksAPI
{
    class Program
    {
    [STAThread]
        static void Main(string[] args)
        {
            Console.WriteLine("Discovery API Sample");
            Console.WriteLine("====================");
            try
            {
                new Program().Run().Wait();
            }
            catch (AggregateException ex)
            {
                foreach (var e in ex.InnerExceptions)
                {
                    Console.WriteLine("ERROR: " + e.Message);
                }
            }
            Console.WriteLine("Press any key to continue...");
            Console.ReadKey();
        }

        private async Task Run()
        {
            // Create the service.
            var service = new DiscoveryService(new BaseClientService.Initializer
                {
                    ApplicationName = "Discovery Sample",
                    ApiKey="...",
                });

            // Run the request.
            Console.WriteLine("Executing a list request...");
            var result = await service.Apis.List().ExecuteAsync();

            // Display the results.
            if (result.Items != null)
            {
                foreach (DirectoryList.ItemsData api in result.Items)
                {
                    Console.WriteLine(api.Id + " - " + api.Title);
                }
            }
        }
    }
}
I used my key and this is the result of the run project:
[mythcat@desk booksAPI]$ dotnet run
Discovery API Sample
====================
Executing a list request...
abusiveexperiencereport:v1 - Abusive Experience Report API
acceleratedmobilepageurl:v1 - Accelerated Mobile Pages (AMP) URL API
accessapproval:v1 - Access Approval API
accesscontextmanager:v1beta - Access Context Manager API
...

Sunday, January 31, 2021

Fedora 33 : Roblox and Wine.

Because I tried to install this platform, I will show you what works and what doesn't. 
At this moment Roblox Player cannot be run with Wine. 
I tested two ways to run it.
First is the roblox-linux-wrapper and the second is the direct way to install RobloxPlayerLauncher.exe.
The roblox-linux-wrapper works but you will get this error
The install process is simple:
[mythcat@desk ~]$ git clone https://github.com/roblox-linux-wrapper/roblox-linux-wrapper.git
Cloning into 'roblox-linux-wrapper'...
remote: Enumerating objects: 17, done.
remote: Counting objects: 100% (17/17), done.
remote: Compressing objects: 100% (16/16), done.
remote: Total 1471 (delta 7), reused 4 (delta 1), pack-reused 1454
Receiving objects: 100% (1471/1471), 380.74 KiB | 274.00 KiB/s, done.
Resolving deltas: 100% (901/901), done.

[mythcat@desk ~]$ whereis wine
wine: /usr/bin/wine /usr/lib/wine /usr/lib64/wine /usr/share/wine /usr/share/man/man1/wine.1.gz

[mythcat@desk ~]$ roblox-linux-wrapper/rlw
> main: Sourcing /home/mythcat/roblox-linux-wrapper/data/rlw-core.sh
> wineinitialize: sourcing /home/mythcat/.rlw/wine_choice
Another way is to download the EXE file and run it with Wine.
[mythcat@desk ~]$ wget http://setup.rbxcdn.com/RobloxPlayerLauncher.exe
wine RobloxPlayerLauncher.exe 
...
You can try to start a game on browser , select the Roblox Player and will get the same error. A good news is about Roblox Studio, this works very well:
[mythcat@desk ~]$ wget https://setup.rbxcdn.com/RobloxStudioLauncherBeta.exe
[mythcat@desk ~]$ wine RobloxStudioLauncherBeta.exe
My video card NVIDIA Corporation GT218 [GeForce 210] (rev a2) is not very good with this application , but works.