Pages

Sunday, October 6, 2019

Fedora 30 : The paris-traceroute tool.

Today I tested two Linux tools named:paris-traceroute. This tool can be install with dnf tool. This tool named paris-traceroute was implemented by Xavier Cuvellier. Debugged and enhanced by Brice Augustin. The techniques invented by the authors of Paris-traceroute to enumerate the paths of ECMP flow-based load balancing. I used the 8.8.8.8 address to test this tool.
[root@desk mythcat]# paris-traceroute 8.8.8.8 -p icmp
...
[root@desk mythcat]# paris-traceroute 8.8.8.8 -i
...
[root@desk mythcat]# paris-traceroute 8.8.8.8 -l
...
Using the verbose mode the tool will print debug messages:
[root@desk mythcat]# paris-traceroute 8.8.8.8 -v
[DEBUG](Options.cc, 222)dst_addr = 8.8.8.8
[DEBUG](Options.cc, 340)protocol     = udp
[DEBUG](Options.cc, 341)src_add      = 
[DEBUG](Options.cc, 342)dst_addr     = 8.8.8.8
[DEBUG](Options.cc, 343)ttl_initial  = 1
[DEBUG](Options.cc, 344)ttl_max      = 30
[DEBUG](Options.cc, 345)tos          = 0
[DEBUG](Options.cc, 346)probe_length = 0
[DEBUG](Options.cc, 347)algo         = hopbyhop
[DEBUG](Options.cc, 348)timeout      = 5000
[DEBUG](Options.cc, 349)delay        = 50
[DEBUG](Options.cc, 350)max_try      = 3
[DEBUG](Options.cc, 351)max_missing  = 3
[DEBUG](Options.cc, 352)id_initial   = 1
[DEBUG](Options.cc, 353)resolve      = true
[DEBUG](Options.cc, 354)ipid         = false
[DEBUG](Util.cc, 246)p_proto = 1
[INFO](Server.cc, 216)waiting for the first packet..

[INFO](TracertImpl.cc, 48)HopByHop algo
[INFO](TracertImpl.cc, 183)Send probe, ttl=1, id=1
[DEBUG](UDPProbe.cc, 247)==> UDP Probe :
[DEBUG](IP4Header.cc, 346)IP4 header :
[DEBUG](IP4Header.cc, 347)tos                = 0
[DEBUG](IP4Header.cc, 348)total_length       = 30
[DEBUG](IP4Header.cc, 349)ttl                = 1
[DEBUG](IP4Header.cc, 350)protocol           = 17
[DEBUG](IP4Header.cc, 353)source_address     = 
[DEBUG](IP4Header.cc, 355)dest_address       = 8.8.8.8
[DEBUG](UDPHeader.cc, 143)UDP header :
[DEBUG](UDPHeader.cc, 144)source_port        = 
[DEBUG](UDPHeader.cc, 145)dest_port          = 
[DEBUG](UDPHeader.cc, 146)datagram_length    = 10
[DEBUG](UDPHeader.cc, 147)checksum           = 12584
[DEBUG](UDPProbe.cc, 250)Data :
[DEBUG]0x01 0x00 
[DEBUG]0x45 0x00 0x00 0x1e 0x00 0x01 0x00 0x00 
[DEBUG]0x01 0x11 0x00 0x00 0xc0 0xa8 0x00 0x8f 
[DEBUG]0x08 0x08 0x08 0x08 0x82 0xb0 0x82 0xb1 
[DEBUG]0x00 0x0a 0x28 0x31 0x01 0x00 
[INFO](Server.cc, 276)Captured first packet!

[DEBUG](Server.cc, 280)Incoming message :
[DEBUG](Server.cc, 281)parsing.. ef72baa0 58
[DEBUG]0x45 0xc0 0x00 0x3a 0x5c 0xcd 0x00 0x00 
[DEBUG]0x40 0x01 0x9b 0x55 0xc0 0xa8 0x00 0x01 
[DEBUG]0xc0 0xa8 0x00 0x8f 0x0b 0x00 0xc6 0x62 
[DEBUG]0x00 0x00 0x00 0x00 0x45 0x00 0x00 0x1e 
[DEBUG]0x00 0x01 0x00 0x00 0x01 0x11 0xe8 0x87 
[DEBUG]0xc0 0xa8 0x00 0x8f 0x08 0x08 0x08 0x08 
[DEBUG]0x82 0xb0 0x82 0xb1 0x00 0x0a 0x28 0x31 
[DEBUG]0x01 0x00 
[DEBUG](Server.cc, 285)Incoming message parsed :
[DEBUG](IP4Header.cc, 346)IP4 header :
[DEBUG](IP4Header.cc, 347)tos                = 192
[DEBUG](IP4Header.cc, 348)total_length       = 58
[DEBUG](IP4Header.cc, 349)ttl                = 64
[DEBUG](IP4Header.cc, 350)protocol           = 1
[DEBUG](IP4Header.cc, 353)source_address     = 
...
You can see more about this tool here. Another tool is dublin-traceroute works like paris-traceroute but introduces a new technique for NAT detection ( this is not in the Fedora repo).

Friday, October 4, 2019

Fedora 30 : A general intro to linux signals with python.

UNIX/Linux systems offer special mechanisms to communicate between each individual process with signals. Let's see these signals:
[mythcat@desk ~]$ kill -l
 1) SIGHUP  2) SIGINT  3) SIGQUIT  4) SIGILL  5) SIGTRAP
 6) SIGABRT  7) SIGBUS  8) SIGFPE  9) SIGKILL 10) SIGUSR1
11) SIGSEGV 12) SIGUSR2 13) SIGPIPE 14) SIGALRM 15) SIGTERM
16) SIGSTKFLT 17) SIGCHLD 18) SIGCONT 19) SIGSTOP 20) SIGTSTP
21) SIGTTIN 22) SIGTTOU 23) SIGURG 24) SIGXCPU 25) SIGXFSZ
26) SIGVTALRM 27) SIGPROF 28) SIGWINCH 29) SIGIO 30) SIGPWR
31) SIGSYS 34) SIGRTMIN 35) SIGRTMIN+1 36) SIGRTMIN+2 37) SIGRTMIN+3
38) SIGRTMIN+4 39) SIGRTMIN+5 40) SIGRTMIN+6 41) SIGRTMIN+7 42) SIGRTMIN+8
43) SIGRTMIN+9 44) SIGRTMIN+10 45) SIGRTMIN+11 46) SIGRTMIN+12 47) SIGRTMIN+13
48) SIGRTMIN+14 49) SIGRTMIN+15 50) SIGRTMAX-14 51) SIGRTMAX-13 52) SIGRTMAX-12
53) SIGRTMAX-11 54) SIGRTMAX-10 55) SIGRTMAX-9 56) SIGRTMAX-8 57) SIGRTMAX-7
58) SIGRTMAX-6 59) SIGRTMAX-5 60) SIGRTMAX-4 61) SIGRTMAX-3 62) SIGRTMAX-2
63) SIGRTMAX-1 64) SIGRTMAX
Each signal is represented by an integer value, and the list of signals that are available. This simple python script create a process and print one message. Each process named PID comes with a number.
[mythcat@desk ~]$ cat python3 signal_001.py 
cat: python3: No such file or directory
import os
import sys
import time
print('PID number is:', os.getpid())
while True:
    print('Waiting...')
    time.sleep(6)
[mythcat@desk ~]$ python3 signal_001.py 
PID number is: 2566
Waiting...
Waiting...
Waiting...
Waiting...
Waiting...
Hangup
The PID process can be kill with this command:
[mythcat@desk ~]$ kill -SIGTERM 2566
Let's see another example that receives the signal we have sent to the process.
import os
import signal
import time

def receiveSignal(signalNumber, frame):
    print('Received:', signalNumber)
    raise SystemExit('Exiting')
    return

if __name__ == '__main__':
    # register the signals to be caught
    signal.signal(signal.SIGHUP, receiveSignal)
    signal.signal(signal.SIGINT, receiveSignal)
    signal.signal(signal.SIGQUIT, receiveSignal)
    signal.signal(signal.SIGILL, receiveSignal)
    signal.signal(signal.SIGTRAP, receiveSignal)
    signal.signal(signal.SIGABRT, receiveSignal)
    signal.signal(signal.SIGBUS, receiveSignal)
    signal.signal(signal.SIGFPE, receiveSignal)
    #signal.signal(signal.SIGKILL, receiveSignal)
    signal.signal(signal.SIGUSR1, receiveSignal)
    signal.signal(signal.SIGSEGV, receiveSignal)
    signal.signal(signal.SIGUSR2, receiveSignal)
    signal.signal(signal.SIGPIPE, receiveSignal)
    signal.signal(signal.SIGALRM, receiveSignal)
    signal.signal(signal.SIGTERM, receiveSignal)
    # register the signal to be caught
    signal.signal(signal.SIGUSR1, receiveSignal)

    # register the signal to be ignored
    signal.signal(signal.SIGINT, signal.SIG_IGN)

    # output current process id
    print('My PID is:', os.getpid())

    signal.pause()
Let't run it and see what happend when send a signal to the PID:
[mythcat@desk ~]$ python3 py_pid.py
My PID is: 2698
Received: 10
Exiting
You can see the kill command will send this output: Received: 10 Exiting .
[mythcat@desk ~]$ kill -SIGUSR1 2698

Sunday, September 22, 2019

Fedora 30 : Detect hardware issues.

You can detect your hardware and read the health of your system using many commands and tools.
Today I show you these tools: lm_sensors-sensord.x86_64 and lshw.
[root@desk mythcat]# dnf install lm_sensors-sensord.x86_64 
...
Installed:
  lm_sensors-sensord-3.5.0-6.fc30.x86_64       rrdtool-1.7.2-1.fc30.x86_64      
  libdbi-0.9.0-13.fc30.x86_64                 

Complete!
...
[root@desk mythcat]# dnf install lshw
Last metadata expiration check: 0:50:16 ago on Sun 22 Sep 2019 10:27:55 PM EEST.
Dependencies resolved.
================================================================================
 Package       Architecture    Version                   Repository        Size
================================================================================
Installing:
 lshw          x86_64          B.02.18-21.fc30           updates          315 k

Transaction Summary
================================================================================
Install  1 Package

Total download size: 315 k
Installed size: 1.1 M
Is this ok [y/N]: y
Downloading Packages:
lshw-B.02.18-21.fc30.x86_64.rpm                 598 kB/s | 315 kB     00:00    
--------------------------------------------------------------------------------
Total                                            56 kB/s | 315 kB     00:05     
Running transaction check
Transaction check succeeded.
Running transaction test
Transaction test succeeded.
Running transaction
  Preparing        :                                                        1/1 
  Installing       : lshw-B.02.18-21.fc30.x86_64                            1/1 
  Running scriptlet: lshw-B.02.18-21.fc30.x86_64                            1/1 
  Verifying        : lshw-B.02.18-21.fc30.x86_64                            1/1 

Installed:
  lshw-B.02.18-21.fc30.x86_64                                                   

Complete!
First, use this command to select and setup the sensors:
[root@desk mythcat]# sensors-detect
# sensors-detect revision $Revision$
# System: Gigabyte Technology Co., Ltd. Z68P-DS3
# Kernel: 5.2.13-200.fc30.x86_64 x86_64
# Processor: Intel(R) Celeron(R) CPU G1620 @ 2.70GHz (6/58/9)

This program will help you determine which kernel modules you need
to load to use lm_sensors most effectively. It is generally safe
and recommended to accept the default answers to all questions,
unless you know what you're doing.

Some south bridges, CPUs or memory controllers contain embedded sensors.
Do you want to scan for them? This is totally safe. (YES/no): YES
...

Driver `coretemp':
  * Chip `Intel digital thermal sensor' (confidence: 9)

Driver `it87':
  * ISA bus, address 0x290
    Chip `ITE IT8728F Super IO Sensors' (confidence: 9)

Do you want to overwrite /etc/sysconfig/lm_sensors? (YES/no): YES
Unloading i2c-dev... OK
The output of sensors can be show like this:
[root@desk mythcat]# sensors
it8728-isa-0290
Adapter: ISA adapter
in0:          +1.04 V  (min =  +0.00 V, max =  +3.06 V)
in1:          +2.00 V  (min =  +0.00 V, max =  +3.06 V)
in2:          +2.98 V  (min =  +0.00 V, max =  +3.06 V)
in3:          +2.96 V  (min =  +0.00 V, max =  +3.06 V)
in4:          +0.00 V  (min =  +0.00 V, max =  +3.06 V)  ALARM
in5:          +0.70 V  (min =  +0.00 V, max =  +3.06 V)
in6:          +1.52 V  (min =  +0.00 V, max =  +3.06 V)
3VSB:         +3.38 V  (min =  +0.00 V, max =  +6.12 V)
Vbat:         +3.00 V  
fan1:        1180 RPM  (min =    0 RPM)
fan2:           0 RPM  (min =    0 RPM)
fan3:           0 RPM  (min =    0 RPM)
fan4:           0 RPM  (min =    0 RPM)
temp1:        +37.0°C  (low  = +127.0°C, high = +127.0°C)  sensor = thermistor
temp2:        +25.0°C  (low  = +127.0°C, high = +127.0°C)  sensor = thermistor
temp3:        +25.0°C  (low  = +127.0°C, high = +127.0°C)  sensor = Intel PECI
intrusion0:  ALARM

nouveau-pci-0500
Adapter: PCI adapter
GPU core:     +0.90 V  (min =  +0.85 V, max =  +1.00 V)
temp1:        +42.0°C  (high = +95.0°C, hyst =  +3.0°C)
                       (crit = +105.0°C, hyst =  +5.0°C)
                       (emerg = +135.0°C, hyst =  +5.0°C)

coretemp-isa-0000
Adapter: ISA adapter
Package id 0:  +37.0°C  (high = +85.0°C, crit = +105.0°C)
Core 0:        +36.0°C  (high = +85.0°C, crit = +105.0°C)
Core 1:        +37.0°C  (high = +85.0°C, crit = +105.0°C)
Using the lshw tool:
[root@desk mythcat]# lshw
desk                        
    description: Desktop Computer
...
The tool extracts detailed information on the hardware configuration of the machine and output is shown like HTML, JSON or SQLite database, see the help:
       lshw [ -version ]

       lshw [ -help ]

       lshw [ -X ]

       lshw [  [ -html ]  [ -short ]  [ -xml ]  [ -json ]  [ -businfo ]  ]  [ -dump filename ]  [
       -class class... ]  [ -disable test... ]  [ -enable test... ]  [ -sanitize ]  [ -numeric  ]
       [ -quiet ]

Monday, September 16, 2019

Fedora 30 : Interactive learning and reinventing the wheel in programming.

Today I returned from an activity that prompted me to find a solution to display logos.
I found this GitHub repo that I read and then turned it into a single script.
It took about an hour.

Saturday, September 7, 2019

Fedora 30 : A general purpose 3D CAD modeler.

I don't use the Computer-aided design (CAD) solutions but today I tested a good one with Fedora 30.
The FreeCAD application is an open source option product design.
This is available on Linux, Windows, Mac OS X+.
The full list with all features can be found at this wiki page.
[root@desk mythcat]# dnf search freecad
Last metadata expiration check: 0:14:20 ago on Sb 07 sep 2019 21:54:39 +0300.
======================== Name Exactly Matched: freecad =========================
freecad.x86_64 : A general purpose 3D CAD modeler
======================= Name & Summary Matched: freecad ========================
freecad-data.noarch : Data files for FreeCAD
[root@desk mythcat]# dnf install freecad.x86_64
Last metadata expiration check: 0:19:37 ago on Sb 07 sep 2019 21:54:39 +0300.
Dependencies resolved.
================================================================================
 Package               Arch   Version                             Repo     Size
================================================================================
Installing:
 freecad               x86_64 1:0.18.3-1.fc30                     updates  38 M
...

Complete!
[root@desk mythcat]# exit 
exit
[mythcat@desk ~]$ FreeCAD
FreeCAD 0.18, Libs: 0.18RUnknown
© Juergen Riegel, Werner Mayer, Yorik van Havre 2001-2019
  #####                 ####  ###   ####  
  #                    #      # #   #   # 
  #     ##  #### ####  #     #   #  #   # 
  ####  # # #  # #  #  #     #####  #   # 
  #     #   #### ####  #    #     # #   # 
  #     #   #    #     #    #     # #   #  ##  ##  ##
  #     #   #### ####   ### #     # ####   ##  ##  ## 
It seems to work very well.

Thursday, September 5, 2019

Fedora 30 : Huion graphics tablet installation.

This is an old tutorial I wrote a few days ago. You need to install the last kernel driver development and dkms according to this website.
[root@desk mythcat]# dnf install -y "kernel-devel-uname-r == $(uname -r)"
Fedora Modular 30 - x86_64                                                          14 kB/s |  25 kB     00:01    
Fedora Modular 30 - x86_64 - Updates                                                28 kB/s |  23 kB     00:00    
google-chrome                                                                      8.8 kB/s | 1.3 kB     00:00    
RPM Fusion for Fedora 30 - Free - Updates                                           12 kB/s | 6.8 kB     00:00    
RPM Fusion for Fedora 30 - Free - Updates                                          338 kB/s | 341 kB     00:01    
RPM Fusion for Fedora 30 - Free                                                     34 kB/s |  11 kB     00:00    
RPM Fusion for Fedora 30 - Nonfree - Updates                                       8.7 kB/s | 6.6 kB     00:00    
RPM Fusion for Fedora 30 - Nonfree - Updates                                        50 kB/s |  45 kB     00:00    
RPM Fusion for Fedora 30 - Nonfree                                                  15 kB/s |  11 kB     00:00    
Fedora 30 - x86_64 - VirtualBox                                                    356  B/s | 181  B     00:00    
Package kernel-devel-5.2.9-200.fc30.x86_64 is already installed.
Dependencies resolved.
Nothing to do.
Complete!
[root@desk mythcat]# dnf install -y dkms
Last metadata expiration check: 0:01:10 ago on Sat 31 Aug 2019 12:29:01 PM EEST.
Package dkms-2.6.1-3.fc30.noarch is already installed.
Dependencies resolved.
Nothing to do.
Complete!
Let's see if this works:
[root@desk mythcat]# xinput
⎡ Virtual core pointer                          id=2    [master pointer  (3)]
⎜   ↳ Virtual core XTEST pointer                id=4    [slave  pointer  (2)]
⎜   ↳ PixArt USB Optical Mouse                  id=8    [slave  pointer  (2)]
⎜   ↳ PenTablet  Pen (0)                        id=11   [slave  pointer  (2)]
⎣ Virtual core keyboard                         id=3    [master keyboard (2)]                                                
    ↳ Virtual core XTEST keyboard               id=5    [slave  keyboard (3)]                                                
    ↳ Power Button                              id=6    [slave  keyboard (3)]                                                
    ↳ Power Button                              id=7    [slave  keyboard (3)]                                                
    ↳ AT Translated Set 2 keyboard              id=9    [slave  keyboard (3)]  
If not work test the modules:
[root@desk mythcat]# modprobe -r hid-kye hid-uclogic hid-polostar hid-viewsonic
modprobe: FATAL: Module hid-polostar not found.
[root@desk mythcat]# modprobe -r hid-kye hid-uclogic  hid-viewsonic
You can use the official GitHub project:
wget https://github.com/DIGImend/digimend-kernel-drivers/releases/download/v10/digimend-kernel-drivers-10.tar.gz
tar xf digimend-kernel-drivers-10.tar.gz
cd digimend-kernel-drivers-10
sudo dnf install -y "kernel-devel-uname-r == $(uname -r)" dkms
sudo make dkms_install

Wednesday, September 4, 2019

Fedora 30 : About the Jupyter lab tool.

The tutorial for today is about Jupiter Lab and Fedora 30. You can see an old tutorial with Fedora 29 here.
The JupyterLab is the next-generation web-based user interface for Project Jupyter.
This can be installed using conda, pip or pipenv.
I used pip3 tool for instalation process on Fedora 30 distro:
[mythcat@desk ~]$ pip3 install jupyterlab --user
...
Successfully installed Send2Trash-1.5.0 attrs-19.1.0 backcall-0.1.0 bleach-3.1.0 defusedxml-0.6.0 
ipykernel-5.1.2 ipython-7.8.0 ipython-genutils-0.2.0 jedi-0.15.1 json5-0.8.5 jsonschema-3.0.2 
jupyter-client-5.3.1 jupyter-core-4.5.0 jupyterlab-1.1.1 jupyterlab-server-1.0.6 mistune-0.8.4 
nbconvert-5.6.0 nbformat-4.4.0 notebook-6.0.1 pandocfilters-1.4.2 parso-0.5.1 pexpect-4.7.0 
pickleshare-0.7.5 prometheus-client-0.7.1 prompt-toolkit-2.0.9 ptyprocess-0.6.0 pyrsistent-0.15.4 
pyzmq-18.1.0 terminado-0.8.2 testpath-0.4.2 tornado-6.0.3 traitlets-4.3.2 wcwidth-0.1.7 
webencodings-0.5.1
[mythcat@desk ~]$ jupyter notebook --version
6.0.1
This tool browsers can be used with :Firefox, Chrome and Safari.
The tool can be start with this command:
[mythcat@desk ~]$ jupyter lab
[I 19:53:05.527 LabApp] Writing notebook server cookie secret to ...
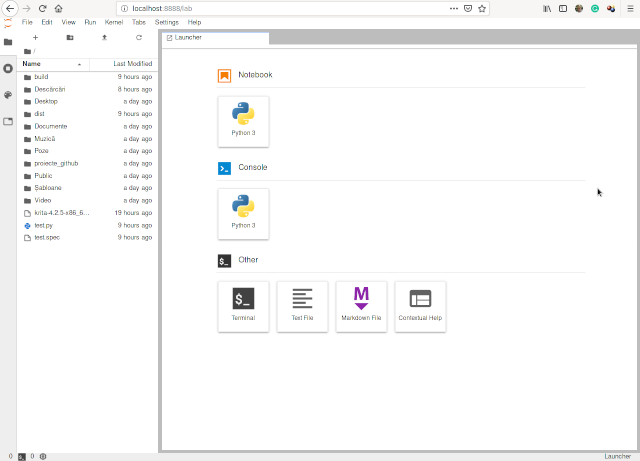
The default browser will open a new tab and show the interface for this tool, see screenshot:
If you install a new python module then you need to close and reopen the tool.
You can run every row command with Shift+Enter keys.
When you want to close it just close the browser tab and press Ctrl+C keys.
Shutdown this notebook server (y/[n])? y
[C 20:09:00.058 LabApp] Shutdown confirmed
[I 20:09:00.304 LabApp] Shutting down 0 kernels
 To see additional kernels follow this link. The Fedora 30 comes with this kernels for Jupyter using the dnf tool:
[root@desk mythcat]# dnf search jupyter | grep kernel
Last metadata expiration check: 0:57:13 ago on Mi 04 sep 2019 19:46:15 +0300.
polymake-jupyter.noarch : Jupyter kernel for polymake
gap-pkg-jupyterkernel.noarch : Jupyter kernel written in GAP
python3-jupyter-c-kernel.noarch : Minimalistic C kernel for Jupyter
gap-pkg-jupyterkernel-doc.noarch : Jupyter kernel for GAP documentation
python3-jupyter-kernel-test.noarch : Machinery for testing Jupyter kernels via
python3-jupyroot.x86_64 : ROOT Jupyter kernel
python3-metakernel.noarch : Metakernel for Jupyter
python3-ipykernel.noarch : IPython Kernel for Jupyter
python3-octave-kernel.noarch : A Jupyter kernel for Octave
python3-metakernel-bash.noarch : A Bash kernel for Jupyter/IPython
python3-metakernel-python.noarch : A Python kernel for Jupyter/IPython
python3-spyder-kernels.noarch : Jupyter kernels for the Spyder console
python3-metakernel-echo.noarch : A simple echo kernel for Jupyter/IPython
R-IRkernel.noarch : Native R Kernel for the 'Jupyter Notebook'
Another feature of Jupyter is the ability to run it as a presentation server:
[mythcat@desk ~]$ jupyter nbconvert --generate-config
Writing default config to: /home/mythcat/.jupyter/jupyter_nbconvert_config.py
[mythcat@desk ~]$ cat /home/mythcat/.jupyter/jupyter_nbconvert_config.py
# Configuration file for jupyter-nbconvert.

#------------------------------------------------------------------------------
# Application(SingletonConfigurable) configuration
#------------------------------------------------------------------------------

## This is an application.
Change jupyter_nbconvert_config.py file by adding your settings. For example:
## Accept connections from all IPs
c.ServePostProcessor.ip = '*'

## Do not open the browser automatically
c.ServePostProcessor.open_in_browser = False
After you work with jupyter you can save it with a name like Test001 and run this command:
[mythcat@desk ~]$ jupyter nbconvert "Test001.ipynb" --to slides --post serve[NbConvertApp] 
Converting notebook Test001.ipynb to slides
[NbConvertApp] Writing 278626 bytes to Test001.slides.html
[NbConvertApp] Redirecting reveal.js requests to https://cdnjs.cloudflare.com/ajax/libs/reveal.js/3.5.0
Serving your slides at http://*:8000/Test001.slides.html
Use Control-C to stop this server
The result of the HTML presentation can be see at http://localhost:8000/Test001.slides.html#.