Pages

Showing posts with label python modules. Show all posts

Sunday, October 27, 2024

Fedora 42 : Can be better? part 020.

I wrote in some posts about this blog about the possibility of improving the distribution of Linux Fedora.
Today I discovered that choosing GNOME is a better option with lighting modes and options for the Nemo file manager actions.
I would have wanted to have a better network system similar to portmanager with S.P.N. for fedora users and team on web.
SPN (Secure Peer Name) is a technology related to secure communication protocols, particularly in the context of peer-to-peer networks and distributed systems.
I want to have more tools and applications on tty with GUI, like ncurses... I created an radio online application with ncurses and you can find it on my pagure.
The main goal of these type of graphic user interface is simplicity, no need hardware resources - this HP Compaq 6710b has only 4Gb RAM, and cand be used with Single Board Computer.
I think Fedora don't have a Fedora Spin for Single Board Computer hardware.
Let's start with python 3 action on nemo file manager.
Go to the action folder and create an action file named: python3.nemo_action.
[root@fedora mythcat]# cd /usr/share/nemo/actions
[root@fedora actions]# nano python3.nemo_action
Add this source code :
[Nemo Action]
Name=Execute Python Script
Icon-Name=python
Exec=env /usr/bin/python3 %F
Selection=S
Name[tr]=Python script         
Extensions=py;
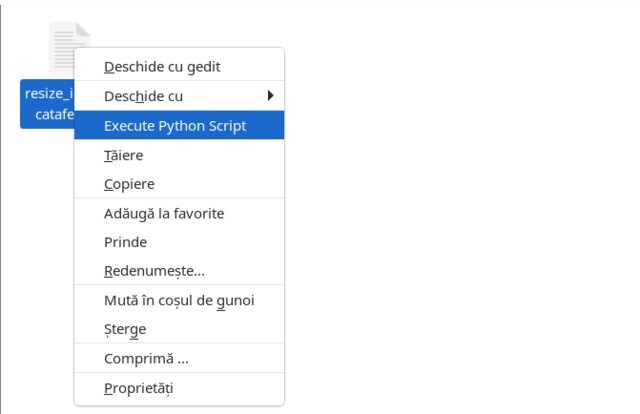
Reopen the Nemo file manager and you see an an Execute Python Script, only on the python script on right click menu.
Let's see some screenshots:

Monday, October 7, 2024

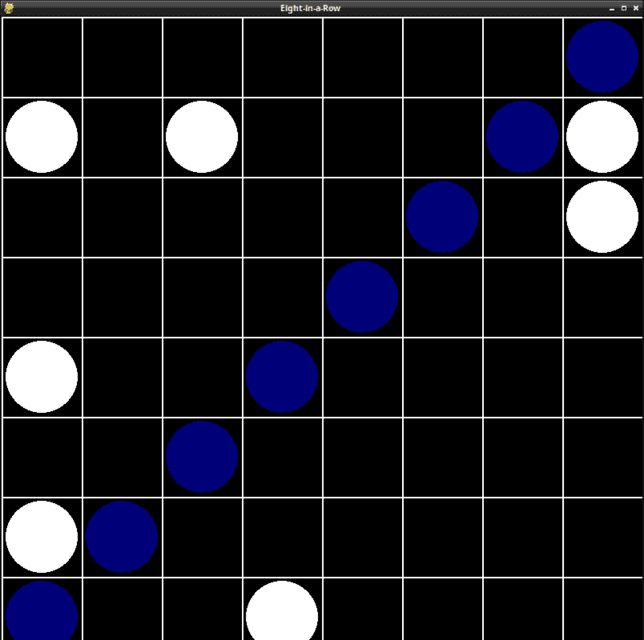
Fedora 42 : Fedora game project with pygame and agentpy - part 004.

... working on hacking game code , you can test two version of the unfinished game with agentpy at my pagure Fedora account.
* Hack the code based on minimal information versus total information. The code has 5 distinct letters. - click on the letters on the keypad - the number of guessed letters is displayed in the form: centered - guessed letters on positions and moved guessed letters but on other positions NOTE: the source code is under development, I need to enter a scroll to be able to enter more codes with letters

Saturday, September 28, 2024

Fedora 42 : Fedora game project with pygame and agentpy - part 003.

I have upgraded the source code with the following changes:
  • added agent with logic using the python agentpy module;
  • I increased the grid to 16 x 16;
  • I kept the win condition at 8 pieces aligned in any direction;
  • I added conditions for displaying the equality message;
The game is hard to win, you can try on my pagure account.

Wednesday, September 25, 2024

Fedora 42 : Fedora game project with pygame and agentpy - part 002.

... and update from 8 in 8 with SVG file type.
The source code I used or you can find it on the pagure project:
import pygame
from pygame.math import Vector2
import random
import os 
username = os.getlogin()
# Initialize Pygame
pygame.init()
# Set up the display
width, height = 800, 800
screen = pygame.display.set_mode((width, height))
pygame.display.set_caption("Eight-in-a-Row")
# Font setup
font = pygame.font.Font(None, 74)
# Colors
WHITE = (255, 255, 255)
BLACK = (0, 0, 0)
BLUE = (0, 0, 120)
# Game board dimensions
BOARD_WIDTH = 8
BOARD_HEIGHT = 8

class Player:
    def __init__(self, color, is_computer=False):
        self.color = color
        self.pieces = set()
        self.is_computer = is_computer
        self.svg_image = self.load_svg_image()

    def add_piece(self, x, y):
        self.pieces.add((x, y))

    # def draw_pieces(self):
    #     for x, y in self.pieces:
    #         pygame.draw.circle(screen, self.color, 
    #                            (x * width // BOARD_WIDTH + width // (2 * BOARD_WIDTH), 
    #                             y * height // BOARD_HEIGHT + height // (2 * BOARD_HEIGHT)), 
    #                            min(width, height) // (2 * BOARD_WIDTH) - 5)
    
    def load_svg_image(self):
        if self.color == BLUE:
            svg_path = "penguin-svgrepo-com.svg"
        elif self.color == WHITE:
            svg_path = "cube-svgrepo-com.svg"
        else:
            svg_path = "cube-svgrepo-com.svg"
        return pygame.image.load(svg_path)

    def draw_pieces(self):
        piece_size = min(width, height) // (BOARD_WIDTH) - 10
        for x, y in self.pieces:
            pos = Vector2(x * width // BOARD_WIDTH + width // (2 * BOARD_WIDTH),
                          y * height // BOARD_HEIGHT + height // (2 * BOARD_HEIGHT))
            scaled_image = pygame.transform.scale(self.svg_image, (piece_size, piece_size))
            image_rect = scaled_image.get_rect(center=pos)
            screen.blit(scaled_image, image_rect)

    def make_move(self, board):
        if self.is_computer:
            empty_squares = [(x, y) for x in range(BOARD_WIDTH) for y in range(BOARD_HEIGHT) 
                             if (x, y) not in board[0] and (x, y) not in board[1]]
            if empty_squares:
                return random.choice(empty_squares)
        return None

def check_winner(player):
    directions = [(0, 1), (1, 0), (1, 1), (1, -1)]
    for x, y in player.pieces:
        for dx, dy in directions:
            if all((x + i*dx, y + i*dy) in player.pieces for i in range(8)):
                return True
    return False
    
def display_winner(winner):
    text = font.render(f"Player {winner} wins!", True, [145,190,190])
    text_rect = text.get_rect(center=(width // 2, height // 2))
    screen.blit(text, text_rect)
    pygame.display.flip()
    pygame.time.wait(3000)  # Display the message for 3 seconds

# Create players
player1 = Player(BLUE)
player2 = Player(WHITE, is_computer=True)
# Game loop
running = True
turn = 0
game_over = False

while running:
    for event in pygame.event.get():
        if event.type == pygame.QUIT:
            running = False
        elif event.type == pygame.MOUSEBUTTONDOWN and not game_over:
            if turn % 2 == 0:  # Human player's turn
                mouse_x, mouse_y = event.pos
                column = mouse_x // (width // BOARD_WIDTH)
                row = mouse_y // (height // BOARD_HEIGHT)
                
                if (column, row) not in player1.pieces and (column, row) not in player2.pieces:
                    player1.add_piece(column, row)
                    
                    if check_winner(player1):
                        # print("Player 1 wins!")
                        display_winner(username)
                        game_over = True
                    
                    turn += 1

    if not game_over and turn % 2 == 1:  # Computer player's turn
        move = player2.make_move((player1.pieces, player2.pieces))
        if move:
            player2.add_piece(*move)
            
            if check_winner(player2):
                # print("Player 2 (Computer) wins!")
                display_winner("Computer")
                game_over = True
            turn += 1

    screen.fill(BLACK)
    
    # Draw game board
    for i in range(BOARD_WIDTH + 1):
        pygame.draw.line(screen, WHITE, (i * width // BOARD_WIDTH, 0), (i * width // BOARD_WIDTH, height), 2)
    for i in range(BOARD_HEIGHT + 1):
        pygame.draw.line(screen, WHITE, (0, i * height // BOARD_HEIGHT), (width, i * height // BOARD_HEIGHT), 2)

    # Draw pieces
    player1.draw_pieces()
    player2.draw_pieces()
    pygame.display.flip()

pygame.quit()

Saturday, September 21, 2024

Fedora 42 : Fedora game project with pygame and agentpy - part 001.

I started a game project with the python packages pygame and agentpy in the Fedora 42 Linux distribution.
I used this version of Fedora:
[mythcat@fedora fedora_game]$ uname -a
Linux fedora 6.11.0-63.fc42.x86_64 #1 SMP PREEMPT_DYNAMIC Sun Sep 15 17:14:12 UTC 2024 x86_64 GNU/Linux
... and this python version:
Python 3.12.3 (main, Apr 17 2024, 00:00:00) [GCC 14.0.1 20240411 (Red Hat 14.0.1-0)] on linux
You can find it on my fedora pagure repo

Sunday, September 3, 2023

Fedora 39 : Issues in Fedora with PyGobject and sway-tests.

Today I wanted to test this repo named sway-tests.
I followed the steps there and received an error from gi.repository.
This error is related to another issue related to PyGobject.
In Fedora Linux distro, installing PyGobject is done with pip like this:
$ pip install PyGobject
In order to have no errors, the dnf or dnf5 tool should be used like this ...
I tested the functionality of this installation with a simple example:
import gi

gi.require_version("Gtk", "3.0")
from gi.repository import Gtk

win = Gtk.Window()
win.connect("destroy", Gtk.main_quit)
win.show_all()
Gtk.main()
It worked very well.
After solving this issue, I returned to the initial one and tested the sway-tests.
$ whereis sway
$ env/bin/pytest --sway=/usr/bin/sway
$ sudo env/bin/pytest --sway=/usr/bin/sway
I used the command both with and without sudo.
Both generated the same errors.
For the following command I had to install ... xorg-x11-server-Xephyr:
Xephyr is an X server which has been implemented as an ordinary X application. It runs in a window just like other X applications, but it is an X server ...
... the fixed centered black window specific to the xorg runtime appeared and somewhere on the side the terminal showed me a bunch of errors.
... obviously, I don't know how well sway-tests is implemented, now it's an archived repo, but I solved the use of PyGobject in python on the Fedora linux distribution.

Monday, August 22, 2022

Fedora 37 : Install PyQt5 and PyQt6 on Fedora.

In this tutorial, I will show you how to install PyQt5 and PyQt6 on Fedora 37 Distro Linux.
I used the DNF tool on the sudo user.
To install PyQt5 I used this command:
[root@fedora mythcat]# dnf install python3-qt5.x86_64
Last metadata expiration check: 2:20:40 ago on Wed 17 Aug 2022 09:42:57 PM EEST.
Dependencies resolved.
...
Installed:
  openal-soft-1.22.2-2.fc37.x86_64                                              
  python-qt5-rpm-macros-5.15.6-7.fc37.noarch                                    
  python3-pyqt5-sip-12.11.0-2.fc37.x86_64                                       
  python3-qt5-5.15.6-7.fc37.x86_64                                              
  python3-qt5-base-5.15.6-7.fc37.x86_64                                         
  qt5-qtconnectivity-5.15.5-2.fc37.x86_64                                       
  qt5-qtlocation-5.15.5-3.fc37.x86_64                                           
  qt5-qtmultimedia-5.15.5-2.fc37.x86_64                                         
  qt5-qtsensors-5.15.5-2.fc37.x86_64                                            
  qt5-qtserialport-5.15.5-2.fc37.x86_64                                         
  qt5-qtsvg-5.15.5-2.fc37.x86_64                                                
  qt5-qttools-common-5.15.5-2.fc37.noarch                                       
  qt5-qttools-libs-designer-5.15.5-2.fc37.x86_64                                
  qt5-qttools-libs-help-5.15.5-2.fc37.x86_64                                    
  qt5-qtwebchannel-5.15.5-2.fc37.x86_64                                         
  qt5-qtwebsockets-5.15.5-2.fc37.x86_64                                         
  qt5-qtxmlpatterns-5.15.5-2.fc37.x86_64                                        

Complete!
If you want to use PyQt6 then you need to use the sip solution.
Let's search and install it with the DNF tool.
[root@fedora mythcat]# dnf search qt6 | grep python
Last metadata expiration check: 1:02:01 ago on Sun 21 Aug 2022 04:43:24 PM EEST.
python3-pyqt6-sip.x86_64 : The sip module support for PyQt6
[root@fedora mythcat]# dnf install python3-pyqt6-sip.x86_64
Last metadata expiration check: 1:02:24 ago on Sun 21 Aug 2022 04:43:24 PM EEST.
Dependencies resolved.
...
Installed:
  python3-pyqt6-sip-13.3.0-3.fc37.x86_64                                        

Complete!
I used the python command and I import PyQt5 and PyQt6
[mythcat@fedora ~]$ python
Python 3.11.0rc1 (main, Aug  9 2022, 00:00:00) [GCC 12.1.1 20220810 (Red Hat 12.1.1-4)] on linux
...
The python modules are installed and working well.

Wednesday, May 4, 2022

Fedora 36 : Install django-hypergen and test it.

Today I test the last version of python version 3.11.0a7 with the Django-hypergen example.
The install process can be found on the GitHub page project.
You can see the full tutorial here.

Saturday, January 8, 2022

Fedora 35 : Testing the new Django web framework version 4.0.1 with channels.

Today I tested in Fedora 35 the new version 4.0.1 of the Django framework and the channels package.
Channels augments Django to bring WebSocket, long-poll HTTP, task offloading, and other async support to your code, using familiar Django design patterns and a flexible underlying framework that lets you not only customize behaviors but also write support for your own protocols and needs. see the GitHub website.
The entire tutorial can be viewed on my blog about python programming language.
The result shows that it works with the admin webpage:

Sunday, December 26, 2021

Fedora 35 : Python and Flask-Mailing on Fedora.

First of all, a Merry Christmas to the users and the Fedora team. Python version 3.10.1 works very well on Fedore 35 and today I tested a packet called: Flask_Mailing.
Flask-Mailing adds SMTP mail sending to your Flask applications., see the Github repo.
Let's start with the installation of this packet with the pip utility.
[mythcat@fedora ~]$ pip install -U flask-mailing
Defaulting to user installation because normal site-packages is not writeable
Collecting flask-mailing
  Downloading Flask_Mailing-0.0.5-py3-none-any.whl (15 kB)
...
Installing collected packages: rfc3986, anyio, typing-extensions, httpcore, dnspython, async-timeout, pydantic, httpx, 
email-validator, blinker, asgiref, aiosmtplib, aioredis, flask-mailing
    Running setup.py install for blinker ... done
Successfully installed aioredis-2.0.0 aiosmtplib-1.1.6 anyio-3.4.0 asgiref-3.4.1 async-timeout-4.0.2 blinker-1.4 dnspython-2.1.0
email-validator-1.1.3 flask-mailing-0.0.5 httpcore-0.14.3 httpx-0.21.1 pydantic-1.8.2 rfc3986-1.5.0 typing-extensions-4.0.1
I create a folder named ExempleFlask001:
[mythcat@fedora ~]$ mkdir ExempleFlask001
[mythcat@fedora ~]$ cd ExempleFlask001/
[mythcat@fedora ExempleFlask001]$ vi flask001.py
I created the simplest example to test through the import procedure and then read with the dir function, here is the source code:
from flask import Flask
from flask_mailing import Mail, Message

app = Flask(__name__)
@app.route("/")
def index():
    test = str(dir(Mail))
    return test
if __name__ == "__main__":
    app.run(debug=True)
The result of running the script on the command line:
[mythcat@fedora ExempleFlask001]$ python flask001.py
 * Serving Flask app 'flask001' (lazy loading)
 * Environment: production
   WARNING: This is a development server. Do not use it in a production deployment.
   Use a production WSGI server instead.
 * Debug mode: on
 * Running on http://127.0.0.1:5000/ (Press CTRL+C to quit)
 * Restarting with stat
 * Debugger is active!
 * Debugger PIN: 319-368-265
 ...
The browser's response to the script is this:

Tuesday, July 6, 2021

Fedora 34 : Can be better? part 019.

Another way to improve the Fedora 34 is to add the lastes PyQt6 python package into repo.
[root@desk mythcat]# dnf search PyQt6
Last metadata expiration check: 2:03:10 ago on Tue 06 Jul 2021 08:52:41 PM EEST.
No matches found. 
First stable release for PyQt6 was on Jan 2021 by Riverbank Computing Ltd. under GPL or commercial and can be used with Python 3.
Let's install with pip tool:
[mythcat@desk ~]$ /usr/bin/python3 -m pip install --upgrade pip
...
  WARNING: The scripts pip, pip3 and pip3.9 are installed in '/home/mythcat/.local/bin' which is not on PATH.
  Consider adding this directory to PATH or, if you prefer to suppress this warning, 
  use --no-warn-script-location.
Successfully installed pip-21.1.3
[mythcat@desk ~]$ pip install PyQt6 --user
...
Let's see a simple example with this python package:
import sys
from PyQt6.QtCore import Qt
from PyQt6.QtWidgets import QApplication, QLabel

def main():
    app = QApplication(sys.argv)
    win = QLabel()
    win.resize(640, 498)
    win.setText("Qt is awesome!!!")
    win.show()
    app.exec()

if __name__ == "__main__":
    main()
I tested and run well.

Tuesday, April 13, 2021

Fedora 33 : First steps with manim.

Manim is an engine for precise programmatic animations, designed for creating explanatory math videos like 3Blue1Brown
The documentation can be found on this webpage
First, install with the DNF tool all packages:
[root@desk manim_Projects]# dnf install cairo-devel pango-devel ffmpeg python3-devel 
texlive-scheme-medium texlive-standalone.noarch texlive-collection-latexextra.noarch

Last metadata expiration check: 2:19:22 ago on Tue 13 Apr 2021 08:20:03 PM EEST.
Package cairo-devel-1.16.0-9.fc33.x86_64 is already installed.
Package pango-devel-1.48.4-1.fc33.x86_64 is already installed.
Package ffmpeg-4.3.2-2.fc33.x86_64 is already installed.
Package python3-devel-3.9.2-1.fc33.x86_64 is already installed.
Package texlive-scheme-medium-9:svn54074-35.fc33.noarch is already installed.
Package texlive-standalone-9:svn47136-35.fc33.noarch is already installed.
Package texlive-collection-latexextra-9:svn54851-35.fc33.noarch is already installed.
Dependencies resolved.
Nothing to do.
Complete!
Use pip tool to install manim and manimlib.
[mythcat@desk manim_Projects]$ pip install manim
...
[mythcat@desk manim_Projects]$ pip install manimlib
...
You can use --user option argument. A default example from the doc area can be a good test.
from manim import * 

config.background_color = DARK_GRAY
class MovingFrame(Scene):
     def construct(self):
        # Write equations
        equation = MathTex("2x^2-5x+2", "=", "(x-2)(2x-1)")

        # Create animation
        self.play(Write(equation))

        # Add moving frames
        framebox1 = SurroundingRectangle(equation[0], buff=.1)
        framebox2 = SurroundingRectangle(equation[2], buff=.1)

        # Create animations
        self.play(Create(framebox1))  # creating the frame

        self.wait()
        # replace frame 1 with frame 2
        self.play(ReplacementTransform(framebox1, framebox2))
    
        self.wait()
I run it well:
[mythcat@desk manim_Projects]$ /home/mythcat/.local/bin/manim -pl -ql -i follow_me_textxt.py 
This is the result:

Saturday, November 7, 2020

Fedora 33 : Install PyGame 2.0 on Fedora.

Today I will show you how to install the python PyGame version 2.0 package with python version 3.9 in Fedora 33 distro. Let's install all Fedora packages need for this python package:
[root@desk pygame]# dnf install SDL2-devel.x86_64 
...
Installed:
  SDL2-devel-2.0.12-4.fc33.x86_64                                               

Complete!
[root@desk pygame]# dnf install SDL2_ttf-devel.x86_64
...
Installed:
  SDL2_ttf-2.0.15-6.fc33.x86_64       SDL2_ttf-devel-2.0.15-6.fc33.x86_64      

Complete!
[root@desk pygame]# dnf install SDL2_image-devel.x86_64
...
Installed:
  SDL2_image-2.0.5-5.fc33.x86_64      SDL2_image-devel-2.0.5-5.fc33.x86_64     

Complete!
[root@desk pygame]# dnf install SDL2_mixer-devel.x86_64 
...
Installed:
  SDL2_mixer-2.0.4-7.fc33.x86_64      SDL2_mixer-devel-2.0.4-7.fc33.x86_64     

Complete!
[root@desk pygame]# dnf install SDL2_gfx-devel.x86_64 
...
Installed:
  SDL2_gfx-1.0.4-3.fc33.x86_64        SDL2_gfx-devel-1.0.4-3.fc33.x86_64       

Complete!
[root@desk pygame]# dnf install portmidi-devel.x86_64 
...
Installed:
  portmidi-devel-217-38.fc33.x86_64                                             

Complete!
Use this command to clone it from GitHub and install it:
[mythcat@desk ~]$ git clone https://github.com/pygame/pygame
Cloning into 'pygame'...
remote: Enumerating objects: 4, done.
remote: Counting objects: 100% (4/4), done.
remote: Compressing objects: 100% (4/4), done.
remote: Total 38509 (delta 0), reused 0 (delta 0), pack-reused 38505
Receiving objects: 100% (38509/38509), 17.78 MiB | 11.66 MiB/s, done.
Resolving deltas: 100% (29718/29718), done.
[mythcat@desk ~]$ cd pygame/
[mythcat@desk pygame]$ python3.9 setup.py install --user


WARNING, No "Setup" File Exists, Running "buildconfig/config.py"
Using UNIX configuration...


Hunting dependencies...
SDL     : found 2.0.12
FONT    : found
IMAGE   : found
MIXER   : found
PNG     : found
JPEG    : found
SCRAP   : found
PORTMIDI: found
PORTTIME: found
FREETYPE: found 23.4.17

If you get compiler errors during install, double-check
the compiler flags in the "Setup" file.
...
copying docs/pygame_tiny.gif -> build/bdist.linux-x86_64/egg/pygame/docs
creating build/bdist.linux-x86_64/egg/EGG-INFO
copying pygame.egg-info/PKG-INFO -> build/bdist.linux-x86_64/egg/EGG-INFO
copying pygame.egg-info/SOURCES.txt -> build/bdist.linux-x86_64/egg/EGG-INFO
copying pygame.egg-info/dependency_links.txt -> build/bdist.linux-x86_64/egg/EGG-INFO
copying pygame.egg-info/entry_points.txt -> build/bdist.linux-x86_64/egg/EGG-INFO
copying pygame.egg-info/not-zip-safe -> build/bdist.linux-x86_64/egg/EGG-INFO
copying pygame.egg-info/top_level.txt -> build/bdist.linux-x86_64/egg/EGG-INFO
writing build/bdist.linux-x86_64/egg/EGG-INFO/native_libs.txt
creating dist
creating 'dist/pygame-2.0.1.dev1-py3.9-linux-x86_64.egg' and adding 'build/bdist.linux-x86_64/egg' to it
removing 'build/bdist.linux-x86_64/egg' (and everything under it)
Processing pygame-2.0.1.dev1-py3.9-linux-x86_64.egg
creating /home/mythcat/.local/lib/python3.9/site-packages/pygame-2.0.1.dev1-py3.9-linux-x86_64.egg
Extracting pygame-2.0.1.dev1-py3.9-linux-x86_64.egg to /home/mythcat/.local/lib/python3.9/site-packages
Adding pygame 2.0.1.dev1 to easy-install.pth file

Installed /home/mythcat/.local/lib/python3.9/site-packages/pygame-2.0.1.dev1-py3.9-linux-x86_64.egg
Processing dependencies for pygame==2.0.1.dev1
Finished processing dependencies for pygame==2.0.1.dev1
Let's test it:
[mythcat@desk pygame]$ ls
build	     dist  examples	    README.rst	setup.cfg  src_c   test
buildconfig  docs  pygame.egg-info  Setup	setup.py   src_py
[mythcat@desk pygame]$ python3.9
Python 3.9.0 (default, Oct  6 2020, 00:00:00) 
[GCC 10.2.1 20200826 (Red Hat 10.2.1-3)] on linux
Type "help", "copyright", "credits" or "license" for more information.
>>> import pygame
pygame 2.0.1.dev1 (SDL 2.0.12, python 3.9.0)
Hello from the pygame community. https://www.pygame.org/contribute.html
>>> 

Sunday, November 3, 2019

Fedora 30 : Introduction to Qt Designer.

Qt Designer is the Qt tool for designing and building graphical user interfaces (GUIs) with Qt Widgets... see the Qt Designer manual webpage.
[root@desk mythcat]# dnf install qt5-designer.x86_64
...
Installed:
  qt5-designer-5.12.5-1.fc30.x86_64                                             
  qt5-qttools-libs-designercomponents-5.12.5-1.fc30.x86_64                      

Complete!
Let's start this tool with this command:
[mythcat@desk ~]$ designer-qt5 
Follow this video tutorial from my youtube channel:

You can preview your work with Ctrl+R keys.
After you finish with the project then save the file with this name: mytest.ui.
The next command to create your working python file named mytest.py.
Use this command with the -x option creates the main section to the my.py file that will allow us to test quickly whether the GUI looks as we intended.
[mythcat@desk ~]$ pyuic5 -x  mytest.ui -o mytest.py
Now you can run it to see the output:
[mythcat@desk ~]$ python3  mytest.py

Friday, October 4, 2019

Fedora 30 : A general intro to linux signals with python.

UNIX/Linux systems offer special mechanisms to communicate between each individual process with signals. Let's see these signals:
[mythcat@desk ~]$ kill -l
 1) SIGHUP  2) SIGINT  3) SIGQUIT  4) SIGILL  5) SIGTRAP
 6) SIGABRT  7) SIGBUS  8) SIGFPE  9) SIGKILL 10) SIGUSR1
11) SIGSEGV 12) SIGUSR2 13) SIGPIPE 14) SIGALRM 15) SIGTERM
16) SIGSTKFLT 17) SIGCHLD 18) SIGCONT 19) SIGSTOP 20) SIGTSTP
21) SIGTTIN 22) SIGTTOU 23) SIGURG 24) SIGXCPU 25) SIGXFSZ
26) SIGVTALRM 27) SIGPROF 28) SIGWINCH 29) SIGIO 30) SIGPWR
31) SIGSYS 34) SIGRTMIN 35) SIGRTMIN+1 36) SIGRTMIN+2 37) SIGRTMIN+3
38) SIGRTMIN+4 39) SIGRTMIN+5 40) SIGRTMIN+6 41) SIGRTMIN+7 42) SIGRTMIN+8
43) SIGRTMIN+9 44) SIGRTMIN+10 45) SIGRTMIN+11 46) SIGRTMIN+12 47) SIGRTMIN+13
48) SIGRTMIN+14 49) SIGRTMIN+15 50) SIGRTMAX-14 51) SIGRTMAX-13 52) SIGRTMAX-12
53) SIGRTMAX-11 54) SIGRTMAX-10 55) SIGRTMAX-9 56) SIGRTMAX-8 57) SIGRTMAX-7
58) SIGRTMAX-6 59) SIGRTMAX-5 60) SIGRTMAX-4 61) SIGRTMAX-3 62) SIGRTMAX-2
63) SIGRTMAX-1 64) SIGRTMAX
Each signal is represented by an integer value, and the list of signals that are available. This simple python script create a process and print one message. Each process named PID comes with a number.
[mythcat@desk ~]$ cat python3 signal_001.py 
cat: python3: No such file or directory
import os
import sys
import time
print('PID number is:', os.getpid())
while True:
    print('Waiting...')
    time.sleep(6)
[mythcat@desk ~]$ python3 signal_001.py 
PID number is: 2566
Waiting...
Waiting...
Waiting...
Waiting...
Waiting...
Hangup
The PID process can be kill with this command:
[mythcat@desk ~]$ kill -SIGTERM 2566
Let's see another example that receives the signal we have sent to the process.
import os
import signal
import time

def receiveSignal(signalNumber, frame):
    print('Received:', signalNumber)
    raise SystemExit('Exiting')
    return

if __name__ == '__main__':
    # register the signals to be caught
    signal.signal(signal.SIGHUP, receiveSignal)
    signal.signal(signal.SIGINT, receiveSignal)
    signal.signal(signal.SIGQUIT, receiveSignal)
    signal.signal(signal.SIGILL, receiveSignal)
    signal.signal(signal.SIGTRAP, receiveSignal)
    signal.signal(signal.SIGABRT, receiveSignal)
    signal.signal(signal.SIGBUS, receiveSignal)
    signal.signal(signal.SIGFPE, receiveSignal)
    #signal.signal(signal.SIGKILL, receiveSignal)
    signal.signal(signal.SIGUSR1, receiveSignal)
    signal.signal(signal.SIGSEGV, receiveSignal)
    signal.signal(signal.SIGUSR2, receiveSignal)
    signal.signal(signal.SIGPIPE, receiveSignal)
    signal.signal(signal.SIGALRM, receiveSignal)
    signal.signal(signal.SIGTERM, receiveSignal)
    # register the signal to be caught
    signal.signal(signal.SIGUSR1, receiveSignal)

    # register the signal to be ignored
    signal.signal(signal.SIGINT, signal.SIG_IGN)

    # output current process id
    print('My PID is:', os.getpid())

    signal.pause()
Let't run it and see what happend when send a signal to the PID:
[mythcat@desk ~]$ python3 py_pid.py
My PID is: 2698
Received: 10
Exiting
You can see the kill command will send this output: Received: 10 Exiting .
[mythcat@desk ~]$ kill -SIGUSR1 2698

Monday, September 16, 2019

Fedora 30 : Interactive learning and reinventing the wheel in programming.

Today I returned from an activity that prompted me to find a solution to display logos.
I found this GitHub repo that I read and then turned it into a single script.
It took about an hour.

Wednesday, September 4, 2019

Fedora 30 : About the Jupyter lab tool.

The tutorial for today is about Jupiter Lab and Fedora 30. You can see an old tutorial with Fedora 29 here.
The JupyterLab is the next-generation web-based user interface for Project Jupyter.
This can be installed using conda, pip or pipenv.
I used pip3 tool for instalation process on Fedora 30 distro:
[mythcat@desk ~]$ pip3 install jupyterlab --user
...
Successfully installed Send2Trash-1.5.0 attrs-19.1.0 backcall-0.1.0 bleach-3.1.0 defusedxml-0.6.0 
ipykernel-5.1.2 ipython-7.8.0 ipython-genutils-0.2.0 jedi-0.15.1 json5-0.8.5 jsonschema-3.0.2 
jupyter-client-5.3.1 jupyter-core-4.5.0 jupyterlab-1.1.1 jupyterlab-server-1.0.6 mistune-0.8.4 
nbconvert-5.6.0 nbformat-4.4.0 notebook-6.0.1 pandocfilters-1.4.2 parso-0.5.1 pexpect-4.7.0 
pickleshare-0.7.5 prometheus-client-0.7.1 prompt-toolkit-2.0.9 ptyprocess-0.6.0 pyrsistent-0.15.4 
pyzmq-18.1.0 terminado-0.8.2 testpath-0.4.2 tornado-6.0.3 traitlets-4.3.2 wcwidth-0.1.7 
webencodings-0.5.1
[mythcat@desk ~]$ jupyter notebook --version
6.0.1
This tool browsers can be used with :Firefox, Chrome and Safari.
The tool can be start with this command:
[mythcat@desk ~]$ jupyter lab
[I 19:53:05.527 LabApp] Writing notebook server cookie secret to ...
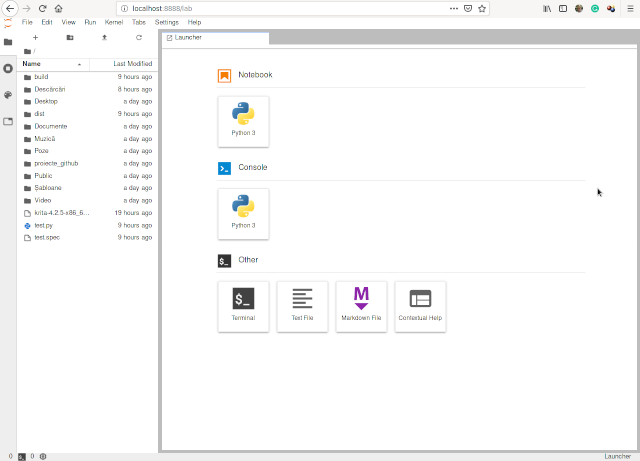
The default browser will open a new tab and show the interface for this tool, see screenshot:
If you install a new python module then you need to close and reopen the tool.
You can run every row command with Shift+Enter keys.
When you want to close it just close the browser tab and press Ctrl+C keys.
Shutdown this notebook server (y/[n])? y
[C 20:09:00.058 LabApp] Shutdown confirmed
[I 20:09:00.304 LabApp] Shutting down 0 kernels
 To see additional kernels follow this link. The Fedora 30 comes with this kernels for Jupyter using the dnf tool:
[root@desk mythcat]# dnf search jupyter | grep kernel
Last metadata expiration check: 0:57:13 ago on Mi 04 sep 2019 19:46:15 +0300.
polymake-jupyter.noarch : Jupyter kernel for polymake
gap-pkg-jupyterkernel.noarch : Jupyter kernel written in GAP
python3-jupyter-c-kernel.noarch : Minimalistic C kernel for Jupyter
gap-pkg-jupyterkernel-doc.noarch : Jupyter kernel for GAP documentation
python3-jupyter-kernel-test.noarch : Machinery for testing Jupyter kernels via
python3-jupyroot.x86_64 : ROOT Jupyter kernel
python3-metakernel.noarch : Metakernel for Jupyter
python3-ipykernel.noarch : IPython Kernel for Jupyter
python3-octave-kernel.noarch : A Jupyter kernel for Octave
python3-metakernel-bash.noarch : A Bash kernel for Jupyter/IPython
python3-metakernel-python.noarch : A Python kernel for Jupyter/IPython
python3-spyder-kernels.noarch : Jupyter kernels for the Spyder console
python3-metakernel-echo.noarch : A simple echo kernel for Jupyter/IPython
R-IRkernel.noarch : Native R Kernel for the 'Jupyter Notebook'
Another feature of Jupyter is the ability to run it as a presentation server:
[mythcat@desk ~]$ jupyter nbconvert --generate-config
Writing default config to: /home/mythcat/.jupyter/jupyter_nbconvert_config.py
[mythcat@desk ~]$ cat /home/mythcat/.jupyter/jupyter_nbconvert_config.py
# Configuration file for jupyter-nbconvert.

#------------------------------------------------------------------------------
# Application(SingletonConfigurable) configuration
#------------------------------------------------------------------------------

## This is an application.
Change jupyter_nbconvert_config.py file by adding your settings. For example:
## Accept connections from all IPs
c.ServePostProcessor.ip = '*'

## Do not open the browser automatically
c.ServePostProcessor.open_in_browser = False
After you work with jupyter you can save it with a name like Test001 and run this command:
[mythcat@desk ~]$ jupyter nbconvert "Test001.ipynb" --to slides --post serve[NbConvertApp] 
Converting notebook Test001.ipynb to slides
[NbConvertApp] Writing 278626 bytes to Test001.slides.html
[NbConvertApp] Redirecting reveal.js requests to https://cdnjs.cloudflare.com/ajax/libs/reveal.js/3.5.0
Serving your slides at http://*:8000/Test001.slides.html
Use Control-C to stop this server
The result of the HTML presentation can be see at http://localhost:8000/Test001.slides.html#.
Monday, July 8, 2019

Fedora 30 : Using the python-wikitcms.

This python module named python-wikitcms can be used for interacting with the Fedora wiki.
The Fedora wiki used Fedora's Wikitcms.
Today I test it and works great with Fedora distro version 30.
First, the install of the fedora package with DNF tool:
[root@desk mythcat]# dnf install python3-wikitcms.noarch
...
Downloading Packages:
(1/8): python3-mwclient-0.9.3-3.fc30.noarch.rpm 186 kB/s |  61 kB     00:00    
(2/8): python3-fedfind-4.2.5-1.fc30.noarch.rpm  314 kB/s | 105 kB     00:00    
(3/8): python3-cached_property-1.5.1-3.fc30.noa  41 kB/s |  20 kB     00:00    
(4/8): python3-requests-oauthlib-1.0.0-1.fc29.n 313 kB/s |  40 kB     00:00    
(5/8): python3-jwt-1.7.1-2.fc30.noarch.rpm      112 kB/s |  42 kB     00:00    
(6/8): python3-oauthlib-2.1.0-1.fc29.noarch.rpm 293 kB/s | 153 kB     00:00    
(7/8): python3-simplejson-3.16.0-2.fc30.x86_64. 641 kB/s | 278 kB     00:00    
(8/8): python3-wikitcms-2.4.2-2.fc30.noarch.rpm 264 kB/s |  84 kB     00:00
I used this simple example to get information about the Fedora wiki:
[mythcat@desk ~]$ python3
Python 3.7.3 (default, May 11 2019, 00:38:04) 
[GCC 9.1.1 20190503 (Red Hat 9.1.1-1)] on linux
Type "help", "copyright", "credits" or "license" for more information.
>>> from wikitcms.wiki import Wiki
>>> my_site = Wiki()
>>> event = my_site.current_event
>>> print(event.version)
31 Rawhide 20190704.n.1
>>> page = my_site.get_validation_page('Installation','23','Final','RC10')
>>> for row in page.get_resultrows():
...     print(row.testcase)
... 
QA:Testcase_Mediakit_Checksums
QA:Testcase_Mediakit_ISO_Size
QA:Testcase_Mediakit_Repoclosure
QA:Testcase_Mediakit_FileConflicts
QA:Testcase_Boot_default_install
...
>>> dir(my_site)
I used this source code to login with my account.
>>> my_site.login()
A webpage is open to get access to the account and show this info:
The OpenID Connect client Wiki Test Control Management System is asking to authorize access for mythcat. this allow you to access it 
After I agree with this the page tells me to close it:
You can close this window and return to the CLI
The next examples show you how to get and show information from the wiki:
>>> print(my_site.username)
Mythcat
>>> result = my_site.api('query', titles='Mythcat')
>>> for page in result['query']['pages'].values():
...             print(page['title'])
... 
Mythcat
>>> for my_contributions in my_site.usercontributions('Mythcat'):
...     print(my_contributions)
...
This python module comes with low documentation.

Sunday, June 30, 2019

Fedora 30 : The Pythonic tool.

The tutorial for today is about Pythonic tool.
Named Pythonic is a graphical programming tool that makes it easy for users to create Python applications using ready-made function modules.
This tool providing the consistent features and characteristics of a trading bot with just a few clicks.
The Pythonic tool is currently available in four languages: English, German, Spanish, and Chinese. 
The tool comes with basic functions such as a scheduler, if-branches, connectivity, and logging functions are available out of the box and can be parameterized using a corresponding GUI.
Each graphical element is functionally processed individually.
The base idea is: A unique graphical input mask to carry out the parameterization necessary for processing, then after a process completes successfully, the returned result can be transferred to a subsequent process for further use.
You can use server processes can be placed in parallel in the background as listener applications that wait for external events and initiate the creation of a process when the event arrives.
Pythonic's data type list makes it easy to utilize different access techniques (push, pop, insert, append).
The install of this tool is easy on Fedora 30 distro:
[mythcat@desk ~]$ python3.7 -m pip install Pythonic --user
Collecting Pythonic
...
Successfully installed PyQt5-5.8.2 Pythonic-0.12 pandas-0.24.2 pythonic-binance-0.7.2
This is a screenshot with this tool.

Tuesday, April 9, 2019

Fedora 29 : Thonny editor for python.

This Python IDE for beginners named Thonny is a simple editor with Python 3.7 built in.
The official webpage can be found here and the GitHub project page is this.
The development team is from the University of Tartu, Estonia with the help from the open-source community. Thonny grew up in University of Tartu (https://www.ut.ee), Institute of Computer Science (https://www.cs.ut.ee).
I test it today with Fedora 29 and works well.
Let's start with the first step:
[mythcat@desk ~]$ pip3 install thonny --user
Collecting thonny
...
Successfully installed astroid-2.2.5 asttokens-1.1.13 docutils-0.14 isort-4.3.17 jedi-0.13.3 lazy-object-proxy-1.3.1 
mccabe-0.6.1 mypy-0.700 mypy-extensions-0.4.1 parso-0.4.0 pylint-2.3.1 pyperclip-1.7.0 pyserial-3.4 thonny-3.1.2 
typed-ast-1.3.1
...
[root@desk mythcat]# dnf install python3-tkinter.x86_64
Last metadata expiration check: 0:21:20 ago on Tue 09 Apr 2019 09:57:24 PM EEST.

Installed:
  python3-tkinter-3.7.2-5.fc29.x86_64          tk-1:8.6.8-1.fc29.x86_64         

Complete!
This editor can be found on Fedora repo, but I used the last released version software.
[root@desk mythcat]# dnf search thonny
Last metadata expiration check: 0:36:55 ago on Tue 09 Apr 2019 09:57:24 PM EEST.
========================= Name Exactly Matched: thonny =========================
thonny.noarch : Python IDE for beginners