Pages

Showing posts with label npm. Show all posts

Sunday, May 16, 2021

Fedora 33 : Firebase command-line interface.

This tutorial is about Firebase command-line interface and Fedora 33 Linux DIstro.
I used npm tool:
...
npm notice Run npm install -g npm@7.13.0 to update!
... 
I updated the npm to the last version with this command:
[mythcat@desk ~]$ sudo  npm install -g npm@7.13.0 

changed 14 packages, and audited 255 packages in 4s

found 0 vulnerabilities
This command will install firebase-tools:
[mythcat@desk ~]$ sudo npm install -g firebase-tools
npm WARN deprecated har-validator@5.1.5: this library is no longer supported
npm WARN deprecated request@2.88.2: request has been deprecated, 
see https://github.com/request/request/issues/3142

added 711 packages, and audited 712 packages in 2m

found 0 vulnerabilities
[mythcat@desk ~]$ firebase --version
9.10.2
[mythcat@desk ~]$ firebase login
i  Firebase optionally collects CLI usage and error reporting information to help improve our products. 
Data is collected in accordance with Google's privacy policy (https://policies.google.com/privacy) and 
is not used to identify you.

? Allow Firebase to collect CLI usage and error reporting information? Yes
i  To change your data collection preference at any time, run `firebase logout` and log in again.

Visit this URL on this device to log in:
https://accounts.google.com/o/oauth2/auth?client_id=...

Waiting for authentication...

✔  Success! Logged in as ...gmail.com
After you set in the browser, you will see this:
Another way for the signin process is this command:
[mythcat@desk ~]$ firebase login:ci
In this moment I can use firebase command to see my projects:
[mythcat@desk ~]$ firebase projects:list
✔ Preparing the list of your Firebase projects
┌──────────────────────┬────────────────────┬────────────────┬──────────────────────┐
│ Project Display Name │ Project ID         │ Project Number │ Resource Location ID │
├──────────────────────┼────────────────────┼────────────────┼──────────────────────┤
...
└──────────────────────┴────────────────────┴────────────────┴──────────────────────┘

3 project(s) total.
This command connect your local project files to your Firebase project and let you to initialize a new Firebase project or use an existing one.
[mythcat@desk ~]$ firebase init hosting

     ######## #### ########  ######## ########     ###     ######  ########
     ##        ##  ##     ## ##       ##     ##  ##   ##  ##       ##
     ######    ##  ########  ######   ########  #########  ######  ######
     ##        ##  ##    ##  ##       ##     ## ##     ##       ## ##
     ##       #### ##     ## ######## ########  ##     ##  ######  ########

You're about to initialize a Firebase project in this directory:

  /home/mythcat

Before we get started, keep in mind:

  * You are initializing your home directory as a Firebase project


=== Project Setup

First, let's associate this project directory with a Firebase project.
You can create multiple project aliases by running firebase use --add, 
but for now we'll just set up a default project.

? Please select an option: (Use arrow keys)
❯ Use an existing project 
  Create a new project 
  Add Firebase to an existing Google Cloud Platform project 
  Don't set up a default project 
After you make changes you can deploy to your site, run the following command:
✔  Firebase initialization complete!
...
[mythcat@desk ~]$ firebase deploy --only hosting
...
More about Firebase and CLI can be read on the official website.
Friday, April 30, 2021

Fedora 33 : Start using the Grunt tool.

Grunt is a tool that allows us to automatically run any set of tasks.
This tool solve minification and concatenation issues.
This tutorial is a simple intro with this tool.
[mythcat@desk ~]$ npm install
npm WARN saveError ENOENT: no such file or directory, open '/home/mythcat/package.json'
npm WARN enoent ENOENT: no such file or directory, open '/home/mythcat/package.json'
npm WARN mythcat No description
npm WARN mythcat No repository field.
npm WARN mythcat No README data
npm WARN mythcat No license field.

up to date in 1.017s
found 0 vulnerabilities
I install easy with npm tool:
[mythcat@desk ~]$ sudo npm install -g grunt-cli
[sudo] password for mythcat: 
/usr/local/bin/grunt -> /usr/local/lib/node_modules/grunt-cli/bin/grunt
+ grunt-cli@1.4.2
added 58 packages from 71 contributors in 8.981s


   ╭────────────────────────────────────────────────────────────────╮
   │                                                                │
   │      New major version of npm available! 6.13.4 → 7.11.2       │
   │   Changelog: https://github.com/npm/cli/releases/tag/v7.11.2   │
   │               Run npm install -g npm to update!                │
   │                                                                │
   ╰────────────────────────────────────────────────────────────────╯

Let's update it:
[mythcat@desk ~]$ sudo npm install -g npm 
Each time grunt is run, it looks for a locally installed Grunt using nodes required by the system.
A typical setup will involve adding two files to your project: package.json and the Gruntfile.
These are the Grunt plugins used :
  • Load Grunt Tasks (load-grunt-tasks) 
  • Time Grunt (time-grunt) 
  • PHPLint (grunt-phplint) 
  • JSHint (grunt-contrib-jshint) 
  • Uglify (grunt-contrib-uglify) 
  • Sass (grunt-sass) 
  • Watch (grunt-contrib-watch)
Let's start it with:
[root@desk wordpress]# npm init
This utility will walk you through creating a package.json file.
It only covers the most common items, and tries to guess sensible defaults.

See `npm help init` for definitive documentation on these fields
and exactly what they do.

Use `npm install pkg` afterwards to install a package and
save it as a dependency in the package.json file.

Press ^C at any time to quit.
package name: (wordpress) 
version: (1.0.0) 
description: 
entry point: (index.js) 
test command: 
git repository: 
keywords: 
author: 
license: (ISC) 
About to write to /usr/share/wordpress/package.json:

{
  "name": "wordpress",
  "version": "1.0.0",
  "description": "",
  "main": "index.js",
  "scripts": {
    "test": "echo \"Error: no test specified\" && exit 1"
  },
  "author": "",
  "license": "ISC"
}


Is this OK? (yes) yes
[root@desk wordpress]# ls
index.php	    wp-comments-post.php  wp-includes	     wp-settings.php
package.json	    wp-config.php	  wp-links-opml.php  wp-signup.php
wp-activate.php     wp-config-sample.php  wp-load.php	     wp-trackback.php
wp-admin	    wp-content		  wp-login.php	     xmlrpc.php
wp-blog-header.php  wp-cron.php		  wp-mail.php
You can see I set the name of the package: wordpress
[root@desk wordpress]# npm install wordpress --save-dev

added 4 packages, and audited 5 packages in 4s

found 0 vulnerabilities 
The Grunt package will be the first thing to add to your project.
[root@desk wordpress]# npm install grunt --save-dev

added 101 packages, and audited 106 packages in 8s

7 packages are looking for funding
  run `npm fund` for details

found 0 vulnerabilities
The npm fund option provides more visibility to npm users on what dependencies are actively looking for ways to fund their work.
[root@desk wordpress]# npm fund
wordpress@1.0.0
├── https://github.com/sponsors/isaacs
│   └── glob@7.1.6, rimraf@3.0.2
├── https://github.com/sponsors/ljharb
│   └── resolve@1.20.0, is-core-module@2.3.0
├── https://github.com/sponsors/jonschlinkert
│   └── picomatch@2.2.3
└─┬ https://github.com/chalk/chalk?sponsor=1
  │ └── chalk@4.1.1
  └── https://github.com/chalk/ansi-styles?sponsor=1
      └── ansi-styles@4.3.0
You can set to false and run again the command:
[root@desk wordpress]# npm config set fund false --global
[root@desk wordpress]# npm config set fund false 
[root@desk wordpress]# npm install grunt --save-dev

up to date, audited 106 packages in 2s

found 0 vulnerabilities 
The easiest way to add Grunt and grunt_plugins from https://gruntjs.com/plugins is to use this command:
npm install grunt_plugins --save-dev
After each install, you can check the file package.json and see if is updated.
I install these packages:
[root@desk wordpress]# npm install grunt-contrib-uglify grunt-contrib-cssmin grunt-contrib-watch --save-dev

added 58 packages, and audited 164 packages in 8s

found 0 vulnerabilities 
Create a file called Gruntfile.js in the project root:
[root@desk wordpress]# touch Gruntfile.js
[root@desk wordpress]# vim Gruntfile.js 
Add this source code to the file.
module.exports = function(grunt) {

    // Project configuration.
    grunt.initConfig({
        pkg: grunt.file.readJSON('package.json'),
        uglify: {
            options: {
                banner: '/*! <%= pkg.name %> <%= grunt.template.today("yyyy-mm-dd") %> */\n'
            },
            build: {
                src: 'src/js/scripts.js',
                dest: 'js/scripts.min.js'
            }
        },
        cssmin: {
            minify: {
                src: 'src/css/style.css',
                dest: 'css/style.min.css'
            }
        },
        watch: {
            uglify: {
                files: 'src/js/scripts.js',
                tasks: ['uglify']
            },
            cssmin: {
                files: 'src/css/style.css',
                tasks: ['cssmin']
            }
        }
    });

    // Load the plugin that provides the "uglify" task.
    grunt.loadNpmTasks('grunt-contrib-uglify');
    // Load the plugin that provides the "cssmin" task.
    grunt.loadNpmTasks('grunt-contrib-cssmin');
    // Load the plugin that provides the "watch" task.
    grunt.loadNpmTasks('grunt-contrib-watch');

    // Uglify task
    grunt.registerTask('scripts', ['uglify']);
    // CSSMin task
    grunt.registerTask('styles', ['cssmin']);
    // Default task(s).
    grunt.registerTask('default', ['uglify', 'cssmin', 'watch']);
    console.log('... runnning grunt');
    };
Because I create in the setting file some paths the next commands will create paths for these.
[root@desk wordpress]# mkdir src
[root@desk wordpress]# mkdir src/js
[root@desk wordpress]# mkdir src/css
[root@desk wordpress]# touch src/js/scripts.js
[root@desk wordpress]# touch src/css/style.css 
I can see the grunt version.
[mythcat@desk wordpress]$ grunt default -V
grunt-cli v1.4.2
grunt v1.4.0 
Now I can run the command grunt or with a specific task named default.
[root@desk wordpress]# grunt 
... runnning grunt
Running "uglify:build" (uglify) task
>> 1 file created 0 B → 29 B

Running "cssmin:minify" (cssmin) task
>> 1 file created. 92 B → 76 B

Running "watch" task
Waiting...
You can see the default task contains both uglify and the cssmin tasks.
If one module is not installed then you can see this type of message:
[root@desk wordpress]# grunt 
...Local Npm module "grunt-contrib-sass" not found. Is it installed?
Let's install it:
[root@desk wordpress]# npm install grunt-contrib-sass

added 17 packages, and audited 186 packages in 10s

found 0 vulnerabilities
I tried to make changes to the configuration file but it is very restrictive. Most attempts failed.

Sunday, September 16, 2018

Fedora 28 : Using AdonisJs web framework.

AdonisJs is a Node.js web framework with a breath of fresh air and drizzle of elegant syntax on top of it.
We prefer developer joy and stability over anything else.
I tested today this web framework named AdonisJs with Fedora 28.
The main goal was to use MySQL with MariaDB from Fedora 28 distro.
Let's start with the installation of AdonisJs on Fedora 28:
[root@desk mythcat]# npm i --global @adonisjs/cli
/usr/bin/adonis -> /usr/lib/node_modules/@adonisjs/cli/index.js
...
+ @adonisjs/cli@4.0.7
added 406 packages from 182 contributors in 33.533s
Go to the default user:
[root@desk mythcat]# exit
exit
Create the application , I named myapp:
[mythcat@desk ~]$ adonis new myapp
    _       _             _         _     
   / \   __| | ___  _ __ (_)___    | |___ 
  / _ \ / _` |/ _ \| '_ \| / __|_  | / __|
 / ___ \ (_| | (_) | | | | \__ \ |_| \__ \
/_/   \_\__,_|\___/|_| |_|_|___/\___/|___/

  [1/6] 🔬  Requirements matched [node & npm]
  [2/6] 🔦  Ensuring project directory is clean [myapp]
  [3/6] 📥  Cloned [adonisjs/adonis-fullstack-app]
  [4/6] 📦  Dependencies installed
  [5/6] 📖  Environment variables copied [.env]
  [6/6] 🔑  Key generated [adonis key:generate]

🚀   Successfully created project
👉   Get started with the following commands
Let's test the default myapp with this commands:
$ cd myapp
$ adonis serve --dev

[mythcat@desk ~]$ cd myapp
[mythcat@desk myapp]$ adonis serve --dev

 SERVER STARTED 
> Watching files for changes...

2018-09-16T09:47:46.799Z - info: serving app on http://127.0.0.1:3333
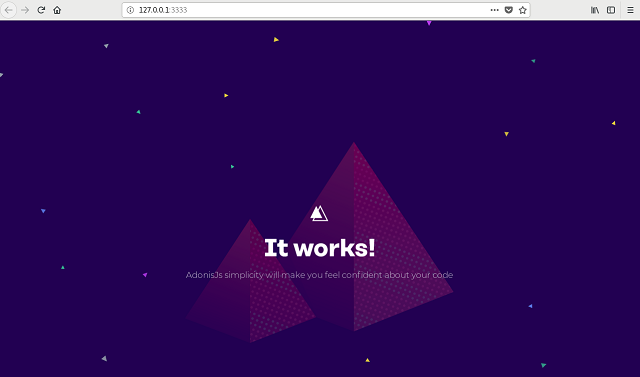
This is the result of the running myapp on 127.0.0.1:3333 web address:
Let's see the folders and files from AdonisJS:
[mythcat@desk myapp]$ ls
ace  config    node_modules  package-lock.json  README.md  server.js
app  database  package.json  public             resources  start
The configuration for web files can be seen here:
[mythcat@desk myapp]$ vim  start/routes.js 
'use strict'

/*
|--------------------------------------------------------------------------
| Routes
|--------------------------------------------------------------------------
|
| Http routes are entry points to your web application. You can create
| routes for different URL's and bind Controller actions to them.
|
| A complete guide on routing is available here.
| http://adonisjs.com/docs/4.1/routing
|
*/

/** @type {import('@adonisjs/framework/src/Route/Manager'} */
const Route = use('Route')

Route.on('/').render('welcome')
~                                                                               
This is telling Adonis that when the root of the site is loaded, render a template/view called welcome.
That welcome template can be found in /resources/views/welcome.edge.
[mythcat@desk myapp]$ cd resources/
[mythcat@desk resources]$ ll
total 0
drwxrwxr-x. 2 mythcat mythcat 26 Sep 16 12:46 views
[mythcat@desk resources]$ cd views/
[mythcat@desk views]$ ll
total 4
-rw-rw-r--. 1 mythcat mythcat 339 Sep 16 12:46 welcome.edge
Let's see the source code of this default webpage:
[mythcat@desk views]$ vim welcome.edge 
...
For example, if you change into start/routes.js from welcome to index then you need to rename the welcome.edge to index.edge .
About css files you can make changes into public/style.css :
[mythcat@desk myapp]$ cd public/
[mythcat@desk public]$ vim  style.css


@import url('https://fonts.googleapis.com/css?family=Montserrat:300');

html, body {
  height: 100%;
  width: 100%;
}

body {
  font-family: 'Montserrat', sans-serif;
  font-weight: 300;
  background-image: url("/splash.png");
  background-color: #220052;
}

* {
  margin: 0;
  padding: 0;
}
...
Using the mysql database is simple. Into Fedora 28 distro you can use mariadb, let's install it.
[mythcat@desk myapp]$ su
Password: 
[root@desk myapp]# dnf install mariadb mariadb-server
...
Complete!
[root@desk myapp]# systemctl start mariadb
[root@desk myapp]# systemctl status mariadb
● mariadb.service - MariaDB 10.2 database server
...
You need to make changes into .env file into your project folder.
[mythcat@desk myapp]$ vim .env
HOST=127.0.0.1
PORT=3333
NODE_ENV=development
APP_URL=http://${HOST}:${PORT}
CACHE_VIEWS=false
APP_KEY=xxxxxxxxxxxxxxxx
DB_CONNECTION=sqlite
DB_HOST=127.0.0.1
DB_PORT=3306
DB_USER=root
DB_PASSWORD=
DB_DATABASE=adonis
SESSION_DRIVER=cookie
HASH_DRIVER=bcrypt
~
Use this changes for mariadb:
DB_CONNECTION=mysql
Install into AdonisJs with this command:
[mythcat@desk myapp]$ adonis install mysql
  [1/1] 📦  Dependencies installed [mysql]
Use this mysql commands to create the database:
[mythcat@desk myapp]$ mysql -u root
Welcome to the MariaDB monitor.  Commands end with ; or \g.
Your MariaDB connection id is 18
Server version: 10.2.17-MariaDB MariaDB Server

Copyright (c) 2000, 2018, Oracle, MariaDB Corporation Ab and others.

Type 'help;' or '\h' for help. Type '\c' to clear the current input statement.

MariaDB [(none)]> create database adonis;
Query OK, 1 row affected (0.11 sec)

MariaDB [(none)]> exit;
Bye 
Let's test migration command for files to allow you to create and delete tables.
[mythcat@desk myapp]$ adonis migration:run
migrate: 1503248427885_user.js
migrate: 1503248427886_token.js
Database migrated successfully in 4.11 s
[mythcat@desk myapp]$ adonis make:migration jobs
> Choose an action undefined
✔ create  database/migrations/1537095058367_jobs_schema.js
Now that our database and tables have been created, I can create a model for handling jobs table and associated data.
The next tasks to follow depends by your website:

  • Creating a Model 
  • Creating a Controller 
  • User Authentication