Pages

Showing posts with label python 3. Show all posts

Wednesday, November 20, 2024

Fedora 41 : generated shapes with python !

Today I created this source code in python that generates eight random convex polygons. The idea was to create sprites for a 2D game: snowballs, boulders, or similar objects ... Obviously I also used Sonet 3.5 artificial intelligence. You can find the source code on the pagure account in fedora.
#!/usr/bin/env python3
"""
SVG Polygon Generator

This script generates multiple deformed polygonal shapes and saves them as separate SVG files.
Each polygon maintains convex properties while having controlled random deformations.

Features:
    - Generates 8 unique polygonal shapes
    - Controls deformation through radial and angular factors
    - Maintains convex properties
    - Exports each shape to a separate SVG file
    - Uses random colors for visual distinction

Usage:
    python generate_svgs.py

Output:
    Creates 8 SVG files named 'polygon_1.svg' through 'polygon_8.svg'
"""

from lxml import etree
import random
import math
from pathlib import Path


def create_svg_root():
    """Create and return a base SVG root element with standard attributes."""
    root = etree.Element("svg")
    root.set("width", "500")
    root.set("height", "500")
    root.set("xmlns", "http://www.w3.org/2000/svg")
    return root


def calculate_points(center_x: float, center_y: float, radius: float, 
                    num_sides: int, deform_factor: float) -> list:
    """
    Calculate polygon points with controlled deformation.

    Args:
        center_x: X coordinate of polygon center
        center_y: Y coordinate of polygon center
        radius: Base radius of the polygon
        num_sides: Number of polygon sides
        deform_factor: Maximum allowed deformation factor

    Returns:
        List of tuples containing (x, y) coordinates
    """
    points = []
    angle_step = 2 * math.pi / num_sides
    
    for i in range(num_sides):
        angle = i * angle_step
        radial_deform = random.uniform(-deform_factor, deform_factor)
        angular_deform = random.uniform(-deform_factor/2, deform_factor/2)
        
        modified_angle = angle + angular_deform
        modified_radius = radius * (1 + radial_deform)
        
        x = center_x + modified_radius * math.cos(modified_angle)
        y = center_y + modified_radius * math.sin(modified_angle)
        points.append((x, y))
    
    return points


def generate_deformed_shapes():
    """Generate multiple deformed polygons and save them to separate SVG files."""
    # Base parameters
    num_sides = 8
    center_x = 250
    center_y = 250
    base_radius = 150
    max_deformation = 0.15
    output_dir = Path("generated_polygons")
    
    # Create output directory if it doesn't exist
    output_dir.mkdir(exist_ok=True)

    for i in range(8):
        root = create_svg_root()
        points = calculate_points(center_x, center_y, base_radius, 
                                num_sides, max_deformation)
        
        path = etree.SubElement(root, "path")
        path_data = f"M {points[0][0]} {points[0][1]}"
        path_data += "".join(f" L {p[0]} {p[1]}" for p in points[1:])
        path_data += " Z"
        
        path.set("d", path_data)
        path.set("fill", "none")
        path.set("stroke", f"#{random.randint(0, 16777215):06X}")
        path.set("stroke-width", "2")
        path.set("opacity", "0.7")

        # Save individual SVG file
        output_file = output_dir / f"polygon_{i+1}.svg"
        tree = etree.ElementTree(root)
        tree.write(str(output_file), pretty_print=True, 
                  xml_declaration=True, encoding='utf-8')
    
    print(f"Generated {num_sides} polygons in {output_dir}")

if __name__ == "__main__":
    generate_deformed_shapes()

Sunday, October 27, 2024

Fedora 42 : Can be better? part 020.

I wrote in some posts about this blog about the possibility of improving the distribution of Linux Fedora.
Today I discovered that choosing GNOME is a better option with lighting modes and options for the Nemo file manager actions.
I would have wanted to have a better network system similar to portmanager with S.P.N. for fedora users and team on web.
SPN (Secure Peer Name) is a technology related to secure communication protocols, particularly in the context of peer-to-peer networks and distributed systems.
I want to have more tools and applications on tty with GUI, like ncurses... I created an radio online application with ncurses and you can find it on my pagure.
The main goal of these type of graphic user interface is simplicity, no need hardware resources - this HP Compaq 6710b has only 4Gb RAM, and cand be used with Single Board Computer.
I think Fedora don't have a Fedora Spin for Single Board Computer hardware.
Let's start with python 3 action on nemo file manager.
Go to the action folder and create an action file named: python3.nemo_action.
[root@fedora mythcat]# cd /usr/share/nemo/actions
[root@fedora actions]# nano python3.nemo_action
Add this source code :
[Nemo Action]
Name=Execute Python Script
Icon-Name=python
Exec=env /usr/bin/python3 %F
Selection=S
Name[tr]=Python script         
Extensions=py;
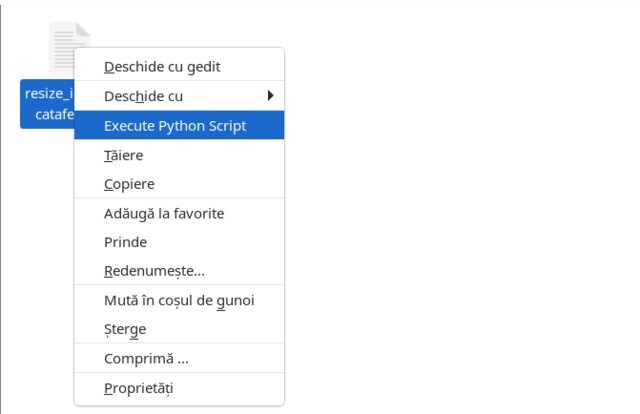
Reopen the Nemo file manager and you see an an Execute Python Script, only on the python script on right click menu.
Let's see some screenshots:

Sunday, October 13, 2024

Fedora 42 : The cvxpy python module ... part 001.

We are building a CVXPY community on Discord. Join the conversation! CVXPY is an open source Python-embedded modeling language for convex optimization problems. It lets you express your problem in a natural way that follows the math, rather than in the restrictive standard form required by solvers.
Today I install the cvxpy python module ...
You can see on the official website - www.cvxpy.org .
NOTE: I don't understand why the blogger don't have a a code tag , I used a div - pre - code into txt file to wrote my posts ...
[mythcat@fedora ~]$ nano tutoriale.txt 
Let's see ...
[mythcat@fedora home]# dnf5 upgrade
[mythcat@fedora home]# dnf5 install openblas-devel
[mythcat@fedora home]# dnf5 install blas-devel
...
$ ldconfig -p | grep openblas
$ ldconfig -p | grep blas
...
[mythcat@fedora home]$ pip install cvxpy
...
Successfully built cvxpy ecos scs qdldl
Installing collected packages: scipy, scs, qdldl, ecos, clarabel, osqp, cvxpy
Successfully installed clarabel-0.9.0 cvxpy-1.5.2 ecos-2.0.14 osqp-0.6.7.post3 qdldl-0.1.7.post4 scipy-1.14.1 scs-3.2.7

Monday, October 7, 2024

Fedora 42 : Fedora game project with pygame and agentpy - part 004.

... working on hacking game code , you can test two version of the unfinished game with agentpy at my pagure Fedora account.
* Hack the code based on minimal information versus total information. The code has 5 distinct letters. - click on the letters on the keypad - the number of guessed letters is displayed in the form: centered - guessed letters on positions and moved guessed letters but on other positions NOTE: the source code is under development, I need to enter a scroll to be able to enter more codes with letters

Saturday, September 28, 2024

Fedora 42 : Fedora game project with pygame and agentpy - part 003.

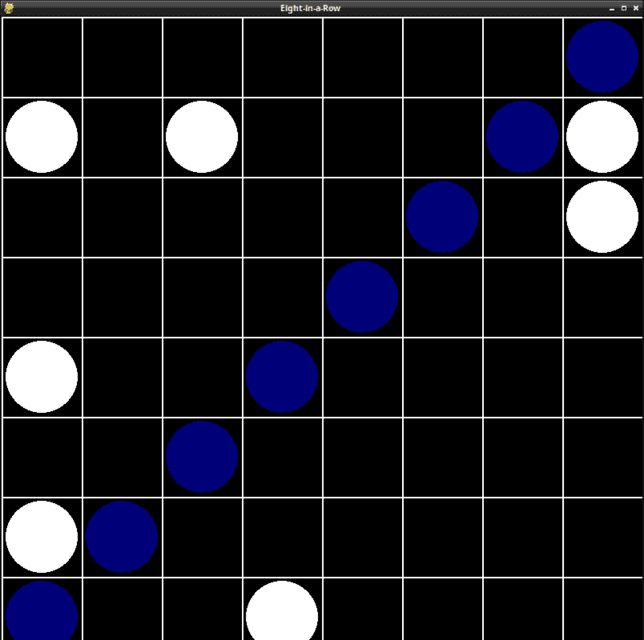
I have upgraded the source code with the following changes:
  • added agent with logic using the python agentpy module;
  • I increased the grid to 16 x 16;
  • I kept the win condition at 8 pieces aligned in any direction;
  • I added conditions for displaying the equality message;
The game is hard to win, you can try on my pagure account.

Wednesday, September 25, 2024

Fedora 42 : Fedora game project with pygame and agentpy - part 002.

... and update from 8 in 8 with SVG file type.
The source code I used or you can find it on the pagure project:
import pygame
from pygame.math import Vector2
import random
import os 
username = os.getlogin()
# Initialize Pygame
pygame.init()
# Set up the display
width, height = 800, 800
screen = pygame.display.set_mode((width, height))
pygame.display.set_caption("Eight-in-a-Row")
# Font setup
font = pygame.font.Font(None, 74)
# Colors
WHITE = (255, 255, 255)
BLACK = (0, 0, 0)
BLUE = (0, 0, 120)
# Game board dimensions
BOARD_WIDTH = 8
BOARD_HEIGHT = 8

class Player:
    def __init__(self, color, is_computer=False):
        self.color = color
        self.pieces = set()
        self.is_computer = is_computer
        self.svg_image = self.load_svg_image()

    def add_piece(self, x, y):
        self.pieces.add((x, y))

    # def draw_pieces(self):
    #     for x, y in self.pieces:
    #         pygame.draw.circle(screen, self.color, 
    #                            (x * width // BOARD_WIDTH + width // (2 * BOARD_WIDTH), 
    #                             y * height // BOARD_HEIGHT + height // (2 * BOARD_HEIGHT)), 
    #                            min(width, height) // (2 * BOARD_WIDTH) - 5)
    
    def load_svg_image(self):
        if self.color == BLUE:
            svg_path = "penguin-svgrepo-com.svg"
        elif self.color == WHITE:
            svg_path = "cube-svgrepo-com.svg"
        else:
            svg_path = "cube-svgrepo-com.svg"
        return pygame.image.load(svg_path)

    def draw_pieces(self):
        piece_size = min(width, height) // (BOARD_WIDTH) - 10
        for x, y in self.pieces:
            pos = Vector2(x * width // BOARD_WIDTH + width // (2 * BOARD_WIDTH),
                          y * height // BOARD_HEIGHT + height // (2 * BOARD_HEIGHT))
            scaled_image = pygame.transform.scale(self.svg_image, (piece_size, piece_size))
            image_rect = scaled_image.get_rect(center=pos)
            screen.blit(scaled_image, image_rect)

    def make_move(self, board):
        if self.is_computer:
            empty_squares = [(x, y) for x in range(BOARD_WIDTH) for y in range(BOARD_HEIGHT) 
                             if (x, y) not in board[0] and (x, y) not in board[1]]
            if empty_squares:
                return random.choice(empty_squares)
        return None

def check_winner(player):
    directions = [(0, 1), (1, 0), (1, 1), (1, -1)]
    for x, y in player.pieces:
        for dx, dy in directions:
            if all((x + i*dx, y + i*dy) in player.pieces for i in range(8)):
                return True
    return False
    
def display_winner(winner):
    text = font.render(f"Player {winner} wins!", True, [145,190,190])
    text_rect = text.get_rect(center=(width // 2, height // 2))
    screen.blit(text, text_rect)
    pygame.display.flip()
    pygame.time.wait(3000)  # Display the message for 3 seconds

# Create players
player1 = Player(BLUE)
player2 = Player(WHITE, is_computer=True)
# Game loop
running = True
turn = 0
game_over = False

while running:
    for event in pygame.event.get():
        if event.type == pygame.QUIT:
            running = False
        elif event.type == pygame.MOUSEBUTTONDOWN and not game_over:
            if turn % 2 == 0:  # Human player's turn
                mouse_x, mouse_y = event.pos
                column = mouse_x // (width // BOARD_WIDTH)
                row = mouse_y // (height // BOARD_HEIGHT)
                
                if (column, row) not in player1.pieces and (column, row) not in player2.pieces:
                    player1.add_piece(column, row)
                    
                    if check_winner(player1):
                        # print("Player 1 wins!")
                        display_winner(username)
                        game_over = True
                    
                    turn += 1

    if not game_over and turn % 2 == 1:  # Computer player's turn
        move = player2.make_move((player1.pieces, player2.pieces))
        if move:
            player2.add_piece(*move)
            
            if check_winner(player2):
                # print("Player 2 (Computer) wins!")
                display_winner("Computer")
                game_over = True
            turn += 1

    screen.fill(BLACK)
    
    # Draw game board
    for i in range(BOARD_WIDTH + 1):
        pygame.draw.line(screen, WHITE, (i * width // BOARD_WIDTH, 0), (i * width // BOARD_WIDTH, height), 2)
    for i in range(BOARD_HEIGHT + 1):
        pygame.draw.line(screen, WHITE, (0, i * height // BOARD_HEIGHT), (width, i * height // BOARD_HEIGHT), 2)

    # Draw pieces
    player1.draw_pieces()
    player2.draw_pieces()
    pygame.display.flip()

pygame.quit()

Saturday, September 21, 2024

Fedora 42 : Fedora game project with pygame and agentpy - part 001.

I started a game project with the python packages pygame and agentpy in the Fedora 42 Linux distribution.
I used this version of Fedora:
[mythcat@fedora fedora_game]$ uname -a
Linux fedora 6.11.0-63.fc42.x86_64 #1 SMP PREEMPT_DYNAMIC Sun Sep 15 17:14:12 UTC 2024 x86_64 GNU/Linux
... and this python version:
Python 3.12.3 (main, Apr 17 2024, 00:00:00) [GCC 14.0.1 20240411 (Red Hat 14.0.1-0)] on linux
You can find it on my fedora pagure repo

Sunday, September 3, 2023

Fedora 39 : Issues in Fedora with PyGobject and sway-tests.

Today I wanted to test this repo named sway-tests.
I followed the steps there and received an error from gi.repository.
This error is related to another issue related to PyGobject.
In Fedora Linux distro, installing PyGobject is done with pip like this:
$ pip install PyGobject
In order to have no errors, the dnf or dnf5 tool should be used like this ...
I tested the functionality of this installation with a simple example:
import gi

gi.require_version("Gtk", "3.0")
from gi.repository import Gtk

win = Gtk.Window()
win.connect("destroy", Gtk.main_quit)
win.show_all()
Gtk.main()
It worked very well.
After solving this issue, I returned to the initial one and tested the sway-tests.
$ whereis sway
$ env/bin/pytest --sway=/usr/bin/sway
$ sudo env/bin/pytest --sway=/usr/bin/sway
I used the command both with and without sudo.
Both generated the same errors.
For the following command I had to install ... xorg-x11-server-Xephyr:
Xephyr is an X server which has been implemented as an ordinary X application. It runs in a window just like other X applications, but it is an X server ...
... the fixed centered black window specific to the xorg runtime appeared and somewhere on the side the terminal showed me a bunch of errors.
... obviously, I don't know how well sway-tests is implemented, now it's an archived repo, but I solved the use of PyGobject in python on the Fedora linux distribution.

Monday, August 22, 2022

Fedora 37 : Install PyQt5 and PyQt6 on Fedora.

In this tutorial, I will show you how to install PyQt5 and PyQt6 on Fedora 37 Distro Linux.
I used the DNF tool on the sudo user.
To install PyQt5 I used this command:
[root@fedora mythcat]# dnf install python3-qt5.x86_64
Last metadata expiration check: 2:20:40 ago on Wed 17 Aug 2022 09:42:57 PM EEST.
Dependencies resolved.
...
Installed:
  openal-soft-1.22.2-2.fc37.x86_64                                              
  python-qt5-rpm-macros-5.15.6-7.fc37.noarch                                    
  python3-pyqt5-sip-12.11.0-2.fc37.x86_64                                       
  python3-qt5-5.15.6-7.fc37.x86_64                                              
  python3-qt5-base-5.15.6-7.fc37.x86_64                                         
  qt5-qtconnectivity-5.15.5-2.fc37.x86_64                                       
  qt5-qtlocation-5.15.5-3.fc37.x86_64                                           
  qt5-qtmultimedia-5.15.5-2.fc37.x86_64                                         
  qt5-qtsensors-5.15.5-2.fc37.x86_64                                            
  qt5-qtserialport-5.15.5-2.fc37.x86_64                                         
  qt5-qtsvg-5.15.5-2.fc37.x86_64                                                
  qt5-qttools-common-5.15.5-2.fc37.noarch                                       
  qt5-qttools-libs-designer-5.15.5-2.fc37.x86_64                                
  qt5-qttools-libs-help-5.15.5-2.fc37.x86_64                                    
  qt5-qtwebchannel-5.15.5-2.fc37.x86_64                                         
  qt5-qtwebsockets-5.15.5-2.fc37.x86_64                                         
  qt5-qtxmlpatterns-5.15.5-2.fc37.x86_64                                        

Complete!
If you want to use PyQt6 then you need to use the sip solution.
Let's search and install it with the DNF tool.
[root@fedora mythcat]# dnf search qt6 | grep python
Last metadata expiration check: 1:02:01 ago on Sun 21 Aug 2022 04:43:24 PM EEST.
python3-pyqt6-sip.x86_64 : The sip module support for PyQt6
[root@fedora mythcat]# dnf install python3-pyqt6-sip.x86_64
Last metadata expiration check: 1:02:24 ago on Sun 21 Aug 2022 04:43:24 PM EEST.
Dependencies resolved.
...
Installed:
  python3-pyqt6-sip-13.3.0-3.fc37.x86_64                                        

Complete!
I used the python command and I import PyQt5 and PyQt6
[mythcat@fedora ~]$ python
Python 3.11.0rc1 (main, Aug  9 2022, 00:00:00) [GCC 12.1.1 20220810 (Red Hat 12.1.1-4)] on linux
...
The python modules are installed and working well.

Thursday, July 21, 2022

Fedora 36 : first steps with the Hy.

Hy is a dialect of the Lisp programming language designed to interact with Python by translating s-expressions into Python's abstract syntax tree (AST). Hy was introduced at Python Conference (PyCon) 2013 by Paul Tagliamonte.
This is quite similar to the old GIMP Script Fu that I've worked with in the past. The syntax assumes a join like tabs in HTML, only we'll use parentheses. I haven't studied in detail the implications it has with the python language, but it certainly wasn't invented for nothing.
First, you need to install it with the pip tool.
[mythcat@fedora ~]$ pip3 install hy --user
Collecting hy
...
Successfully built hy
Installing collected packages: funcparserlib, colorama, hy
Successfully installed colorama-0.4.5 funcparserlib-1.0.0 hy-0.24.0
The I test some examples:
[mythcat@fedora ~]$ hy
Hy 0.24.0 using CPython(main) 3.10.5 on Linux
=> (setv a 1)
=> "hello world"
"hello world"
=> (setv mylist [1 2 3])

=> (get mylist 0)
1
=> (defn greet [name]
...  "Hello "
...  (print "Hello " name))
=> (greet "mythcat")
Hello  mythcat
You can test it online with this online tool:

Wednesday, May 4, 2022

Fedora 36 : Install django-hypergen and test it.

Today I test the last version of python version 3.11.0a7 with the Django-hypergen example.
The install process can be found on the GitHub page project.
You can see the full tutorial here.

Saturday, January 8, 2022

Fedora 35 : Testing the new Django web framework version 4.0.1 with channels.

Today I tested in Fedora 35 the new version 4.0.1 of the Django framework and the channels package.
Channels augments Django to bring WebSocket, long-poll HTTP, task offloading, and other async support to your code, using familiar Django design patterns and a flexible underlying framework that lets you not only customize behaviors but also write support for your own protocols and needs. see the GitHub website.
The entire tutorial can be viewed on my blog about python programming language.
The result shows that it works with the admin webpage:

Sunday, December 26, 2021

Fedora 35 : Python and Flask-Mailing on Fedora.

First of all, a Merry Christmas to the users and the Fedora team. Python version 3.10.1 works very well on Fedore 35 and today I tested a packet called: Flask_Mailing.
Flask-Mailing adds SMTP mail sending to your Flask applications., see the Github repo.
Let's start with the installation of this packet with the pip utility.
[mythcat@fedora ~]$ pip install -U flask-mailing
Defaulting to user installation because normal site-packages is not writeable
Collecting flask-mailing
  Downloading Flask_Mailing-0.0.5-py3-none-any.whl (15 kB)
...
Installing collected packages: rfc3986, anyio, typing-extensions, httpcore, dnspython, async-timeout, pydantic, httpx, 
email-validator, blinker, asgiref, aiosmtplib, aioredis, flask-mailing
    Running setup.py install for blinker ... done
Successfully installed aioredis-2.0.0 aiosmtplib-1.1.6 anyio-3.4.0 asgiref-3.4.1 async-timeout-4.0.2 blinker-1.4 dnspython-2.1.0
email-validator-1.1.3 flask-mailing-0.0.5 httpcore-0.14.3 httpx-0.21.1 pydantic-1.8.2 rfc3986-1.5.0 typing-extensions-4.0.1
I create a folder named ExempleFlask001:
[mythcat@fedora ~]$ mkdir ExempleFlask001
[mythcat@fedora ~]$ cd ExempleFlask001/
[mythcat@fedora ExempleFlask001]$ vi flask001.py
I created the simplest example to test through the import procedure and then read with the dir function, here is the source code:
from flask import Flask
from flask_mailing import Mail, Message

app = Flask(__name__)
@app.route("/")
def index():
    test = str(dir(Mail))
    return test
if __name__ == "__main__":
    app.run(debug=True)
The result of running the script on the command line:
[mythcat@fedora ExempleFlask001]$ python flask001.py
 * Serving Flask app 'flask001' (lazy loading)
 * Environment: production
   WARNING: This is a development server. Do not use it in a production deployment.
   Use a production WSGI server instead.
 * Debug mode: on
 * Running on http://127.0.0.1:5000/ (Press CTRL+C to quit)
 * Restarting with stat
 * Debugger is active!
 * Debugger PIN: 319-368-265
 ...
The browser's response to the script is this:

Saturday, November 6, 2021

Fedora 35 : PyQt6 and Python 3.

I tested the new python version 10 and pyqt version 6 on the fedora version 35 distribution.
[mythcat@fedora ~]$ python
Python 3.10.0 (default, Oct  4 2021, 00:00:00) [GCC 11.2.1 20210728 (Red Hat 11.2.1-1)] on linux
Type "help", "copyright", "credits" or "license" for more information.
...
[mythcat@fedora ~]$ uname -a
Linux fedora 5.14.15-300.fc35.x86_64 #1 SMP Wed Oct 27 15:53:39 UTC 2021 x86_64 x86_64 x86_64 GNU/Linux
I install PyQt6 easy with pip tool:

[mythcat@fedora ~]$ pip install PyQt6 --user
Collecting PyQt6
  Downloading PyQt6-6.2.1-cp36-abi3-manylinux1_x86_64.whl (7.7 MB)
  ...
  Downloading PyQt6_Qt6-6.2.1-py3-none-manylinux_2_28_x86_64.whl (50.0 MB)
  ...
  Downloading PyQt6_sip-13.1.0-cp310-cp310-manylinux1_x86_64.whl (309 kB)
Installing collected packages: PyQt6-sip, PyQt6-Qt6, PyQt6
Successfully installed PyQt6-6.2.1 PyQt6-Qt6-6.2.1 PyQt6-sip-13.1.0
I tested with this python source code and it works fine.
import sys
from PyQt6.QtWidgets import QApplication, QWidget

def main():

    app = QApplication(sys.argv)

    w = QWidget()
    w.resize(250, 200)
    w.move(300, 300)

    w.setWindowTitle('Simple')
    w.show()

    sys.exit(app.exec())

if __name__ == '__main__':
    main()

Tuesday, July 6, 2021

Fedora 34 : Can be better? part 019.

Another way to improve the Fedora 34 is to add the lastes PyQt6 python package into repo.
[root@desk mythcat]# dnf search PyQt6
Last metadata expiration check: 2:03:10 ago on Tue 06 Jul 2021 08:52:41 PM EEST.
No matches found. 
First stable release for PyQt6 was on Jan 2021 by Riverbank Computing Ltd. under GPL or commercial and can be used with Python 3.
Let's install with pip tool:
[mythcat@desk ~]$ /usr/bin/python3 -m pip install --upgrade pip
...
  WARNING: The scripts pip, pip3 and pip3.9 are installed in '/home/mythcat/.local/bin' which is not on PATH.
  Consider adding this directory to PATH or, if you prefer to suppress this warning, 
  use --no-warn-script-location.
Successfully installed pip-21.1.3
[mythcat@desk ~]$ pip install PyQt6 --user
...
Let's see a simple example with this python package:
import sys
from PyQt6.QtCore import Qt
from PyQt6.QtWidgets import QApplication, QLabel

def main():
    app = QApplication(sys.argv)
    win = QLabel()
    win.resize(640, 498)
    win.setText("Qt is awesome!!!")
    win.show()
    app.exec()

if __name__ == "__main__":
    main()
I tested and run well.

Tuesday, April 13, 2021

Fedora 33 : First steps with manim.

Manim is an engine for precise programmatic animations, designed for creating explanatory math videos like 3Blue1Brown
The documentation can be found on this webpage
First, install with the DNF tool all packages:
[root@desk manim_Projects]# dnf install cairo-devel pango-devel ffmpeg python3-devel 
texlive-scheme-medium texlive-standalone.noarch texlive-collection-latexextra.noarch

Last metadata expiration check: 2:19:22 ago on Tue 13 Apr 2021 08:20:03 PM EEST.
Package cairo-devel-1.16.0-9.fc33.x86_64 is already installed.
Package pango-devel-1.48.4-1.fc33.x86_64 is already installed.
Package ffmpeg-4.3.2-2.fc33.x86_64 is already installed.
Package python3-devel-3.9.2-1.fc33.x86_64 is already installed.
Package texlive-scheme-medium-9:svn54074-35.fc33.noarch is already installed.
Package texlive-standalone-9:svn47136-35.fc33.noarch is already installed.
Package texlive-collection-latexextra-9:svn54851-35.fc33.noarch is already installed.
Dependencies resolved.
Nothing to do.
Complete!
Use pip tool to install manim and manimlib.
[mythcat@desk manim_Projects]$ pip install manim
...
[mythcat@desk manim_Projects]$ pip install manimlib
...
You can use --user option argument. A default example from the doc area can be a good test.
from manim import * 

config.background_color = DARK_GRAY
class MovingFrame(Scene):
     def construct(self):
        # Write equations
        equation = MathTex("2x^2-5x+2", "=", "(x-2)(2x-1)")

        # Create animation
        self.play(Write(equation))

        # Add moving frames
        framebox1 = SurroundingRectangle(equation[0], buff=.1)
        framebox2 = SurroundingRectangle(equation[2], buff=.1)

        # Create animations
        self.play(Create(framebox1))  # creating the frame

        self.wait()
        # replace frame 1 with frame 2
        self.play(ReplacementTransform(framebox1, framebox2))
    
        self.wait()
I run it well:
[mythcat@desk manim_Projects]$ /home/mythcat/.local/bin/manim -pl -ql -i follow_me_textxt.py 
This is the result:

Saturday, November 7, 2020

Fedora 33 : Install PyGame 2.0 on Fedora.

Today I will show you how to install the python PyGame version 2.0 package with python version 3.9 in Fedora 33 distro. Let's install all Fedora packages need for this python package:
[root@desk pygame]# dnf install SDL2-devel.x86_64 
...
Installed:
  SDL2-devel-2.0.12-4.fc33.x86_64                                               

Complete!
[root@desk pygame]# dnf install SDL2_ttf-devel.x86_64
...
Installed:
  SDL2_ttf-2.0.15-6.fc33.x86_64       SDL2_ttf-devel-2.0.15-6.fc33.x86_64      

Complete!
[root@desk pygame]# dnf install SDL2_image-devel.x86_64
...
Installed:
  SDL2_image-2.0.5-5.fc33.x86_64      SDL2_image-devel-2.0.5-5.fc33.x86_64     

Complete!
[root@desk pygame]# dnf install SDL2_mixer-devel.x86_64 
...
Installed:
  SDL2_mixer-2.0.4-7.fc33.x86_64      SDL2_mixer-devel-2.0.4-7.fc33.x86_64     

Complete!
[root@desk pygame]# dnf install SDL2_gfx-devel.x86_64 
...
Installed:
  SDL2_gfx-1.0.4-3.fc33.x86_64        SDL2_gfx-devel-1.0.4-3.fc33.x86_64       

Complete!
[root@desk pygame]# dnf install portmidi-devel.x86_64 
...
Installed:
  portmidi-devel-217-38.fc33.x86_64                                             

Complete!
Use this command to clone it from GitHub and install it:
[mythcat@desk ~]$ git clone https://github.com/pygame/pygame
Cloning into 'pygame'...
remote: Enumerating objects: 4, done.
remote: Counting objects: 100% (4/4), done.
remote: Compressing objects: 100% (4/4), done.
remote: Total 38509 (delta 0), reused 0 (delta 0), pack-reused 38505
Receiving objects: 100% (38509/38509), 17.78 MiB | 11.66 MiB/s, done.
Resolving deltas: 100% (29718/29718), done.
[mythcat@desk ~]$ cd pygame/
[mythcat@desk pygame]$ python3.9 setup.py install --user


WARNING, No "Setup" File Exists, Running "buildconfig/config.py"
Using UNIX configuration...


Hunting dependencies...
SDL     : found 2.0.12
FONT    : found
IMAGE   : found
MIXER   : found
PNG     : found
JPEG    : found
SCRAP   : found
PORTMIDI: found
PORTTIME: found
FREETYPE: found 23.4.17

If you get compiler errors during install, double-check
the compiler flags in the "Setup" file.
...
copying docs/pygame_tiny.gif -> build/bdist.linux-x86_64/egg/pygame/docs
creating build/bdist.linux-x86_64/egg/EGG-INFO
copying pygame.egg-info/PKG-INFO -> build/bdist.linux-x86_64/egg/EGG-INFO
copying pygame.egg-info/SOURCES.txt -> build/bdist.linux-x86_64/egg/EGG-INFO
copying pygame.egg-info/dependency_links.txt -> build/bdist.linux-x86_64/egg/EGG-INFO
copying pygame.egg-info/entry_points.txt -> build/bdist.linux-x86_64/egg/EGG-INFO
copying pygame.egg-info/not-zip-safe -> build/bdist.linux-x86_64/egg/EGG-INFO
copying pygame.egg-info/top_level.txt -> build/bdist.linux-x86_64/egg/EGG-INFO
writing build/bdist.linux-x86_64/egg/EGG-INFO/native_libs.txt
creating dist
creating 'dist/pygame-2.0.1.dev1-py3.9-linux-x86_64.egg' and adding 'build/bdist.linux-x86_64/egg' to it
removing 'build/bdist.linux-x86_64/egg' (and everything under it)
Processing pygame-2.0.1.dev1-py3.9-linux-x86_64.egg
creating /home/mythcat/.local/lib/python3.9/site-packages/pygame-2.0.1.dev1-py3.9-linux-x86_64.egg
Extracting pygame-2.0.1.dev1-py3.9-linux-x86_64.egg to /home/mythcat/.local/lib/python3.9/site-packages
Adding pygame 2.0.1.dev1 to easy-install.pth file

Installed /home/mythcat/.local/lib/python3.9/site-packages/pygame-2.0.1.dev1-py3.9-linux-x86_64.egg
Processing dependencies for pygame==2.0.1.dev1
Finished processing dependencies for pygame==2.0.1.dev1
Let's test it:
[mythcat@desk pygame]$ ls
build	     dist  examples	    README.rst	setup.cfg  src_c   test
buildconfig  docs  pygame.egg-info  Setup	setup.py   src_py
[mythcat@desk pygame]$ python3.9
Python 3.9.0 (default, Oct  6 2020, 00:00:00) 
[GCC 10.2.1 20200826 (Red Hat 10.2.1-3)] on linux
Type "help", "copyright", "credits" or "license" for more information.
>>> import pygame
pygame 2.0.1.dev1 (SDL 2.0.12, python 3.9.0)
Hello from the pygame community. https://www.pygame.org/contribute.html
>>> 

Tuesday, September 15, 2020

Fedora 32 : Can be better? part 008.

The Fedora development is not very active in the last programming language.
The main reason is the build new packages and put on the repository.
I think this can be improved with a good tool to solve all dependencies and link all into a good package.
Today I tested the new Python version 3.5.10 released on September 5th, 2020.
I download an unzip the archive and I use these commands to build this python version
[mythcat@desk ~]$ cd Python-3.5.10/
[mythcat@desk Python-3.5.10]$ ./configure
checking build system type... x86_64-pc-linux-gnu
checking host system type... x86_64-pc-linux-gnu
checking for python3.5... no
checking for python3... python3
checking for --enable-universalsdk... no
...
The next command is make:
[mythcat@desk Python-3.5.10]$ make
gcc -pthread -c -Wno-unused-result -Wsign-compare -DNDEBUG -g -fwrapv -O3 -Wall -Wstrict-prototypes
   -Werror=declaration-after-statement   -I. -I./Include    -DPy_BUILD_CORE -o Programs/python.o 
./Programs/python.c
...
# On Darwin, always use the python version of the script, the shell
# version doesn't use the compiler customizations that are provided
# in python (_osx_support.py).
if test `uname -s` = Darwin; then \
 cp python-config.py python-config; \
fi
Then I used make test.
[mythcat@desk Python-3.5.10]$ make test
running build
running build_ext
INFO: Can't locate Tcl/Tk libs and/or headers

Python build finished successfully!
...
For the last part I used this command:
[mythcat@desk Python-3.5.10]$ sudo make install
...
The result of this is ...
[mythcat@desk Python-3.5.10]$ ls
aclocal.m4     config.sub    Include          Mac              Modules  platform        python            README
build          configure     install-sh       Makefile         Objects  Programs        Python            setup.py
config.guess   configure.ac  Lib              Makefile.pre     Parser   pybuilddir.txt  python-config     Tools
config.log     Doc           libpython3.5m.a  Makefile.pre.in  PC       pyconfig.h      python-config.py
config.status  Grammar       LICENSE          Misc             PCbuild  pyconfig.h.in   python-gdb.py
[mythcat@desk Python-3.5.10]$ ./python 
Python 3.5.10 (default, Sep  6 2020, 22:32:07) 
[GCC 10.2.1 20200723 (Red Hat 10.2.1-1)] on linux
Type "help", "copyright", "credits" or "license" for more information.
...

Sunday, November 3, 2019

Fedora 30 : Introduction to Qt Designer.

Qt Designer is the Qt tool for designing and building graphical user interfaces (GUIs) with Qt Widgets... see the Qt Designer manual webpage.
[root@desk mythcat]# dnf install qt5-designer.x86_64
...
Installed:
  qt5-designer-5.12.5-1.fc30.x86_64                                             
  qt5-qttools-libs-designercomponents-5.12.5-1.fc30.x86_64                      

Complete!
Let's start this tool with this command:
[mythcat@desk ~]$ designer-qt5 
Follow this video tutorial from my youtube channel:

You can preview your work with Ctrl+R keys.
After you finish with the project then save the file with this name: mytest.ui.
The next command to create your working python file named mytest.py.
Use this command with the -x option creates the main section to the my.py file that will allow us to test quickly whether the GUI looks as we intended.
[mythcat@desk ~]$ pyuic5 -x  mytest.ui -o mytest.py
Now you can run it to see the output:
[mythcat@desk ~]$ python3  mytest.py

Wednesday, October 16, 2019

Fedora 30 : News about python 3.8.0 and install on Linux.

The new release of python development comes today.
You can see on the official webpage the new versions of Python 3.7.5 Oct. 15, 2019 and Python 3.8.0 Oct. 14, 2019.
I wrote about how to install version 3.8.0 on Fedora 30.
See the full tutorial here.