[root@desk mythcat]# dnf upgrade --refresh
Waiting for process with pid 2427 to finish.
Adobe Systems Incorporated 2.4 kB/s | 2.9 kB 00:01
Fedora Modular 29 - x86_64 45 kB/s | 25 kB 00:00
Fedora Modular 29 - x86_64 - Updates 29 kB/s | 24 kB 00:00
Fedora 29 - x86_64 - Updates 25 kB/s | 23 kB 00:00
Fedora 29 - x86_64 25 kB/s | 25 kB 00:01
packages-microsoft-com-prod 6.4 kB/s | 2.9 kB 00:00
RPM Fusion for Fedora 29 - Free - Updates 13 kB/s | 10 kB 00:00
RPM Fusion for Fedora 29 - Free 22 kB/s | 10 kB 00:00
Visual Studio Code 8.7 kB/s | 2.9 kB 00:00
Dependencies resolved.
...
Upgraded:
selinux-policy-3.14.2-57.fc29.noarch
selinux-policy-devel-3.14.2-57.fc29.noarch
selinux-policy-sandbox-3.14.2-57.fc29.noarch
selinux-policy-targeted-3.14.2-57.fc29.noarch
x264-libs-0.155-3.20180806git0a84d98.fc29.x86_64
Complete!
[root@desk mythcat]# dnf install dnf-plugin-system-upgrade
[root@desk mythcat]# dnf system-upgrade download --releasever=30
Before you continue ensure that your system is fully upgraded by running "dnf --refresh upgrade".
Do you want to continue [y/N]: y
...
- problem with installed package python2-libdnf-0.31.0-2.fc29.x86_64
(try to add '--allowerasing' to command line to replace conflicting packages or '--skip-broken'
to skip uninstallable packages)
[root@desk mythcat]# dnf system-upgrade download --releasever=30 --allowerasing
Before you continue ensure that your system is fully upgraded by running "dnf --refresh upgrade".
Do you want to continue [y/N]: y
...
Transaction Summary
================================================================================
Install 92 Packages
Upgrade 2716 Packages
Remove 8 Packages
Downgrade 22 Packages
Total download size: 2.9 G
DNF will only download packages, install gpg keys, and check the transaction.
Is this ok [y/N]: y
...
Importing GPG key
...
Key imported successfully
Running transaction check
Running transaction test
...
Download complete! Use 'dnf system-upgrade reboot' to start the upgrade.
To remove cached metadata and transaction use 'dnf system-upgrade clean'
The downloaded packages were saved in cache until the next successful transaction.
You can remove cached packages by executing 'dnf clean packages'.
tutorials, tips, tricks, commands, programming, linux, windows, database, sql, python, programming language, Fedora, drawing, painting, tutorial, tutorials
Thursday, May 2, 2019
Fedora 30 : First test.
Fedora 30 is available now.
Use these commands to see how can be updated to Fedora 30.
Monday, April 29, 2019
Fedora 29 : About poedit tool.
In this tutorial I will briefly introduce the linux poedit tool.
Let's start installing it in Fedora 29.
Poedit is a powerful and intuitive editor for translating interfaces that use gettext.
Available for Windows, macOS, and Linux.
What is a PO file?
The .PO file is a portable object file, which is text-based. These types of files are used in common in software development. The .PO file may be referenced by Java programs, GNU gettext, or other software programs as a properties file.
What is MO file?
The .MO files or Machine Object is a binary data file that contains object data referenced by a program.
It is typically used to translate program code and may be loaded or imported into the GNU gettext program.
These files can be provided by developer source code or you can sign in into the Crowdin.
This provides powerful tools to manage localization for projects of any type and any size.
Open the application and put all info on from File-> Preferences.
The Poedit asks some of the essential information such as your name, email address, translation memory settings, and more to change your preferences.
Set the path (absolute path) settings in your Catalog otherwise, the Poedit isn't able to use gettext from source files.
Before starting your translate issue be advice with the rules are set by GNU gettext utilities
Let's start installing it in Fedora 29.
[root@desk mythcat]# dnf search poedit
Last metadata expiration check: 0:01:09 ago on Mon 29 Apr 2019 01:23:39 PM EEST.
========================= Name Exactly Matched: poedit =========================
poedit.x86_64 : GUI editor for GNU gettext .po files
[root@desk mythcat]# dnf install poedit
Last metadata expiration check: 0:02:40 ago on Mon 29 Apr 2019 01:23:39 PM EEST.
Dependencies resolved.
...
Complete!
About this software named Poedit (formerly poEdit) shareware and cross-platform gettext catalog editor to aid in the process of language localization.Poedit is a powerful and intuitive editor for translating interfaces that use gettext.
Available for Windows, macOS, and Linux.
What is a PO file?
The .PO file is a portable object file, which is text-based. These types of files are used in common in software development. The .PO file may be referenced by Java programs, GNU gettext, or other software programs as a properties file.
What is MO file?
The .MO files or Machine Object is a binary data file that contains object data referenced by a program.
It is typically used to translate program code and may be loaded or imported into the GNU gettext program.
These files can be provided by developer source code or you can sign in into the Crowdin.
This provides powerful tools to manage localization for projects of any type and any size.
Open the application and put all info on from File-> Preferences.
The Poedit asks some of the essential information such as your name, email address, translation memory settings, and more to change your preferences.
Set the path (absolute path) settings in your Catalog otherwise, the Poedit isn't able to use gettext from source files.
Before starting your translate issue be advice with the rules are set by GNU gettext utilities
Sunday, April 14, 2019
Fedora 29 : Install Inkscape with Flatpak Linux tool.
Today I used the Flatpak Linux tool to install the last version of Inkscape 0.92.4 5da689c313 released at 2019-01-14.
Flatpak (formerly xdg-app) is a software utility for software deployment, package management, and application virtualization for Linux desktop computers. It provides a sandbox environment in which users can run applications in isolation from the rest of the system. see Wikipedia Flatpak.
The Flatpak tool is installed by default on Fedora Workstation. To install and runt the last version of Inkscape you need to use these commands:
[mythcat@desk Downloads]$ flatpak install org.inkscape.Inkscape.flatpakref
org.inkscape.Inkscape permissions:
ipc x11 file access [1]
[1] host
ID Arch Branch Remote Download
1. [✓] org.gnome.Platform.Locale x86_64 3.30 flathub 17.4 kB / 320.2 MB
2. [✓] org.freedesktop.Platform.VAAPI.Intel x86_64 18.08 flathub 1.8 MB / 1.8 MB
3. [✓] org.freedesktop.Platform.html5-codecs x86_64 18.08 flathub 4.8 MB / 4.9 MB
4. [✓] org.inkscape.Inkscape x86_64 stable flathub 86.1 MB / 88.6 MB
5. [✓] org.inkscape.Inkscape.Locale x86_64 stable flathub 8.5 kB / 18.6 MB
Installation complete.
[mythcat@desk Downloads]$ flatpak run org.inkscape.Inkscape
Gtk-Message: 22:58:01.259: Failed to load module "pk-gtk-module"
Gtk-Message: 22:58:01.259: Failed to load module "canberra-gtk-module"
The Inkscape drawing tool works well.
Tuesday, April 9, 2019
Fedora 29 : Thonny editor for python.
This Python IDE for beginners named Thonny is a simple editor with Python 3.7 built in.
The official webpage can be found here and the GitHub project page is this.
The development team is from the University of Tartu, Estonia with the help from the open-source community. Thonny grew up in University of Tartu (https://www.ut.ee), Institute of Computer Science (https://www.cs.ut.ee).
I test it today with Fedora 29 and works well.
Let's start with the first step:
[mythcat@desk ~]$ pip3 install thonny --user
Collecting thonny
...
Successfully installed astroid-2.2.5 asttokens-1.1.13 docutils-0.14 isort-4.3.17 jedi-0.13.3 lazy-object-proxy-1.3.1
mccabe-0.6.1 mypy-0.700 mypy-extensions-0.4.1 parso-0.4.0 pylint-2.3.1 pyperclip-1.7.0 pyserial-3.4 thonny-3.1.2
typed-ast-1.3.1
...
[root@desk mythcat]# dnf install python3-tkinter.x86_64
Last metadata expiration check: 0:21:20 ago on Tue 09 Apr 2019 09:57:24 PM EEST.
Installed:
python3-tkinter-3.7.2-5.fc29.x86_64 tk-1:8.6.8-1.fc29.x86_64
Complete!
This editor can be found on Fedora repo, but I used the last released version software.[root@desk mythcat]# dnf search thonny
Last metadata expiration check: 0:36:55 ago on Tue 09 Apr 2019 09:57:24 PM EEST.
========================= Name Exactly Matched: thonny =========================
thonny.noarch : Python IDE for beginners
Posted by
Cătălin George Feștilă
Labels:
2019,
Fedora,
Fedora 29,
open-source,
python,
python 3,
python modules,
software,
thonny,
tutorial,
tutorials
Thursday, March 21, 2019
Fedora 29 : Testing the dnf python module.
Today we tested with Fedora 29 a python module called DNF.
All users have used this tool.
This python module is not very documented on the internet.
A more complex example can be found on DNF tool documentation.
I tried to see what I can get from this module.
Let's start installing it with the pip tool:
All users have used this tool.
This python module is not very documented on the internet.
A more complex example can be found on DNF tool documentation.
I tried to see what I can get from this module.
Let's start installing it with the pip tool:
$ pip install dnf --user
Here are some tests that I managed to run in the python shell.[mythcat@desk ~]$ python
Python 2.7.15 (default, Oct 15 2018, 15:26:09)
[GCC 8.2.1 20180801 (Red Hat 8.2.1-2)] on linux2
Type "help", "copyright", "credits" or "license" for more information.
>>> import sys
>>> import dnf
>>> dir(dnf)
['Base', 'Plugin', 'VERSION', '__builtins__', '__doc__', '__file__', '__name__', '__package__',
'__path__', '__version__', 'base', 'callback', 'cli', 'comps', 'conf', 'const', 'crypto', 'db',
'dnf', 'dnssec', 'drpm', 'exceptions', 'goal', 'history', 'i18n', 'lock', 'logging', 'match_counter',
'module', 'package', 'persistor', 'plugin', 'pycomp', 'query', 'repo', 'repodict', 'rpm', 'sack',
'selector', 'subject', 'transaction', 'unicode_literals', 'util', 'warnings', 'yum']
>>> import dnf.conf
>>> print(dnf.conf.Conf())
[main]
assumeno: 0
assumeyes: 0
autocheck_running_kernel: 1
bandwidth: 0
best: 0
...
>>> import dnf.module
>>> import dnf.rpm
>>> import dnf.cli
>>> base = dnf.Base()
>>> base.update_cache()
True
This read all repositories:
>>> base.read_all_repos()
You need to read the sack for querying:
>>> base.fill_sack()
>>> base.sack_activation = True
Create a query to matches all packages in sack:
>>> qr=base.sack.query()
Get only available packages:
>>> qa=qr.available()
Get only installed packages:
>>> qi=qr.installed()
>>> q_a=qa.run()
>>> for pkg in qi.run():
... if pkg not in q_a:
... print('%s.%s' % (pkg.name, pkg.arch))
...
NetworkManager-openvpn.x86_64
NetworkManager-openvpn-gnome.x86_64
coolkey.x86_64
glibc-debuginfo.x86_64
glibc-debuginfo-common.x86_64
kernel.x86_64
kernel.x86_64
kernel-core.x86_64
kernel-core.x86_64
Get all packages installed on Linux:
>>> q_i=qi.run()
>>> for pkg in qi.run():
... print('%s.%s' % (pkg.name, pkg.arch))
You can see more about the Python programming language on my blog.
Wednesday, March 13, 2019
Fedora 29 : Use Selinux with Firefox.
Today I tested Selinux with the Firefox browser.
The main purpose was to create a policy for this browser.
You can use this example to create your own policies.
Using Fedora 29 this problem can be resolved easily.
Let's start with installing an important packet using the dnf tool.
[root@desk selinux_001]# dnf install policycoreutils-devel
Let's see the other commands used to create policies named firefox.te:
[mythcat@desk ~]$ mkdir selinux_001
[mythcat@desk ~]$ cd selinux_001/
[mythcat@desk selinux_001]$ whereis firefox
firefox: /usr/bin/firefox /usr/lib64/firefox /etc/firefox /usr/share/man/man1/firefox.1.gz
[mythcat@desk selinux_001]$ sepolicy generate --init -n firefox /usr/bin/firefox
nm: /usr/bin/firefox: file format not recognized
Failed to retrieve rpm info for selinux-policy
Created the following files:
/home/mythcat/selinux_001/firefox.te # Type Enforcement file
/home/mythcat/selinux_001/firefox.if # Interface file
/home/mythcat/selinux_001/firefox.fc # File Contexts file
/home/mythcat/selinux_001/firefox_selinux.spec # Spec file
/home/mythcat/selinux_001/firefox.sh # Setup Script
[mythcat@desk selinux_001]$ cat firefox.te
policy_module(firefox, 1.0.0)
########################################
#
# Declarations
#
type firefox_t;
type firefox_exec_t;
init_daemon_domain(firefox_t, firefox_exec_t)
permissive firefox_t;
########################################
#
# firefox local policy
#
allow firefox_t self:fifo_file rw_fifo_file_perms;
allow firefox_t self:unix_stream_socket create_stream_socket_perms;
domain_use_interactive_fds(firefox_t)
files_read_etc_files(firefox_t)
miscfiles_read_localization(firefox_t)
[mythcat@desk selinux_001]$ cat firefox.fc
/usr/bin/firefox -- gen_context(system_u:object_r:firefox_exec_t,s0)
I have modified this policy generated by sepolicy by adding my own rules:
[mythcat@desk selinux_001]$ cat firefox.te
policy_module(firefox, 1.0.0)
########################################
#
# Declarations
#
type firefox_t;
type firefox_exec_t;
init_daemon_domain(firefox_t, firefox_exec_t)
permissive firefox_t;
# my rules
require {
type unreserved_port_t;
type http_port_t;
class tcp_socket { accept listen name_bind name_connect };
}
########################################
#
# firefox local policy
#
allow firefox_t self:fifo_file rw_fifo_file_perms;
allow firefox_t self:unix_stream_socket create_stream_socket_perms;
# my rules
allow firefox_t http_port_t:tcp_socket { name_bind name_connect };
allow firefox_t unreserved_port_t:tcp_socket { name_bind name_connect };
allow firefox_t self:tcp_socket { listen accept };
domain_use_interactive_fds(firefox_t)
files_read_etc_files(firefox_t)
miscfiles_read_localization(firefox_t)
I used the following commands to get my own policy:
[mythcat@desk selinux_001]$ make -f /usr/share/selinux/devel/Makefile
Compiling targeted firefox module
/usr/bin/checkmodule: loading policy configuration from tmp/firefox.tmp
/usr/bin/checkmodule: policy configuration loaded
/usr/bin/checkmodule: writing binary representation (version 19) to tmp/firefox.mod
Creating targeted firefox.pp policy package
rm tmp/firefox.mod tmp/firefox.mod.fc
[mythcat@desk selinux_001]$ sudo semodule -i firefox.pp
[sudo] password for mythcat:
The semodule is the tool used to manage SELinux policy modules, including installing, upgrading, listing and removing modules.
Let's see the result:
[root@desk selinux_001]# semodule -l | grep firefox
firefox
Posted by
Cătălin George Feștilă
Labels:
2019,
Fedora,
Fedora 29,
linux,
linux tools,
selinux,
tutorial,
tutorials
Friday, February 1, 2019
Fedora 29 : The Piskel application.
This application is a tool for drawing and create sprites.
You can test online or use it locally by download it into your operating system.
The development team comes with this intro:
Create animations in your browser. Try an example, use Google sign in to access your gallery or simply create a new sprite.
I download it to Fedora 29 distro and working well.
This is result:
Posted by
Cătălin George Feștilă
Labels:
2019,
drawing,
Fedora,
Fedora 29,
linux,
linux tools,
software
Thursday, January 24, 2019
Fedora 29 : Selinux and python.
Today I tested the selinux python module with Fedora 29.
The wikipedia page comes with this intro about SELinux: Security-Enhanced Linux (SELinux) is a Linux kernel security module that provides a mechanism for supporting access control security policies, including mandatory access controls (MAC). ... A Linux kernel integrating SELinux enforces mandatory access control policies that confine user programs and system services, as well as access to files and network resources.
This kernel module can help you with security the network and running application on your Linux.
This very complex kernel module can be used with your policy configuration files designed to fix your security issues.
First, the install is easy to do with the dnf tool:
[root@desk mythcat]# dnf install python2-libselinux.x86_64
Last metadata expiration check: 1:31:46 ago on Thu 24 Jan 2019 07:04:16 AM EET.
Dependencies resolved.
...
Installed:
python2-libselinux-2.8-6.fc29.x86_64
Complete!
I tested this python module with a few simple examples:[mythcat@desk ~]$ python
Python 2.7.15 (default, Oct 15 2018, 15:26:09)
[GCC 8.2.1 20180801 (Red Hat 8.2.1-2)] on linux2
Type "help", "copyright", "credits" or "license" for more information.
>>> import selinux
>>> selinux.is_selinux_enabled()
1
>>> selinux.lgetfilecon_raw(".bashrc")
[37, 'unconfined_u:object_r:user_home_t:s0']
>>> selinux.lgetfilecon_raw(".bashrc")
[37, 'unconfined_u:object_r:user_home_t:s0']
>>> selinux.selinux_getpolicytype()[1]
'targeted'
>>> selinux.selinux_getpolicytype()
[0, 'targeted']
Posted by
Cătălin George Feștilă
Labels:
2.7,
2019,
Fedora,
Fedora 29,
python,
python modules,
selinux,
tutorial,
tutorials
Sunday, January 13, 2019
Fedora 29 : The AppImage tool and Krita Next.
The AppImage is a universal software package format.
The process of packaging the software in AppImage is a storage file provide by the developer.
This file is a compressed image with all the dependencies and libraries needed to run the desired software. The AppImage doesn’t really install the software just execute it without no extraction and no installation.
The most common features:
I tested the Krita Next with this tool.
The appimage file of Krita Next can be found here.
About the Krita Next this is a daily builds that contain new features, but could be unstable.
After I download the file I change it to executable with:
The process of packaging the software in AppImage is a storage file provide by the developer.
This file is a compressed image with all the dependencies and libraries needed to run the desired software. The AppImage doesn’t really install the software just execute it without no extraction and no installation.
The most common features:
- Can run on various different Linux distributions;
- No need of installing and compiling software;
- No need of root permission and the system files are not touched;
- Can be run anywhere including live disks;
- Applications are in read only mode;
- Software are removed just by just deleting the AppImage file;
- Applications packaged in AppImage are not sandboxed by default.
I tested the Krita Next with this tool.
The appimage file of Krita Next can be found here.
About the Krita Next this is a daily builds that contain new features, but could be unstable.
After I download the file I change it to executable with:
[mythcat@desk Downloads]$ chmod +x krita-4.2.0-pre-alpha-95773b5-x86_64.appimage
[mythcat@desk Downloads]$ ./krita-4.2.0-pre-alpha-95773b5-x86_64.appimage
Posted by
Cătălin George Feștilă
Labels:
2019,
AppImage,
Krita,
linux tools,
tool,
tutorial,
tutorials
Monday, January 7, 2019
Fedora 29 : The figlet linux tool.
About this Linux tool you can read at figlet manual :
FIGlet prints its input using large characters (called ``FIGcharac- ters'')made up of ordinary screen characters (called ``sub-charac- ters''). FIGlet output is generally reminiscent of the sort of ``sig- natures'' many people like to put at the end of e-mail and UseNet mes- sages. It is also reminiscent of the output of some banner programs, although it is oriented normally, not sideways.
...
Let's see some examples:
The arguments of this tool set to the left, center and right or change size and font:
The simple one can be this:
FIGlet prints its input using large characters (called ``FIGcharac- ters'')made up of ordinary screen characters (called ``sub-charac- ters''). FIGlet output is generally reminiscent of the sort of ``sig- natures'' many people like to put at the end of e-mail and UseNet mes- sages. It is also reminiscent of the output of some banner programs, although it is oriented normally, not sideways.
...
Let's see some examples:
[root@desk mythcat]# dnf install figlet
Last metadata expiration check: 1:05:53 ago on Mon 07 Jan 2019 06:52:19 PM EET.
Dependencies resolved.
[mythcat@desk ~]$ figlet --h
figlet: invalid option -- '-'
Usage: figlet [ -cklnoprstvxDELNRSWX ] [ -d fontdirectory ]
[ -f fontfile ] [ -m smushmode ] [ -w outputwidth ]
[ -C controlfile ] [ -I infocode ] [ message ]
[mythcat@desk ~]$ figlet -v
FIGlet Copyright (C) 1991-2012 Glenn Chappell, Ian Chai, John Cowan,
Christiaan Keet and Claudio Matsuoka
Internet: Version: 2.2.5, date: 31 May 2012
FIGlet, along with the various FIGlet fonts and documentation, may be
freely copied and distributed.
If you use FIGlet, please send an e-mail message to .
The latest version of FIGlet is available from the web site,
http://www.figlet.org/
Usage: figlet [ -cklnoprstvxDELNRSWX ] [ -d fontdirectory ]
[ -f fontfile ] [ -m smushmode ] [ -w outputwidth ]
[ -C controlfile ] [ -I infocode ] [ message ]
The messages can be set and show on output like a print similar to an ASCII banner.The arguments of this tool set to the left, center and right or change size and font:
The simple one can be this:
[mythcat@desk ~]$ figlet 2019
Friday, December 28, 2018
Fedora 29 : The most common BIOS commands.
Fedora Distribution has many things that many overlook in the maintenance process.
Today I will show you some commands for your BIOS.
These are fairly common and are fairly recent.
First is efibootmgr:
The dmidecode and biosdecode commands are Linux distro independent and preinstalled in most of them.
Let's see commands that depend on hardware.
The vpddecode command for IBM and Lenovo hardware only, the vpd stands for vital product data.
The ownership command is for only Compaq hardware, to get Compaq specific ownership tag info.
Today I will show you some commands for your BIOS.
These are fairly common and are fairly recent.
First is efibootmgr:
[root@desk mythcat]# efibootmgr
EFI variables are not supported on this system.
The next one is dmidecode, see:[root@desk mythcat]# dmidecode -t 11
# dmidecode 3.2
Getting SMBIOS data from sysfs.
SMBIOS 2.4 present.
[root@desk mythcat]# dmidecode --type processor
# dmidecode 3.2
...
The dmidecode command can be used with the arg -t from 0 to 39, or you can use the --type with this keywords:- baseboard
- bios
- cache
- chassis;
- connector
- memory
- processor
- slot
- system
The dmidecode and biosdecode commands are Linux distro independent and preinstalled in most of them.
Let's see commands that depend on hardware.
The vpddecode command for IBM and Lenovo hardware only, the vpd stands for vital product data.
The ownership command is for only Compaq hardware, to get Compaq specific ownership tag info.
Wednesday, December 12, 2018
Fedora 29 : Using pytorch on Fedora distro.
The goal of this tutorial is about how to install and start using the pytorch python module.
Another part is to show tensors without using matplotlib python module.
The reason I wrote this simple tutorial and not on my python blogger is Fedora distro.
The python module named pytorch is based on Torch, used for applications such as natural language processing.
The installation of pytorch into many operating systems can be tricky.
Let's start this tutorial using GitHub clone commands:
[mythcat@desk ~]$ git clone --recursive https://github.com/pytorch/pytorch
...
running install_scripts
Installing convert-caffe2-to-onnx script to /home/mythcat/.local/bin
Installing convert-onnx-to-caffe2 script to /home/mythcat/.local/bin
Using this commands un Fedora linux shell will install easy this python module:[mythcat@desk ~]$ cd pytorch/
[mythcat@desk ~]$ pip install typing
[mythcat@desk ~]$ python setup.py install --user
[mythcat@desk ~]$ pip install torchvision --user
Collecting torchvision
...
You cannot use the pytorch into pytorch folder.[mythcat@desk pytorch]$ cd ..
[mythcat@desk ~]$ python -c "import torch; print(torch.__version__)"
1.0.0a0+bf1d411
The result of this output is not an common error. You can fix if you set the paths for pytorch installation. Let's test the pytorch installation:[mythcat@desk ~]$ python
Python 2.7.15 (default, Oct 15 2018, 15:26:09)
[GCC 8.2.1 20180801 (Red Hat 8.2.1-2)] on linux2
Type "help", "copyright", "credits" or "license" for more information.
>>> import torch
>>> import torchvision
>>> import torchvision.dataset as datasets
Traceback (most recent call last):
File "", line 1, in
ImportError: No module named dataset
>>> import torchvision.datasets as datasets
>>> print(dir(torch))
['Argument', 'ArgumentSpec', 'Block', 'BoolType', 'ByteStorage', 'ByteTensor', 'CharStorage', 'CharTensor', 'Code',
'CompleteArgumentSpec', 'DoubleStorage', 'DoubleTensor', 'DynamicType', 'ExecutionPlanState', 'FatalError', 'FloatStorage',
'FloatTensor', 'FloatType', 'FunctionSchema', 'Future', 'Generator', 'Gradient', 'Graph', 'GraphExecutor',
'GraphExecutorState', 'HalfStorage', 'HalfStorageBase', 'HalfTensor', 'IODescriptor', 'IntStorage', 'IntTensor', 'IntType',
'JITException', 'ListType',
...
>>> print(dir(datasets))
['CIFAR10', 'CIFAR100', 'CocoCaptions', 'CocoDetection', 'DatasetFolder', 'EMNIST', 'FakeData', 'FashionMNIST',
'ImageFolder', 'LSUN', 'LSUNClass', 'MNIST', 'Omniglot', 'PhotoTour', 'SEMEION', 'STL10', 'SVHN', '__all__',
'__builtins__', '__doc__', '__file__', '__name__', '__package__', '__path__', 'cifar', 'coco', 'fakedata',
'folder', 'lsun', 'mnist', 'omniglot', 'phototour', 'semeion', 'stl10', 'svhn', 'utils']
>>> x = torch.rand(76)
>>> x.size()
>>> print(x)
tensor([0.9839, 0.5844, 0.4347, 0.5883, 0.1383, 0.7701, 0.1879, 0.5604, 0.4486,
0.6782, 0.5038, 0.1078, 0.1244, 0.0996, 0.0230, 0.5457, 0.8903, 0.7732,
0.9948, 0.3201, 0.3149, 0.7180, 0.8811, 0.4468, 0.8169, 0.2998, 0.3900,
0.8067, 0.0090, 0.6006, 0.8385, 0.8786, 0.3652, 0.5630, 0.1407, 0.7747,
0.5734, 0.4998, 0.4056, 0.7473, 0.2797, 0.8852, 0.3563, 0.9421, 0.1136,
0.7676, 0.4224, 0.4350, 0.4968, 0.4457, 0.3047, 0.6792, 0.1026, 0.3593,
0.4147, 0.6517, 0.5916, 0.3567, 0.8584, 0.9421, 0.2091, 0.6339, 0.5428,
0.3811, 0.9310, 0.8856, 0.0770, 0.7920, 0.4860, 0.4276, 0.4780, 0.8627,
0.7287, 0.4340, 0.2859, 0.2213])
>>> from PIL import Image
>>> logo = np.array(Image.open('logo.png').resize((512,512)))
>>> logo_tensor = torch.from_numpy(logo)
>>> logo_tensor.size()
(512, 512, 4)
>>> img = Image.fromarray(logo)
>>> img.show()
Posted by
Cătălin George Feștilă
Labels:
2018,
Fedora,
Fedora 29,
linux,
linux tools,
python,
python 3,
python modules,
pytorch,
tutorial,
tutorials
Sunday, December 9, 2018
Fedora 29 : Python 3 and Jupyter notebook.
Today I tested the Jupyter Notebook with Fedora 29.
About the Jupyter Notebook the official website comes with this intro:
The Jupyter Notebook is an open-source web application that allows you to create and share documents that contain live code, equations, visualizations and narrative text. Uses include: data cleaning and transformation, numerical simulation, statistical modeling, data visualization, machine learning, and much more.
First I check with DNF tool the update and the upgrade of the Fedora 29 distro.
The next step was to install this:
You can see I created a new notebook with Python 3.
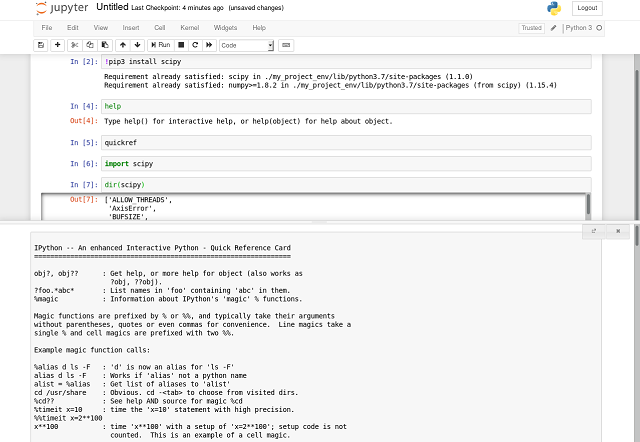
The result is shown into another tab webpage browser where I used few commands to install new module scipy and I check if this working well:
About the Jupyter Notebook the official website comes with this intro:
The Jupyter Notebook is an open-source web application that allows you to create and share documents that contain live code, equations, visualizations and narrative text. Uses include: data cleaning and transformation, numerical simulation, statistical modeling, data visualization, machine learning, and much more.
First I check with DNF tool the update and the upgrade of the Fedora 29 distro.
The next step was to install this:
# dnf install python3-pip
# dnf install python3-devel.x86_64
# pip3 install --upgrade pip
With my account shell I used this commands to create and run the Jupiter Notebook:$ pip3 install --user virtualenv
$ mkdir my_project
$ cd my_project/
$ virtualenv my_project_env
$ source my_project_env/bin/activate
$ pip3 install jupiter
$ jupiter notebook
The last command will start your default browser and will see this: You can see I created a new notebook with Python 3.
The result is shown into another tab webpage browser where I used few commands to install new module scipy and I check if this working well:
!pip3 install scipy
help
quickref
The result of this notebook looks like this image:
Posted by
Cătălin George Feștilă
Labels:
2018,
Fedora,
Fedora 29,
Jupyter,
linux,
linux tools,
python 3,
python modules,
scipy,
tutorial,
tutorials
Subscribe to:
Posts (Atom)