Pages

Monday, January 6, 2020

Fedora 31 : Can be better? part 004.

The common question of any Fedora Linux user: Can be better?.
Yes, we can fix some common errors...
This is a common error generated by the GTK on Fedora distro applications:
[mythcat@desk bin]$ ./studio.sh 

(java:12631): Gtk-WARNING **: 11:45:47.061: Unable to locate theme engine in module_path: "murrine",

(java:12631): Gtk-WARNING **: 11:45:47.061: Unable to locate theme engine in module_path: "murrine",

(java:12631): Gtk-WARNING **: 11:45:47.106: Unable to locate theme engine in module_path: "murrine",
...
First, find the running GUI environment from the terminal:
[mythcat@desk ~]$ echo $XDG_CURRENT_DESKTOP
X-Cinnamon
This allows us to know that the issue may be a GTK theme package.
[root@desk bin]# dnf install gtk-murrine-engine.x86_64
Last metadata expiration check: 0:45:00 ago on Mon 06 Jan 2020 11:14:27 AM EET.
Dependencies resolved.
...
Installed:
  gtk-murrine-engine-0.98.2-17.fc31.x86_64                                      

Complete!
Now the Android Studio works well without warning errors:
[mythcat@desk bin]$ ./studio.sh 
Jan 06, 2020 12:00:51 PM java.util.prefs.FileSystemPreferences$1 run
INFO: Created user preferences directory.
...

Saturday, January 4, 2020

Fedora 31 : Install MongoDB on Fedora 31 distro.

Today I will show you how to install the MongoDB on Fedora 31 distro. MongoDB is a general-purpose, document-based, distributed database built for modern application developers and for the cloud.
You can see the source code for MongoDb at the GitHub website.
First, you need to create a repository file.
[mythcat@desk ~]$ su
Password: 
[root@desk mythcat]# vi /etc/yum.repos.d/mongodb.repo
Add the code for this repository file.
[mongodb-org-4.2]
name=MongoDB Repository
baseurl=https://repo.mongodb.org/yum/redhat/8Server/mongodb-org/testing/x86_64/
gpgcheck=1
enabled=1
gpgkey=https://www.mongodb.org/static/pgp/server-4.2.asc
Let's search this Fedora apckage with dnf tool
[root@desk mythcat]# dnf search mongodb-org
MongoDB Repository                                        5.8 kB/s | 6.5 kB     00:01    
=========================== Name Exactly Matched: mongodb-org ============================
mongodb-org.x86_64 : MongoDB open source document-oriented database system (metapackage)
=============================== Name Matched: mongodb-org ================================
mongodb-org-shell.x86_64 : MongoDB shell client
mongodb-org-tools.x86_64 : MongoDB tools
mongodb-org-mongos.x86_64 : MongoDB sharded cluster query router
mongodb-org-server.x86_64 : MongoDB database server
[root@desk mythcat]# dnf install mongodb-org.x86_64 
Last metadata expiration check: 0:01:46 ago on Fri 03 Jan 2020 05:27:49 PM EET.
Dependencies resolved.
==========================================================================================
 Package                 Arch        Version                   Repository            Size
==========================================================================================
Installing:
 mongodb-org             x86_64      4.2.2-0.1.rc1.el8         mongodb-org-4.2       10 k
Installing dependencies:
 mongodb-org-mongos      x86_64      4.2.2-0.1.rc1.el8         mongodb-org-4.2       14 M
 mongodb-org-server      x86_64      4.2.2-0.1.rc1.el8         mongodb-org-4.2       25 M
 mongodb-org-shell       x86_64      4.2.2-0.1.rc1.el8         mongodb-org-4.2       17 M
 mongodb-org-tools       x86_64      4.2.2-0.1.rc1.el8         mongodb-org-4.2       47 M

Transaction Summary
==========================================================================================
Install  5 Packages

Total download size: 103 M
Installed size: 260 M
Is this ok [y/N]: y
...
 From       : https://www.mongodb.org/static/pgp/server-4.2.asc
Is this ok [y/N]: y
Key imported successfully
...
Installed:
  mongodb-org-4.2.2-0.1.rc1.el8.x86_64        mongodb-org-mongos-4.2.2-0.1.rc1.el8.x86_64
  mongodb-org-server-4.2.2-0.1.rc1.el8.x86_64 mongodb-org-shell-4.2.2-0.1.rc1.el8.x86_64 
  mongodb-org-tools-4.2.2-0.1.rc1.el8.x86_64 

Complete!
Start and enable MongoDB service to start on boot.
[root@desk mythcat]# systemctl start mongod
[root@desk mythcat]# sudo systemctl enable mongod
[root@desk mythcat]# systemctl status mongod
● mongod.service - MongoDB Database Server
   Loaded: loaded (/usr/lib/systemd/system/mongod.service; enabled; vendor preset: disabl>
   Active: active (running) since Fri 2020-01-03 17:32:36 EET; 17s ago
     Docs: https://docs.mongodb.org/manual
 Main PID: 9019 (mongod)
   Memory: 71.0M
      CPU: 890ms
   CGroup: /system.slice/mongod.service
           └─9019 /usr/bin/mongod -f /etc/mongod.conf

Jan 03 17:32:34 desk systemd[1]: Starting MongoDB Database Server...
Jan 03 17:32:34 desk mongod[9017]: about to fork child process, waiting until server is r>
Jan 03 17:32:34 desk mongod[9017]: forked process: 9019
Jan 03 17:32:36 desk mongod[9017]: child process started successfully, parent exiting
Jan 03 17:32:36 desk systemd[1]: Started MongoDB Database Server.
Jan 03 17:32:47 desk systemd[1]: /usr/lib/systemd/system/mongod.service:16: PIDFile= refe>
...
Use the netstat utility to confirm that indeed Mongod service is listening.
[root@desk mythcat]# netstat -pnltu | grep mongo
tcp        0      0 127.0.0.1:27017         0.0.0.0:*               LISTEN      9019/mongod
Create an admin user with elevated privileges to perform elevated tasks.
[root@desk mythcat]# mongo
MongoDB shell version v4.2.2-rc1
...
> use admin 
switched to db admin
> db.createUser(
...  {
...  user: "admin",
...  pwd: "123",
...  roles: [ { role: "userAdminAnyDatabase", db: "admin" } ]
...  }
...  )
Successfully added user: {
 "user" : "admin",
 "roles" : [
  {
   "role" : "userAdminAnyDatabase",
   "db" : "admin"
  }
 ]
}
Show the users:
> show users
{
 "_id" : "admin.admin",
 "userId" : UUID("5ca3a1c2-6225-4158-b2bc-e32e5e5de58f"),
 "user" : "admin",
 "db" : "admin",
 "roles" : [
  {
   "role" : "userAdminAnyDatabase",
   "db" : "admin"
  }
 ],
 "mechanisms" : [
  "SCRAM-SHA-1",
  "SCRAM-SHA-256"
 ]
}
To enable authentication edit the /lib/systemd/system/mongod.service file, under the [Service] section, locate and edit the Environment parameter as shown.
[root@desk mythcat]# vim /lib/systemd/system/mongod.service
...
[Unit]
Description=MongoDB Database Server
Documentation=https://docs.mongodb.org/manual
After=network.target

[Service]
User=mongod
Group=mongod
Environment="OPTIONS= --auth -f /etc/mongod.conf"
...
Apply the changes to the service mongo unit.
[root@desk mythcat]# systemctl daemon-reload
[root@desk mythcat]# systemctl restart mongod
[root@desk mythcat]# systemctl status mongod
● mongod.service - MongoDB Database Server
   Loaded: loaded (/usr/lib/systemd/system/mongod.service; enabled; vendor preset: disable>
   Active: active (running) since Fri 2020-01-03 17:44:09 EET; 11s ago
     Docs: https://docs.mongodb.org/manual
  Process: 9272 ExecStartPre=/usr/bin/mkdir -p /var/run/mongodb (code=exited, status=0/SUC>
  Process: 9273 ExecStartPre=/usr/bin/chown mongod:mongod /var/run/mongodb (code=exited, s>
  Process: 9274 ExecStartPre=/usr/bin/chmod 0755 /var/run/mongodb (code=exited, status=0/S>
  Process: 9275 ExecStart=/usr/bin/mongod $OPTIONS (code=exited, status=0/SUCCESS)
 Main PID: 9277 (mongod)
   Memory: 168.3M
      CPU: 1.423s
   CGroup: /system.slice/mongod.service
           └─9277 /usr/bin/mongod --auth -f /etc/mongod.conf
...

Friday, January 3, 2020

Fedora 31 : Test Google locally Apps Script CLI.

The Apps Script CLI, or clasp, is a tool that lets you create, edit, and deploy Apps Script projects locally like Sheets, Docs, Forms, and Slides.
[mythcat@desk ~]$ mkdir google
[mythcat@desk ~]$ cd google
[mythcat@desk google]$ sudo dnf install nodejs
[sudo] password for mythcat: 
Last metadata expiration check: 2:03:50 ago on Fri 03 Jan 2020 11:37:12 AM EET.
Dependencies resolved.
================================================================================
 Package          Arch        Version                        Repository    Size
================================================================================
Installing:
 nodejs           x86_64      1:12.13.1-1.fc31               updates      413 k
Installing dependencies:
 nodejs-libs      x86_64      1:12.13.1-1.fc31               updates       19 M
 npm              x86_64      1:6.12.1-1.12.13.1.1.fc31      updates      3.4 M
Installing weak dependencies:
 nodejs-docs      noarch      1:12.13.1-1.fc31               updates      2.4 M

Transaction Summary
================================================================================
Install  4 Packages

Total download size: 25 M
Installed size: 132 M
Is this ok [y/N]: y
...
Complete!
The clasp uses requires Node.js >= v6.0.0. Let's install it:
[mythcat@desk google]$ sudo npm install n -g
/usr/local/bin/n -> /usr/local/lib/node_modules/n/bin/n
+ n@6.1.3
added 1 package from 4 contributors in 0.705s
[mythcat@desk google]$ sudo n latest

  installing : node-v13.5.0
       mkdir : /usr/local/n/versions/node/13.5.0
       fetch : https://nodejs.org/dist/v13.5.0/node-v13.5.0-linux-x64.tar.gz
   installed : v13.5.0 (with npm 6.13.4)

Note: the node command changed location and the old location may be remembered in your 
current shell.
         old : /usr/bin/node
         new : /usr/local/bin/node
To reset the command location hash either start a new shell, or execute PATH="$PATH"
[mythcat@desk google]$ sudo npm i @google/clasp -g
/usr/local/bin/clasp -> /usr/local/lib/node_modules/@google/clasp/src/index.js
npm WARN inquirer-autocomplete-prompt@1.0.1 requires a peer of inquirer@^5.0.0 || 
^6.0.0 but none is installed. You must install peer dependencies yourself.

+ @google/clasp@2.3.0
added 191 packages from 118 contributors in 53.457s 
The simple run of clasp command shows us all arguments:
[mythcat@desk google]$ clasp
Usage: clasp  [options]

clasp - The Apps Script CLI

Options:
  -v, --version                               
  -h, --help                                  output usage information

Commands:
  login [options]                             Log in to script.google.com
  logout                                      Log out
  create [options]                            Create a script
  clone [options] [scriptId] [versionNumber]  Clone a project
  pull [options]                              Fetch a remote project
  push [options]                              Update the remote project
  status [options]                            Lists files that will be pushed by clasp
  open [options] [scriptId]                   Open a script
  deployments                                 List deployment ids of a script
  deploy [options]                            Deploy a project
  undeploy [options] [deploymentId]           Undeploy a deployment of a project
  version [description]                       Creates an immutable version of the script
  versions                                    List versions of a script
  list                                        List App Scripts projects
  logs [options]                              Shows the StackDriver logs
  run [options] [functionName]                Run a function in your Apps Scripts project
  apis [options]                              List, enable, or disable APIs
    list
    enable 
    disable 
  help                                        Display help
  setting|settings [settingKey] [newValue]    Update  in .clasp.json
  *                                           Any other command is not supported
You can log in with this command
[mythcat@desk google]$ clasp login
Logging in globally...
...
This will open a webpage for authentification and ends with this text message: Logged in! You may close this page.
Now you can create a new folder for your project named clasp_code.
Use this command and arrows key to select the type of the project:
[mythcat@desk clasp_code]$ clasp create --title "my first project with clasp";
? Create which script? (Use arrow keys)
❯ standalone 
  docs 
  sheets 
  slides 
  forms 
  webapp 
  api 
...
User has not enabled the Apps Script API. Enable it by visiting 
https://script.google.com/home/usersettings then retry. 
If you enabled this API recently, wait a few minutes for the action to propagate 
to our systems and retry.
Open the URL to activate the API and run the command again to get the JSON file named appsscript.json.
You can clone an old project by script_ID.
Use this command into a new folder with the script_ID value from project menu File -> Project properties -> Info -> Script ID.
This will download the project in your current directory.
clasp clone script_ID 
To edit your project use this command:
[mythcat@desk clasp_code]$ clasp open
The next step is to pull and push operations:
[mythcat@desk clasp_code]$ clasp pull
Warning: files in subfolder are not accounted for unless you set a '.claspignore' file.
Cloned 2 files.
└─ appsscript.json
└─ Code.js
[mythcat@desk clasp_code]$ clasp push
└─ Code.js
└─ appsscript.json
Pushed 2 files.
The clasp allows you to manage versions and deployments with these commands:
[mythcat@desk clasp_code]$ clasp version "First version"
Created version 1.
[mythcat@desk clasp_code]$ clasp deploy 1 "First deployment"
Created version 2.
For more information see the GitHub webpage.

Sunday, December 29, 2019

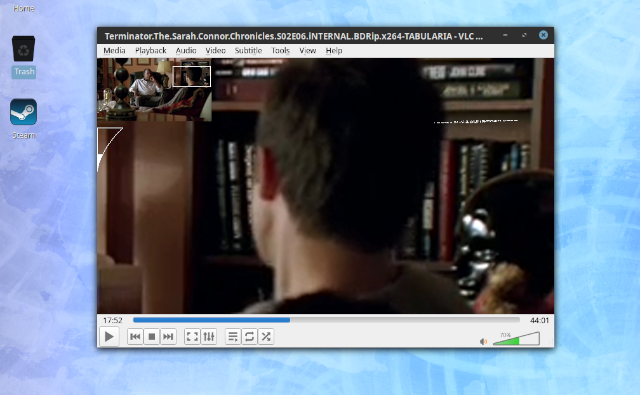
Fedora 31 : The VLC zoom effect!

Zoom, zoom ... zoom
This is not the only effect from the VLC application you can set more.
If you want to use the zoom effect when you play movies with VLC software then use these settings:
Tools -> Effects and Filters (Ctr +E) -> Video Effects -> Interactive Zoom
See the next images:

Saturday, December 28, 2019

Fedora 31 : Run Minecraft game on Fedora distro.

To install and play the Minecraft game you need to install Java both versions JRE and JDK.
You need to buy or use only redeem codes from Minecraft Java Edition.
[root@desk mythcat]# cd minecraft-launcher/
[root@desk minecraft-launcher]# dnf install java-latest-openjdk
[root@desk minecraft-launcher]# dnf install java-latest-openjdk-devel
The game can download it from here.
I download the Minecraft.tar.gz file and I unarchive into my folder named minecraft-launcher.
After that I run this command to play the game:
[mythcat@desk minecraft-launcher]$ ./minecraft-launcher 
which: no java in (/home/mythcat/google-cloud-sdk/bin:/home/mythcat/.local/bin
:/home/mythcat/bin:/usr/local/bin:/usr/bin:/usr/local/sbin:/usr/sbin)
...

Thursday, December 26, 2019

Fedora 31 : Install Google Chrome.

Most Linux distributions come with dedicated browsers or Firefox browser.
But if you want to use Google services like Google Optimize then you will need Google Chrome browser.
Today I will show you how to install it in the Linux distribution Fedora 31.
[mythcat@desk ~]$ sudo dnf install https://dl.google.com/linux/direct/google-chrome-stable_current_x86_64.rpm
[sudo] password for mythcat: 
Last metadata expiration check: 2:29:06 ago on Thu 26 Dec 2019 07:54:58 PM EET.
google-chrome-stable_current_x86_64.rpm              16 MB/s |  59 MB     00:03    
Dependencies resolved.
====================================================================================
 Package                   Arch        Version              Repository         Size
====================================================================================
Installing:
 google-chrome-stable      x86_64      79.0.3945.88-1       @commandline       59 M
Installing dependencies:
 liberation-fonts          noarch      1:2.00.5-6.fc31      fedora            8.4 k

Transaction Summary
====================================================================================
Install  2 Packages

Total size: 60 M
Total download size: 8.4 k
Installed size: 210 M
Is this ok [y/N]: y
...
Installed:
  google-chrome-stable-79.0.3945.88-1.x86_64                                        
  liberation-fonts-1:2.00.5-6.fc31.noarch                                           

Complete!
You can start it with this commands:
[mythcat@desk ~]$ google-chrome
google-chrome         google-chrome-stable 

Friday, December 20, 2019

Fedora 31 : Start with tito tool.

If you have some Fedora related project and you want to your output an RPM package, then you can use the tito tool.
This tool comes with the version 0.6.12 and today is finally out!
The team of this software comes with this intro:
Tito is a tool for managing RPM based projects using git for their source code repository.
Let's install it:
[root@desk mythcat]# dnf search tito
Last metadata expiration check: 1:52:16 ago on Fri 20 Dec 2019 06:10:02 PM EET.
========================== Name Exactly Matched: tito ==========================
tito.noarch : A tool for managing rpm based git projects
============================ Summary Matched: tito =============================
mtdev.x86_64 : Multitouch Protocol Translation Library
mtdev.i686 : Multitouch Protocol Translation Library
mtdev-devel.i686 : Multitouch Protocol Translation Library Development Package
mtdev-devel.x86_64 : Multitouch Protocol Translation Library Development Package
[root@desk mythcat]# dnf install tito.noarch 
...
Complete!
[root@desk mythcat]# systemctl daemon-reload 
Let's see the arguments of this tool:
[mythcat@desk django]$ tito
Usage: tito MODULENAME --help
Supported modules:
   build    - Build packages.
   init     - Initialize directory for use by tito.
   release  - Build and release to yum repos
   report   - Display various reports on the repo.
   tag      - Tag package releases.
Before you use this tool you need to have these folders into your project folder:
docs/
mypackage.spec
README
.tito/
src/
test/
Let's try to use it with my old django project in the directory with the git checkout of your project.
[mythcat@desk projects]$ cd django/
[mythcat@desk django]$ tito init
Creating tito metadata in: /home/mythcat/projects/django/.tito
   - created /home/mythcat/projects/django/.tito
   - wrote tito.props
   - created /home/mythcat/projects/django/.tito/packages
   - wrote /home/mythcat/projects/django/.tito/packages/.readme
   - committed to git
Done!
This creates a .tito folder.
Now I can create my .spec file named django_project.spec:
%if 0%{?rhel} > 7 || 0%{?fedora}
%global use_python3 1
%global use_python2 0
%global ourpythonbin %{__python3}
%global our_sitelib %{python3_sitelib}
%else
%global use_python3 0
%global use_python2 1
%if 0%{?__python2:1}
%global ourpythonbin %{__python2}
%global our_sitelib %{python2_sitelib}
%else
%global ourpythonbin %{__python}
%global our_sitelib %{our_sitelib}
%endif
%endif
%{!?our_sitelib: %define our_sitelib %(%{ourpythonbin} -c "from distutils.sysconfig 
import get_python_lib; print get_python_lib()")}

Name: django_chart
Version: 0.0.2
Release: 1%{?dist}
Summary: A tool for managing rpm based git projects

License: GPLv2
URL: https://github.com/catafest/django_chart
Source0: https://github.com/catafest/django_chart/archive/django_chart-%{version}-1.tar.gz

BuildArch: noarch
%if %{use_python3}
BuildRequires: python3-devel
BuildRequires: python3-setuptools
Requires: python3-setuptools
Requires: python3-bugzilla
Requires: python3-blessings
Requires: rpm-python3
%else
BuildRequires: python2-devel
BuildRequires: python-setuptools
Requires: python-setuptools
Requires: python-bugzilla
Requires: python-blessings
Requires: rpm-python
%endif
BuildRequires: asciidoc
BuildRequires: docbook-style-xsl
BuildRequires: libxslt
BuildRequires: rpmdevtools
BuildRequires: rpm-build
BuildRequires: tar
BuildRequires: which

%if 0%{?fedora}
# todo: add %%check to spec file in accordance with
# https://fedoraproject.org/wiki/QA/Testing_in_check
BuildRequires: git
BuildRequires: python-bugzilla
BuildRequires: python3-devel
BuildRequires: python3-setuptools
BuildRequires: python3-bugzilla
BuildRequires: rpm-python3
%endif

Requires: rpm-build
Requires: rpmlint
Requires: fedpkg
Requires: fedora-packager
Requires: rpmdevtools
# Cheetah used not to exist for Python 3, but it's what Mead uses.  We
# install it and call via the command line instead of importing the
# previously potentially incompatible code, as we have not yet got
# around to changing this
Requires: /usr/bin/cheetah

%description
django_chart is a project for managing chart with django 
git.

%prep
# the weird directory name is because github makes the directory name
# '(projectname)-(tag)', and the tags for django_chart have 'django_chart' in them and
# '-1' on the end...
%setup -q -n django_chart-django_chart-%{version}-1
sed -i 1"s|#!.*|#!%{ourpythonbin}|" bin/django_chart

%build
%{ourpythonbin} setup.py build
# convert manages
a2x -d manpage -f manpage django_chartrc.5.asciidoc
a2x -d manpage -f manpage django_chart.8.asciidoc
a2x -d manpage -f manpage django_chart.props.5.asciidoc
a2x -d manpage -f manpage releasers.conf.5.asciidoc

%install
rm -rf $RPM_BUILD_ROOT
%{ourpythonbin} setup.py install -O1 --skip-build --root $RPM_BUILD_ROOT
rm -f $RPM_BUILD_ROOT%{our_sitelib}/*egg-info/requires.txt
# manpages
%{__mkdir_p} %{buildroot}%{_mandir}/man5
%{__mkdir_p} %{buildroot}%{_mandir}/man8
cp -a django_chartrc.5 django_chart.props.5 releasers.conf.5 %{buildroot}/%{_mandir}/man5/
cp -a django_chart.8 %{buildroot}/%{_mandir}/man8/
# bash completion facilities
install -Dp -m 0644 share/django_chart_completion.sh %{buildroot}%{_datadir}/bash-completion/completions/
django_chart


%files
%doc AUTHORS COPYING
%doc doc/*
%doc %{_mandir}/man5/django_chartrc.5*
%doc %{_mandir}/man5/django_chart.props.5*
%doc %{_mandir}/man5/releasers.conf.5*
%doc %{_mandir}/man8/django_chart.8*
%{_bindir}/django_chart
%{_bindir}/generate-patches.pl
%{_datadir}/bash-completion/completions/django_chart
%dir %{our_sitelib}/django_chart
%{our_sitelib}/django_chart/*
%{our_sitelib}/django_chart-*.egg-info


%changelog
* Fri Dec 20 2019 catafest  0.0.2-1
- new package built with tito

* Fri Dec 20 2019 Catalin George Festila  0.6.12-1
If your git checkout has multiple projects/packages go to that directory from which you are creating tar.gz otherwise stay in your git root.
[mythcat@desk django]$ tito tag --debug
Creating output directory: /tmp/tito
Importing tito.tagger.VersionTagger
Using tagger class: 
Looking for .spec in /home/mythcat/projects/django
Using file: django_project.spec
Looking for .spec in /home/mythcat/projects/django
Using file: django_project.spec
Command: rpm --eval '%scl'
Status code: 0
Command output: %scl

Command: rpm -q --qf '%{name}
'  --eval '%undefine scl' --specfile /home/mythcat/projects/django/django_project.spec 2> /dev/null | 
grep -e '^$' -v | head -1
Status code: 0
Command output: django_chart

Command: git config --get user.name
Status code: 0
Command output: catafest

Command: git config --get user.email
Status code: 0
Command output: catalinfest@gmail.com

Getting latest package info from: /home/mythcat/projects/django/.tito/packages/django_chart
Command: rpm -q --qf '%{version}-%{release}
' --define "_sourcedir /home/mythcat/projects/django" --define 'dist %undefined' --specfile 
/home/mythcat/projects/django/django_project.spec 2> /dev/null | grep -e '^$' -v | head -1
Status code: 0
Command output: 0.0.2-1

Tagging new version of django_chart: untagged -> 0.0.2-1
Cargo.toml file not found, this is probably not a Rust project
No destination version file found, skipping.
Command: git add /home/mythcat/projects/django/.tito/packages/django_chart
Status code: 0
Command output: 

Command: git add /home/mythcat/projects/django/django_project.spec
Status code: 0
Command output: 

Command: git commit -m 'Automatic commit of package [django_chart] release [0.0.2-1].' -m 
'Created by command:' -m '/usr/bin/tito tag --debug'
Status code: 0
Command output: [master 3b2d812] Automatic commit of package [django_chart] release [0.0.2-1].
 2 files changed, 126 insertions(+)
 create mode 100644 .tito/packages/django_chart
 create mode 100644 django_project.spec

Command: git tag -m "Tagging package [django_chart] version [django_chart-0.0.2-1] in directory 
[./]." django_chart-0.0.2-1
Status code: 0
Command output: 

Created tag: django_chart-0.0.2-1
   View: git show HEAD
   Undo: tito tag -u
   Push: git push --follow-tags origin
Use the git tool for push:
git push && git push origin some-tag-1.0
If you do not want to push it to a remote repository, you must add to the following commands option --offline.
[mythcat@desk django]$ tito build --tgz [--offline]
[mythcat@desk django]$ tito build --srpm [--offline]
[mythcat@desk django]$ tito build --rpm [--offline]
This last command execute all previous steps in one and call rpmbuild on that SRPM file which will produce binary rpm package.