Pages

Wednesday, October 10, 2018

Fedora 28 : Testing Blender 2.80 .

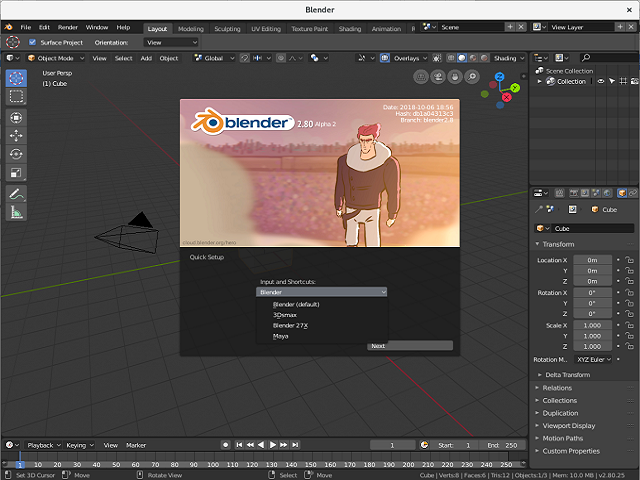
I tested the new Blender 2.80 alpha 2 version and is working well.
You can start to download it from the official download page.
The next step: unarchive the tar.bz file and run the blender from the newly created folder.
I try to create a package but seems the tool not working with the .spec file.
This is a screenshot with this Blender 3D software running in my Fedora 28.

Thursday, October 4, 2018

Fedora 28 : Strife another golang game framework.

Today I tested this 2D game framework named Strife.
You can read more about this from the official website.
The development team tells us:
  "This a work in progress. It provides a very minimal toolset for rendering shapes, images, and text as well as capturing user input."
This game framework uses SDL2 libraries.
Strife is open source and available under the MIT license.
Let's start with installation into Fedora 28 distro.
[root@desk mythcat]# dnf install SDL2-devel.x86_64
[root@desk mythcat]# dnf install SDL2_ttf-devel.x86_64 
[root@desk mythcat]# dnf install SDL2_image-devel.x86_64 
[mythcat@desk ~]$ go get github.com/felixangell/strife
[mythcat@desk ~]$ cd $GOPATH/src/github.com/felixangell/strife
I test one example from installation folder with particles:
[mythcat@desk strife]$ cd example/particles
[mythcat@desk particles]$ go run particles.go
2018/10/04 22:13:18 initializing window  1280 x 720
2018/10/04 22:13:18 dpi, default_dpi =  0 72
2018/10/04 22:13:21 Loading font  /usr/share/fonts/DejaVuSans.ttf
2018/10/04 22:13:21 Failed to load font at '/usr/share/fonts/DejaVuSans.ttf'
 ' try setting a font yourself with strife.LoadFont
resize to  1280 x 960
resize to  1280 x 720
closing window!
This is result of the running example:

Monday, October 1, 2018

Fedora 28 : Web development with Nikola and python.

The development team comes with this info about Nikola:
Nikola is a static site and blog generator, written in Python. It can use Mako and Jinja2 templates, and input in many popular markup formats, such as reStructuredText and Markdown — and can even turn Jupyter Notebooks into blog posts! It also supports image galleries and is multilingual. Nikola is flexible, and page builds are extremely fast, courtesy of do it (which is rebuilding only what has been changed).
I tested today with Fedora 28 and python version 2.7.15.
If you take a look at Nikola handbook, you will see all the features, options and settings you need for web development.
The installation is very simple:
[mythcat@desk ~]$ pip install Nikola --user
Collecting Nikola
...
Installing collected packages: Nikola
Successfully installed Nikola-7.8.15

[mythcat@desk ~]$ nikola init mysite
[2018-10-01T14:09:02Z] WARNING: Nikola: In order to USE_BUNDLES, you must install the "webassets" Python package.
[2018-10-01T14:09:02Z] WARNING: bundles: Setting USE_BUNDLES to False.
Creating Nikola Site
====================

This is Nikola v7.8.15.  We will now ask you a few easy questions about your new site.
If you do not want to answer and want to go with the defaults instead, simply restart with the `-q` parameter.
--- Questions about the site ---
Site title [My Nikola Site]: my_website
Site author [Nikola Tesla]: catafest
Site author's e-mail [n.tesla@example.com]: catafest@yahoo.com
Site description [This is a demo site for Nikola.]: website with Nikola static sit
Site URL [https://example.com/]: http://example.com
    The URL does not end in '/' -- adding it.
Enable pretty URLs (/page/ instead of /page.html) that don't need web server configuration? [Y/n] y
--- Questions about languages and locales ---
We will now ask you to provide the list of languages you want to use.
Please list all the desired languages, comma-separated, using ISO 639-1 codes.  
The first language will be used as the default.
Type '?' (a question mark, sans quotes) to list available languages.
Language(s) to use [en]: en

Please choose the correct time zone for your blog. Nikola uses the tz database.
You can find your time zone here:
https://en.wikipedia.org/wiki/List_of_tz_database_time_zones

Time zone [Europe/Bucharest]: 
    Current time in Europe/Bucharest: 17:12:36
Use this time zone? [Y/n] y
--- Questions about comments ---
You can configure comments now.  Type '?' (a question mark, sans quotes) to list available comment systems.  
If you do not want any comments, just leave the field blank.
Comment system: 

That's it, Nikola is now configured.  Make sure to edit conf.py to your liking.
If you are looking for themes and addons, check out https://themes.getnikola.com/ and https://plugins.getnikola.com/.
Have fun!
[2018-10-01T14:12:54Z] INFO: init: Created empty site at mysite.
Now you can build and start the server with this command:
[mythcat@desk ~]$ cd mysite/
[mythcat@desk mysite]$ ls
cache  conf.py  conf.pyc  files  galleries  listings  pages  posts
[mythcat@desk mysite]$ nikola build
[2018-10-01T14:14:51Z] WARNING: Nikola: In order to USE_BUNDLES, you must install the "webassets" Python package.
[2018-10-01T14:14:51Z] WARNING: bundles: Setting USE_BUNDLES to False.
Scanning posts........done!
.  render_posts:timeline_changes
...
[2018-10-01T14:14:52Z] WARNING: Nikola: Python 2 is old and busted. Python 3 is the new hotness.
[2018-10-01T14:14:52Z] WARNING: Nikola: Nikola is going to deprecate Python 2 support in 2017. You already have Python 3
available in your system. Why not switch?

Please check http://bit.ly/1FKEsiX for details.

.  sitemap:output/sitemap.xml
.  sitemap:output/sitemapindex.xml
.  robots_file:output/robots.txt
[mythcat@desk mysite]$ nikola serve -b 
Let's see the result of this running server:
To add a post just use this command:
[mythcat@desk mysite]$ nikola new_post
[2018-10-01T14:16:09Z] WARNING: Nikola: In order to USE_BUNDLES, you must install the "webassets" Python package.
[2018-10-01T14:16:09Z] WARNING: bundles: Setting USE_BUNDLES to False.
Creating New Post
-----------------

Title: New post
Scanning posts........done!
[2018-10-01T14:16:24Z] INFO: new_post: Your post's text is at: posts/new-post.rst

[mythcat@desk mysite]$ nikola build
[2018-10-01T14:16:34Z] WARNING: Nikola: In order to USE_BUNDLES, you must install the "webassets" Python package.
[2018-10-01T14:16:34Z] WARNING: bundles: Setting USE_BUNDLES to False.
Scanning posts........done!
.  render_posts:timeline_changes
The result will be this:

There are a few themes for Nikola available at the Themes Index.
[mythcat@desk mysite]$ nikola theme -l
[2018-10-01T14:21:20Z] WARNING: Nikola: In order to USE_BUNDLES, you must install the "webassets" Python package.
[2018-10-01T14:21:20Z] WARNING: bundles: Setting USE_BUNDLES to False.
Available Themes:
-----------------
blogtxt
bnw
bootblog
bootblog-jinja
bootstrap
bootstrap-jinja
bootstrap3-gradients
bootstrap3-gradients-jinja
cadair
canterville
carpet
detox
foundation6
hack
hemingway
hpstr
hyde
jidn
lanyon
libretto
lotabout
material-theme
maupassant
mdl
monospace
oldfashioned
planetoid
readable
reveal
reveal-jinja
slidemenu
srcco.de
yesplease
zen
zen-forkawesome
zen-ipython
zen-jinja

Saturday, September 29, 2018

Fedora 28 : Integrate tinymce editor with Fedora and Django.

This is a raw tutorial about how to integrate the python module named django-tinymce with a Django project.
I used the raw word because you need to have a working Django project into your Fedora distro.
You can see my old tutorial about Django to see how to build a Django project.
About this python module, you can read more here.
The django-tinymce is a Django application that contains a widget to render a form field as a TinyMCE editor.
I have a project named trydjango with a Django application named products into my django folder.
I used activate command to activate my virtual environment:
[mythcat@desk django]$ source bin/activate
I install this python module named django-tinymce:
(django) [mythcat@desk django]$ pip install django-tinymce4-lite
Collecting django-tinymce4-lite
...
Installing collected packages: jsmin, django-tinymce4-lite
Successfully installed django-tinymce4-lite-1.7.2 jsmin-2.2.2
Let's see my folder project django named src:
(django) [mythcat@desk django]$ cd src/
(django) [mythcat@desk src]$ ll
total 136
-rw-r--r--. 1 mythcat mythcat 135168 Sep 28 12:21 db.sqlite3
-rwxrwxr-x. 1 mythcat mythcat    541 Sep 23 18:56 manage.py
drwxrwxr-x. 4 mythcat mythcat    142 Sep 26 21:45 pages
drwxrwxr-x. 4 mythcat mythcat    142 Sep 28 18:30 products
drwxrwxr-x. 3 mythcat mythcat    112 Sep 28 12:04 templates
drwxrwxr-x. 3 mythcat mythcat     93 Sep 28 12:14 trydjango
The installation is simple and star with to your settings.py and url.py file:
(django) [mythcat@desk src]$ cd trydjango/
(django) [mythcat@desk trydjango]$ vim settings.py 

INSTALLED_APPS = [
    'django.contrib.admin',
    'django.contrib.auth',
    'django.contrib.contenttypes',
    'django.contrib.sessions',
    'django.contrib.messages',
    'django.contrib.staticfiles',
    'products',
    'tinymce',
]
(django) [mythcat@desk trydjango]$ vim urls.py

from django.contrib import admin
from django.urls import path, include

from pages.views import home_view, about_view, contact_view
from products.views import product_detail_view

urlpatterns = [
    path('', home_view, name='home'),
    path('about/', about_view),
    path('contact/',contact_view),
    path('admin/',admin.site.urls),
    path('product/',product_detail_view),
    path(r'^tinymce/', include('tinymce.urls')),
This is my change I used to add the tinymce editor into my django application named products.
(django) [mythcat@desk products]$ vim models.py
from django.db import models
from tinymce.models import HTMLField

# Create your models here.
class Product(models.Model):
    title = models.CharField(max_length=120)
#    description = models.TextField(blank=True, null=True)
    description = HTMLField()
    price = models.DecimalField(decimal_places=2, max_digits=1000)
    summary = models.TextField(default='this is cool!')
You can see I used HTMLField and default come is TextField.
The result of this changes can see into the next output:

Thursday, September 27, 2018

Fedora 28 : Show a video with Google Apps Script.

It's not a tutorial specific to Fedora's distribution, but many users of this are programmers or developers and its tutorial is very useful.
The tutorial is about how to display a video in a sidebar on a Google document.
I used Google Apps Script to do this.
You can see the tutorial here.
This is a screenshot with the output of this tutorial:

Monday, September 24, 2018

Fedora 28 : Add the Fedora logo to the Google document.

I've been able to progress with Google Apps Script.
The latest tutorial with number 008.
This tutorial is about adding a logo and creating an add-on to a document in google drive.
See the full tutorial here, and result of this addon:

Sunday, September 23, 2018

Fedora 28 : Start a service daemon with Python.

In this tutorial I will starting one service using systemctl , python and systemd. First, you need to create a file named testpython.service .
[mythcat@desk system]# cd /etc/systemd/system/
[root@desk system]# vim testpython.service
This file is a configuration file for this service.
[Unit]
Description=Python Service
After=multi-user.target
[Service]
Type=simple
ExecStart=/usr/bin/python /home/mythcat/test_service.py
[Install]
WantedBy=multi-user.target
Create the python file for this service. I named test_service.py .
[root@desk system]# exit
exit
[mythcat@desk system]$ cd ~
[mythcat@desk ~]$ vim test_service.py

#!/usr/bin/env python

import logging
import time

logging.basicConfig(level="INFO")

while True:
    logging.info("Hi")
    time.sleep(3)
Change permissions file for this python file and testpython.service, see:
[mythcat@desk ~]$ chmod 764 test_service.py
Because you run this service with systemd then selinux will send you error, fix that:
[mythcat@desk ~]$ chcon -t bin_t ~/test_service.py
Reload all services and start your service with this commands:
[root@desk system]# systemctl daemon-reload
[root@desk system]# systemctl start  testpython.service
[root@desk system]# systemctl status  testpython.service
● testpython.service - Python Service
   Loaded: loaded (/etc/systemd/system/testpython.service; enabled; vendor>
   Active: active (running) since Sat 2018-09-22 21:36:23 EEST; 5s ago
 Main PID: 7213 (python)
    Tasks: 1 (limit: 2102)
   Memory: 5.7M
   CGroup: /system.slice/testpython.service
           └─7213 /usr/bin/python /home/mythcat/test_service.py

Sep 22 21:36:23 desk systemd[1]: Started Python Service.
Sep 22 21:36:24 desk python[7213]: INFO:root:Hi
Sep 22 21:36:27 desk python[7213]: INFO:root:Hi
You can use the journalctl command to see the output of this service:
[root@desk system]# journalctl -u testpython.service 
-- Logs begin at Sat 2018-09-22 20:40:06 EEST, end at Sat 2018-09-22 21:31:07 EEST. --
Sep 22 20:40:06 desk python[6232]: INFO:root:Hi
Sep 22 20:40:09 desk python[6232]: INFO:root:Hi
Sep 22 20:40:12 desk python[6232]: INFO:root:Hi
Sep 22 20:40:15 desk python[6232]: INFO:root:Hi
Sep 22 20:40:18 desk python[6232]: INFO:root:Hi
Sep 22 20:40:21 desk python[6232]: INFO:root:Hi
Sep 22 20:40:24 desk python[6232]: INFO:root:Hi
Sep 22 20:40:27 desk python[6232]: INFO:root:Hi
Sep 22 20:40:30 desk python[6232]: INFO:root:Hi
Let's see the result: